Monthly Archives: August 2010

A step by step guide to sourdough

I thought it’d be useful to do an entry with a step by step guide to sourdough.

Not, I will add quickly, because I am any sort of expert. But because I know a few people who are interested in ‘getting into’ sourdough and have been asking me questions about it, so I thought they might find it useful. But also there’s nothing like someone who has just learned how to do something to explain it back to you. I know that I had a few questions when I first started (which was only a few months ago!) so this is really to help those that are even greener beginners than I.

Hopefully, you will have got yourself a copy of Dan Lepard’s The Handmade Loaf, which is the book that got me on this incredibly exciting (je jeste pas) journey into artisan bread-making. You will have your starter, which is explained in great detail in his book. And you will know the basics of what you’re doing. I include the basic recipe that I now use but really  this is to show you what to do regardless of which recipe you follow.

The basic recipe I follow

200g starter

340g water (just from the tap)

500g flour (I use 400g of white bread flour and 100g wholemeal bread flour/spelt)

a teaspoon of salt – I use Maldon

The equipment that I use and find useful:

A large stainless steel bowl, actually two.
A clean, baby muslin
A little whisk that I picked up from somewhere (Bakery Bits does a similar one here)
A dough scraper
A fork

You’ll need (if you don’t follow basic above)

Flour – according to recipe
Cold water – according to recipe
Salt – I use Maldon sea salt ground in a mortar and pestle – according to recipe

All Dan’s recipes ask for X g of starter. It took me a while to work out that if I didn’t have the actual amount in my starter jar, it didn’t matter. I could pour in what I had (not all of it! you always keep some starter to make more out from it), and then top it up with water and flour. But if you do this – i.e. feed the starter in a bowl to make more of it – you’ll need to leave it for a few hours before it’s ready.

For example. Let’s say the recipe calls for 500g of starter. If you have that to spare in your jar, great. Spoon it in to a bowl. But what about if you don’t really have that to spare?

After a while you will get to know roughly how much starter you have in your starter jar in the fridge. For example, I pretty much know I always have 200g of starter to spare, but I’m pushing it to get to 250g and I would never have a spare 500g in the jar.

So I get my bowl, put it on the scales and, for white leaven I measure out 100% of flour to 80% water (for a rye starter it’s more like 100% floor to 90% water). So for example, I’d put in 150g of flour to 120g water, which weighs 350g on the scales. I then top that up with 150g of  actual starter from my jar.

It sounds complicated, and sometimes the calculations do cause me to stare into space and bite my lip and ssssh my children if they try to talk to me, but you do get your head round it.

The easier way I remember it is that the ratio equates to:

100g flour to 80g water or,
125g flour to 100g water or,
150g flour to 120g of water, and I use those three formula calculationy things to muddle me along.

If you’re using starter that’s all straight from the starter jar, you can go straight onto ‘first dough’.

If not then you you now mix up the starter with a fork or a whisk or a spoon until it’s all incorporated (it will be quite thick). Leave it for a few hours until it’s looser looking, more relaxed, with some bubbles. If you imagine that when you first mixed it up it was a bit uptight, top button done up, now it’s slipped into a pair of velvet slippers and a smoking jacket and is having an evening smoke.

Remember to refresh your starter in the jar. I use 125g flour/100g of water or 100g flour/80g of water depending on how much space is in the  jar.

First dough

I call this first dough, just cos. It’s when you add the other ingredients to the starter, which will be

Flour
Water
Salt

according to the recipe that you’re following. You add it all in and mix it around. The dough will look ‘scrapy’, with bits sticking out maybe.

Do not panic. Do not try to mix the dough until it’s smooth. You will be there all day and start to cry. Believe that great things can happen.

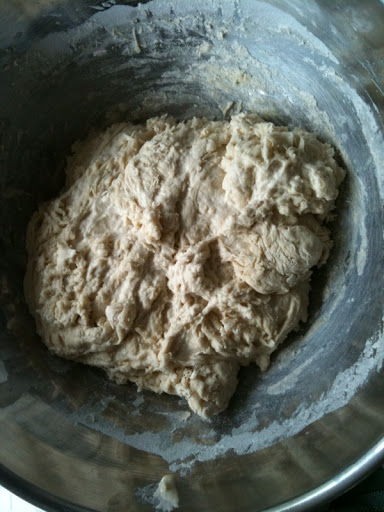
This is a white sourdough dough after the very first mix. Looks pretty unruly huh?

Let the dough rest for ten minutes; all of Dan’s sourdough recipes ask for rests of

10min
10min
10min
30min
1hr
1hr

then it can vary to another 1hr or 2hrs. You’ll need to see the recipe but once you’ve gone past the first 2/3  stages it’s pretty much all of a muchness with a tiny knead and then a rest of X amount of time.

So, first rest of ten minutes. I just let it rest in the bowl I mixed it up in. The bowl will have scraps of dough around it and every time EVERY TIME, my partner says “can’t you scrape them up into the dough”.

And the answer is: no. It doesn’t work like that. So you’ll have a ball of scruffy looking dough, kinda dry looking (DO NOT be tempted to add more water), in a bowl with bits all over it. See the picture above.

Cover it with a dishcloth and bite your nails nervously. Set the timer for ten minutes.

In the meantime, oil a surface. I use sunflower oil and recommend you do too. Dan recommends olive oil, too, but he’s probably richer than you or I. Sunflower oil is just fine. I use a big, big chopping board so that I can move my dough around the kitchen. Remember sourdough bread takes hours to make, so unless you are sure you can remain at the same work station unmolested, or don’t mind clearing up after yourself each time, use a board. I also find a dough scraper invaluable. I got mine from Ikea, it’s stainless steel, it’s great. I use it when I go back to the dough after each rest to pick the dough up with and move it around. I also oil the board before each knead. Oil works great and doesn’t alter the integrity of the dough. If you add flour or water, I found, you can get into a big sticky mess. Use oil, be brave.

After ten minutes, turn the dough out onto the board and start to knead gently. I do 12 kneads, sort of turning the dough in on itself, and around. Amazingly, you will see the dough start to get smoother. Don’t panic if you’ve still got some bits that don’t seem to quite adhere, and it’s not yet as smooth as it could be, although by this stage you should have a dough with promise.

This is the same dough as above, but after its rest of ten minutes and its first knead. Big difference isn’t there?

Now: either oil a bowl and put the dough in it, covering it with a cloth (I use the baby muslins for this, but a dishcloth would do fine, obviously you don’t need to have had a baby and have baby muslins to do this FFS) or put the dough on the surface you just kneaded it on and cover it with an oiled bowl.

If you have lots of large stainless steel bowls, like I do, then lucky you. You don’t need to wash up just yet. Otherwise you’ll need to wash up the doughy-bowl, dry it, oil it and put it to use.

Set the timer for un’altre ten minutes.

This is the same white sourdough dough, after its third lot of ten minute rises.

At each stage the dough will have relaxed a little and started to grown. At first, when you’re only leaving it for 10 or 30 mins, you won’t notice it so much. But when you get to the longer proving times, you’ll see how it stretches out and relaxes. When you first get back to the dough you’ll also feel  how it’s softer and starts to stiffen up as you knead it.

Don’t be tempted to knead it more than 10-15 seconds.

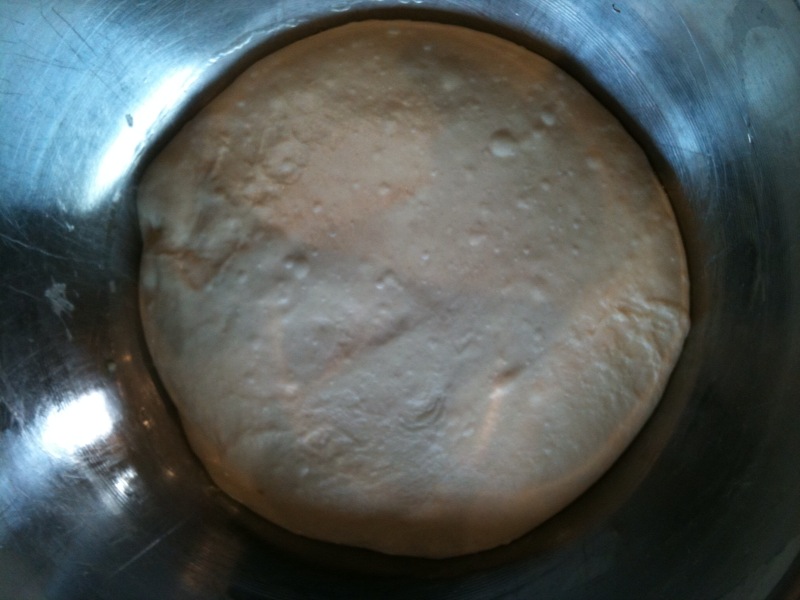
Et voila le dough after the first one hour rise. You can see bubbles on the surface yes? Good sign.
After the second, 1hr rise. The dough is bigger, more relaxed, smoother. A bit like me after Christmas.
Here it is after its 2hr rise. Just before it’s shaped and put into a banneton for its overnight sleep.

I should point out that the bread-heads always say that if it’s warm (like a hot sunny day or just if your kitchen is warm) then you might be able to leave your bread for less time, say 40 minutes instead of an hour. I’ve never bothered with this particularly and always do what time suits me. Equally, if you leave the bread for longer than ten minutes (or 30mins or an hour or whatever rest you’re on), cos the phone goes, or Corrie is on, it doesn’t matter either. Obviously you can’t completely take the piss, but sourdough is a bit like a very loving/drunk parent/partner: it is very forgiving.

When you’ve done your resting and kneading for the last time, you shape it into a ball, let it rest for ten minutes and then shape it into the final shape you want and put it to prove in a lined bowl or banneton for the last rise of whatever the recipe says (usually about 4hrs or so). I always do the final prove (prove = rise) in the fridge, cos that’s what works for me. I leave it for 10-36hrs for white dough, and up to 72 hours for wholemeal/rye etc. I haven’t experimented with longer than that  yet.

These are my little loaves after ten hours in the fridge. They don’t look massively risen, but comparatively, they are. I wanted two smaller baton shapes. Had I put all the dough in one basket it would have been up to the top by this stage.

In the morning this is what I do: I preheat the oven to 220C. I put in two baking trays, the one I will bake the bread on goes on the top shelf. The tray I will put the ice cubes on will go on the bottom shelf. Don’t use your best tray for the ice cubes.

When the oven is up to temperature, fill a glass with ice cubes and get your polenta ready. Take out the top baking tray – the one that will receive the bread – and dust it with polenta. You can’t put the polenta on before this (i.e. at the time of first putting the tray in the oven) or it will burn.

Turn the bread out onto the polenta. This is where the linen lined bannetons really come into their own, because it makes the process easy.

These are the loaves, turned out onto a polenta dusted tray and slashed.

Don’t be afraid to slash the loaves. Even if they look like they’re collapsing a bit when you do it. They will recover in the oven. Use a bread knife: be confident and slash the dough deeply, the deeper you slash the more room the bread has to rise in the oven. Try to cut, rather than push: in other words let the knife do the work, not you pushing down. I do about four slashes for a 600g baton shape. Experiment with what works for you.

When you’ve slashed, put the bread into the oven, and just before shutting the door, pour the ice cubes onto the bottom tray. They will fizz and steam. That’s good. That steam will keep the bread moist. If you have a water sprayer, you should also spray the top of the bread. This is important because once the crust has hardened, the bread can no longer rise, so the longer you can leave it before the crust hardens, the more chance you have of ‘oven spring’ – the bread making that final push upwards in the oven.

Things that really make a difference:

Slashing – your bread won’t be so aerated without it.
Ice cubes –  you won’t get such a good crust or so much rise.
Preheated baking tray – you won’t get such a good crust or such a good rise.
Polenta – you can do without it, but it produces a really professional finish, even if it is only on the bottom.

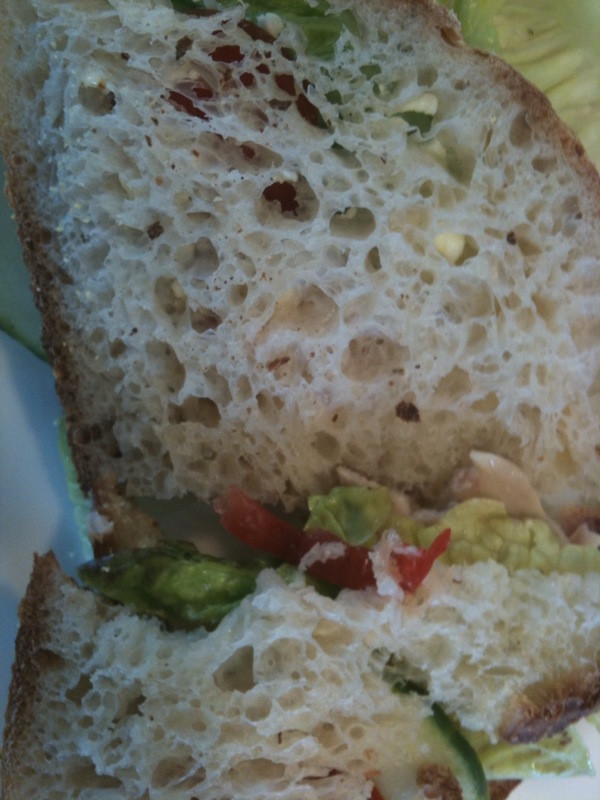
The finished product

That’s it!

Gardening gloves wot are great.

I was born in Selfridges. Well not literally, but almost in that I was born just down the road and that’s where I lived til I was thirty. Most of my family have, at one time or another, worked in Selfridges. My First Holy Communion dress was made there (my aunt used to work in the alterations department). So I know lots about Selfridges, and Oxford Street. As I once said to a fishing ghillie, who asked me what sort of terrain I was used to, I’m comfortable with concrete and carpets.

Growing up a stone’s throw from Selfridges, in a two-bedroomed mansion block flat, didn’t teach me much about gardening however. I did have an impressive window-sill collection of plants. And when we went to Italy we had an orchard and my relatives had land. But gardens? Nope.

Three years ago, I bought me a house in Suffolk. We now have just under one acre of land. I have no idea what to do with most of it. The reason we bought our funny little 1960’s house (little being a good, descriptive word here) was because the garden that came with it was the best we’d seen. The former occupants were very keen gardeners. VERY keen. We have lawns, and a little formal garden at the back, and a woodland walk bit and lots of trees (which I’ve learned the names of, mostly) and borders n’ stuff, it’s all very magical and perfect for children to play in.

But I have no clue at all what to do with it. I am not exaggerating, not one single bit, when I say that I can tell a tree, I know what grass looks like and I can identify roses and daffodils. And moss. But that really is about it. People I know come round and say “but darling, look at your cornus controversia traversia fantasia tree, it’s divine, how did you get it so tiered?” and I think “do my gardening for me.”

When we first moved in, driven by keen enthusiasm and with only one child to look after (which let me tell you, is EASY, retrospectively) I decided one day to do some weeding of things that looked, to me, like weeds. To be fair to me, which I always try to be, I did check with my partner, who said “yes them’s is weeds”. So I pulled them all up.

Later I discovered they were poppies. Wild and rude poppies (rude cos they just go where they like) but poppies none the less. It’s taken them three years to recover from my frantic plucking. I like poppies.

In 2008 I could ignore the garden cos I was pregnant, and shuffling around like a Barbar Papa. In 2009 I could ignore the garden because I’d just had a baby (at HOME, a HBAC, yes it is possible people). This year I’m realising that unless we want to end up with a garden like that one in The Secret Garden (except without the possibility of staff, or a TV crew, to make it alright) I was going to have to do some work in it.

But, as I’ve mentioned in other posts. I’m a girl that needs kit before I can do anything. Growing up, I was forced FORCED to work in my parents’ cafe. One of the things I did was the washing up. There is nothing like doing washing up of un-known people’s dishes to really put you off washing up. I remember coming across bits of food floating in the water that, to this day, can still make me retch at the memory. I was too small to wear rubber gloves (are you crying yet?).

These days, when I am washing precious things, things that cannot go into the dishwasher, I will only do so if wearing rubber gloves. I need that degree of separation because I’ve been deeply scarred.

So of course, with gardening it is obvious I need lots of my own kit if I’m to really take any interest in it.

I have my own wheelbarrow, but that has since been stolen by my eighty-year old father who will insist on helping out in the garden. My partner also nicks the wheelbarrow. So I’ve lost interest in it.

I NEED really expensive secateurs, because we all know that will make me much cleverer and more capable in the garden. But until I’ve ascertained which those are to be, I make use of my three other pairs of secateurs, all of which have broken/rusted because I don’t take care of them properly because I haven’t bought them especially for me.

So finally we get onto gardening gloves. It is completely unfathomable that I could garden without them. So three years ago I bought some Briers gardening gloves from Chartwell, Winston Churchill’s old home. They were cream, and leather and really rather good. But they too got ‘borrowed’ and then they hung on the washing line until they turned brittle.

I bought some very good, green, leather gauntlets, reduced to a fiver (from lots more) in Johnny Lou Lou’s last year. But the mice ate them, goddamit, in the garage. Then I ignored my own advice and bought several pairs of cheap gloves from Homebase, all of which were totally rubbish.

Two weeks ago, I put out an appeal on Facebook for good gardening gloves and my online friend Vicky R, told me to try Atlas Gardening Gloves. I was suspicious because I’d only ever worn leather gardening gloves. And these were rubber nylon things. The pictures of them are a bit misleading, because they look like they’d be thick and unwieldly, like a beefed up rubber glove. But they’re not.

Blimey the look enormous. I promise I haven’t got Shrek hands. Photographed here on yet another stainless steel surface in my kitchen.

God they’re fantastic. I mean, I know it sounds completely mad to rave about a gardening glove, or anything, in that ‘they’ve changed my life way’. But they have. Here’s why:

They’re really sensitive, so you can do almost anything in them, from coaxing out a weed root, to handling really rough weeds. What the pics don’t really convey is that they’re really soft, you can scrunch them up in  your hand.

They scrunch up small, not particularly useful per se, but means they’re flexible, which is.

Because of this: they’re not so tough they’d be able to handle super hard thorns (you can get some others for that, which I’ve yet to try) and I have stung myself on the back of the hand with a nettle (although that’s good for you in the long run init, protects against arthritis) because the back of the glove is less protected to make the glove more flexible. But I lived.

They come in all different colours, which I like, so I know which are mine.

They’re washable.

They’re cheap compared to leather gloves. But actually, so much better I think.

Sizing: I have fairly small hands, and I got a medium, which fit fine, but with room. I may go to a small next time for uber sensitivity and pretend I am a garden surgeon. They’re not like rubber gloves in that hard to get off way if they’re too small, because they feel like fabric.

So the upshot is that I have been out in the garden pulling up actual weeds (since that is the only thing I am trusted to do) regularly.

Vicky gets them from eBay where they are cheaper. But I got mine direct where there is more selection.

So there you have it.

In search of the perfect vanilla ice cream

I’m aware this is my second food post in as many days. And I want to stress this isn’t a food blog, but just random things I use and consume that come into my head.

Vanilla ice cream is the most basic of flavours, and because of this, it gets overlooked. I’ve made many vanilla ice creams and they have varied from too vanilla-y to what tastes like little more than flor di latte (which means flower of the milk and is the plainest ice cream flavour you can get).

Heston Blumenthal has a recipe for vanilla ice cream that involves coffee beans, and sounds interesting, but I haven’t made it yet because it involves six vanilla pods. Heston’s recipes are amazing, but they don’t work out cheap (he has a current recipe in Waitrose for Banana Eton Mess which works out at £18 for the ingredients, Heston love, don’t you know there’s a recession on??).

My beloved Panasonic ice cream machine came with a humble little paper recipe pamphlet that, nevertheless, has proved to have some of the best ice cream recipes on it (I still think its chocolate ice cream recipe is unsurpassable).

This is what it suggests for vanilla ice cream:

120ml double cream
2 large egg yolks
50g granulated sugar
80ml milk (I always use semi-skimmed, to no obvious detriment)
1-2 tsp vanilla extract

You beat the egg yolks and sugar together, until pale and fluffy. If you don’t want to do a big work out (and really, you should, it’s the little jobs like this that our grandmothers did that all added up to keeping them fit, that and washing clothes by hand and turning mattresses etc). Add the milk and mix together well. Place this mixture in a saucepan and stir over a low heat. Don’t boil (but if it starts to boil a bit don’t panic, just turn it down and mop your brow and pay more attention next time). When its thickened to form a custard (which I find needs quite a vigorous heat), remove it from the heat and let it cool. Make yourself a cup of tea or something.

In a separate bowl, whisk the cream up, then add the vanilla extract to the custard mixture, then the whipped cream. Chill then churn in the machine.

Now a few notes about this recipe. You’ll see it tells you to whip the cream and then add it. I’ve done it without whipping it and the result has been the same. But try it the proper way first (I find the whipped cream flattens anyway when you mix it into the custard mixture). You’ll also see later that, although similar ingredients are used in other recipes, the way they’re put together varies. I guess it goes to show it all amounts to the same thing.

I found 2tsp of vanilla extract waaaaaaaaaaay too vanilla-y for this amount of ice cream (which doesn’t give you much, but just scale it up for more), so you may need to experiment.

This recipe above was my standard vanilla ice cream recipe for ages.

Then I started getting lots of books about ice cream. One which is pretty good is called Ice Cream. In it there is a recipe for vanilla ice cream which uses:

300ml full cream milk (again, I say, I always use semi skimmed milk and it’s just fine)
1 vanilla pod
4 large egg yolks
100g vanilla sugar
300ml double cream

What you do with it all is put the milk and the vanilla pod, which you’ve split in half length ways, in a pan and heat gently then remove it from the heat and let the pod infuse for 15 mins. With this one, in a separate heat proof bowl, you beat the egg yolks and sugar until thick and pale.

Remove the pod from the milk, scraping out all the seeds and slowly beat the milk into the egg mixture.

Place the bowl over a pan of simmering water, stir mixture until it coats the back of a wooden spoon (which it pretty much does straight away but you can carry on stirring as it’s fairly calming and you can day dream, the mixture won’t come to much harm as it’s in a bain marie).

Remove bowl, cover surface with cling film or grease proof paper (I am so lazy, I have pre-cut baking parchment circles for cake making and I use one of those) and let it cool, then chill for an hour or so. Then stir in the double cream and sling the whole lot into the ice cream maker.

All good. Ish. The ice cream is perfectly fine, but nothing special. A few notes about the ingredients. Vanilla pods annoy me. They’re expensive, sometimes, even if correctly stored, they go brittle and don’t work with you. I manage to leave behind half the seeds and all in all, I think are a pretty imprecise way of using vanilla. Do not buy vanilla sugar! It might as well be labelled “food stuff for stupid people with too much money”, just get a container, put some caster sugar in it, and lob a vanilla pod in it.  Keep it like that forever and ever. When you take some sugar out to use it for a recipe, put a bit more caster sugar in. Vanilla pods are great at this, they infuse the sugar with their bossy vanilla-y-ness. When you remember, replace the pod with a fresh one. If you’re reading this recipe and thinking “but I want to make vanilla ice cream NOW and I don’t have time to infuse my sugar with a vanilla pod”, then I applaud your enthusiasm but say: just use regular caster sugar this time. I swear you won’t notice much difference, which just goes to show what a terrific waste of money shop-bought vanilla sugar is.

So I decided to slightly adapt the above recipe. And when I say slightly, I really do mean slightly.

I bought some vanilla paste.  The one I used is by Taylor and Colledge and I buy it from Waitrose. It’s not a cheap alternative, at about a fiver for a small pot but I reckon you get more value from it as you can  use the whole product, none of that scraping etc, see above.

Now, my Ice cream books says that one tablespoon of vanilla paste equals one vanilla pod. The Taylor and Colledge website says one teaspoon. I used one tablespoon, which did seem like a lot. But for just over a pint of ice cream, it resulted in a very, very good vanilla ice cream. It was speckled, pale yellow, very vanilla-y tasting without making you want to grab the table for support; overall, almost buttery. In the way that people use buttery to describe something delicious, I don’t mean it tasted buttery literally as that wouldn’t really be that great. You experiment with how much vanilla paste to put in according to taste.

Try it and let me know what you think and also, what’s your favourite vanilla ice cream recipe?

Best banana chips

I’m not a huge fan of banana chips. This is due to a legacy of over dosing on them when small (sadly the same effect was not forthcoming for cake, or chocolate). They – the banana chips – sort of suck you in with their super sugariness, fooling you into thinking they are in any way healthy (I’m talking about the coated ones) when they’re not.

My daughter regards banana chips as the ultimate treat. I am not sure how I’ve succeeded in conning her into believing that dried fruit trumps Haribo* sweets (which I never, EVER buy her since they have zero nutritional benefit unless you’re stuck in a lift and about to die and they’re all you have in which case I guess the sugar would keep you alive) but I have.

Every Saturday we go to the local market and I let her buy 20p of banana chips, which are of the coated variety and taste, to my mind, of shite. But she likes them and the occasional treat ain’t bad. When we go to Waitrose she sometimes asks if she can have the more expensive banana chips in packets and which aren’t coated with loadsa sugar, which I sometimes let her have even though they are, have I mentioned, expensive: like £2 for what amounts to about five pieces of dehydrated banana, which gram for gram must surely make it more expensive than, perhaps, gold or something.

Last week when we were in London, we went to the John Lewis Food Hall, aka the poshest Waitrose you can get and I bought her some Slow Dried Cavendish Banana. They aren’t chips at all (sorry about the misleading title, but “banana bits” might not have registered in the same way) but chunks of banana that look, frankly, like shite.

Voila the packet, they cost £1.99 or so for 200g. For those of you interested in such things, they contain 385kcal per 100g, 3.9g protein, 82g carbs (of which 74g are sugars), 1.8g fat and 7g of fibre.

This is what’s inside. Looks like a piece of poo init? But trust me much more yummy.

But God they were delicious. They’re ‘slow dried’ and don’t have anything added to them, but they’re chewy, naturally very sweet and just really pretty fucking delicious. So much so that I ended up eating way loads more than I planned and ended up with really sticky fingers before I’d even got back up to ground floor in John Lewis, which I then plastered all over the escalator rail (sorry about that).

In fact, as I photographed the packet, there are two pieces left which I would have snaffled and stolen from my own flesh and blood, had I not just eaten two pieces of dark chocolate.

Talking of chocolate, and talking of Zotter chocolate as I was last month. When I was back at the JL Food Hall I bought another flavour: 70% cocoa with wine and pumpkin. It was just GREAT. Although my parents weren’t impressed. My mother took one bite and it launched her into a tale of some chocolate she once had which “wasa so awful, I hadda to spitta itta out”.

You really have to try this – Zotter – chocolate if you come across it.

Anyway the banana bites/bits. Would be really good for packed lunches and the like. So, er kinda topical in that tedious back to school way…

*When I was chamber-maiding during school holidays I once went in to clean someone’s room and they had a packet of Haribo sweets and I couldn’t stop eating them, so much so that I ate about 3/4 of the packet and had to then carefully position each sweet in the packet to make it look like there was more than there was. I so get how people like the chewiness, very addictive. But I still won’t buy them for my children.

Starting to experiment pt2: potato bread with a 36hr prove

Because we had guests coming for Sunday lunch, I decided to make a double batch of potato bread on Saturday. I had an inkling it would be good, because the dough was really frisky: I could barely contain it on the chopping board I use to knead my dough. It was so alive there was no way I could knead it and leave it on the board, covered with a large stainless steel bowl, as I normally do, because it would have pushed right out from the bowl.  So instead I had to put it back into the bowl, and cover it with a tea towel whilst it rested.

I also discovered that it’s so much easier to fold dough, in the fancy way they tell you to (basically folding the dough into three, so take one third of it, fold it into the centre and then the other side, fold in on top) with so much dough. It was really easy to fold in this way, although not easy to keep in any sort of shape. I practically had to pour it into the bannetons.

I cooked one lot in a 1k round on the Sunday but the other I left in a 600g banneton (in the fridge at 4C) til this morning. It had risen hugely and spread out lots on the baking tray the moment I turned it out. I slashed it four times and it looked very collapsed, but I’m used to that with long-prove breads now and hoped it would revive in the oven. It did.

Instead of what I usually do, which is put it in the oven at the highest temperature and then turning it down, I’ve been experimenting with putting the bread in the oven at 220C for the first 8-10 mins, then putting it up higher to 250C, then back down. This is what I did this time.

The bread rose beautifully, had a great crust (heavier and darker than the one I did for Sunday lunch, probably cos of the shape) and OMG it tastes divine. The longer prove has definitely improved the flavour.

I’d go as far as to say it’s very probably the best tasting bread I’ve ever made. I will try to photograph the crumb later (if there is any left), it’s really good. Not overproved (as I feared), kinda waxy, very white. And so moist.

Swoon.

Great girls’ mac

Some years ago, I bought this great mac from Mini Mode the now (almost, as of the end of this month) defunct brand you could only get at Boots. It has a hood, which you can’t see, and was pretty hydrophobic and it looked good with most things. I always got asked where it was from. I loved this mac. My daughter loved it (although if I remember rightly, like most things, she had to be coerced to wear it). My partner/her father loved it. Even my parents thought it was pretty cool, although not actually pretty cool as that would reinforce their idea that I don’t dress my daughter warmly enough, ever. It had done many years sterling service, but even if Mini Mode were still going, it only ever went up to age six and my daughter is nearly seven. So the hunt for a new mac was on.


The lovely mac from Mini Mode which did gave many years of service through snow ‘n’ wind ‘n’ rain.

Nice, stylish girls’ macs are not easy to find. They’re either too cutesy, too pink, too branded or just plain rubbish. My mother, when not feeding my daughter two Bahlsen plain chocolate biscuits sandwiched together, had, she said, spied a really nice mac in Zara but hadn’t bought it yet.

Last week my eldest and I went to London. She came with me whilst I went on my appointments, aka going to get my hair done at John Freida and meeting up with the totally fabulous perfumier Roja Dove at the reading rooms in Claridges (ha! you thought my life was all making bread in Suffolk, wrong, wrong, wrong!). Because we then decided, quite ad hoc, to stay the night in London I decided to go shopping with her for school shoes at Johnny Lou Lou’s. As we were leaving there I spied Next.

Now, lots of my friends seem to find nice children’s clothes in Next. I never do. But that’s mostly cos I don’t really look and I don’t order from the catalogue because last time I did they opened a credit account for me and started sending me scary statements that made me fearful and it took me ages to cancel it.

Anyway. I thought I’d give it a go by actually going in there and looking around properly. And I found what I think is a great little mac/trenchcoat for girls. It’s camel coloured (so, like, bang on trend for this season if you care about such things, which I really do not), has little details like slightly puffed sleeves and a dotty lining. It’s really cute, and looks well made and isn’t too expensive.

It’s 100% cotton and is billed as ‘shower proof’ and is of course washable at 40 degrees.

Stone Trench Coat for girls” by Next, in sizes to fit ages 3-16 and costs  from £21-£27.

Testing testing

I’ve installed various things on here and this is just to see if they work. Which I’m sure they won’t. If anyone understands Google Analytics and/or how to get my ‘subscribe to this blog via email’ thing to actually work, please tell me!

Starting to experiment pt1: white sourdough 36 hr prove

Now that I’m getting a bit more cocky confident about sourdough bread making, I’m starting to experiment a bit more. I know that the bread geeks might poo-pooh at my experiments, and how tame they are. But I’m new to all this and hoping to help other rookie bakers, not really teach anything to anyone, let alone seasoned bakers. Although if I manage that, too, then hoo-RAH.

I wrote in another post about long proving of loaves. I regularly prove our ‘house bread’ (Dan Lepard’s Mill Loaf) for 72 hours now. But thus far I’d only proved white sourdough for about ten hours regularly, and 24 hours max.

So the other day, my partner (I’m so fed up of saying boyfyhusband, it sounds so fucking twee) was going to London and I decided to send my Italian Daddie – who lives there with my Italian Mamma – a loaf of my bread.  He’s the sort of man who eats bread at every meal and he buys his baguettes from the supermarket, and I think they’re a poor substitute for the sort of bread he grew up with.

He likes his bread to be white and crusty. So I made a batch of sourdough, shaped one into a round for us, and one into a baton for him, proved it overnight and got up at FIVE O’CLOCK IN THE MORNING to cook it as my partner was leaving at 6am. I kept the other loaf and cooked it yesterday morning, after a 36 hour final prove in the fridge at 4 degrees.

I am pleased to report that it was splendid. I cooked it for only 20 mins, 15 mins at 250 and 5 at 220, as I was after a slightly softer crust than the usual blackened, sour crust I go for. It was delicious, delicate and here it is, photographed in the morning sunlight.

White sourdough, cooked after a 36hr prove.

Steamin’

One of the reasons I started this blog, was that, being a consumer journalist, I get a fair amount of calls/emails from friends asking me about stuff they want to buy: “Should I buy this, should I buy that, what’s the best one to get” etc. Or, from  my friend Mark (I was SO going to name you in full but shan’t) “do I need an electric food steamer? (no, just use a pan with a steamer on the top); do I need an electric rice cooker? (no, just use a pan FFS); do I need a cappuccino machine (yes).

I’m not complaining, it’s a privilege, etc, but when you’ve got two young children, it’s not always easy to chat. So much easier to say “go look at my blog”.

Many moons ago, I used to write a column called Dear Annie in the Independent on Sunday (and, for a bit, the Observer); it was like being a doctor at a party (except SO much more important). I’d get people coming up to me saying “I need a dress for a wedding a week Saturday, what do you suggest?” I still get emails from readers asking me about clothing issues, even though I stopped writing the column some years ago. When I was fishing correspondent of the Independent I used to get people phoning me up in a panic at the supermarket: “Can I buy cod?” “The prawns are from Madagascar, is that okay?” “What is it about farmed salmon that I should know?”

Now that I’ve neatly told you some of the things I used to do, as a by the by, I can also slip in another one, as co-founder of a parenting website (no not that one, this one: www.iwantmymum.com) I’ve been hugely fortunate in learning lots from other mums. Nothing like a bit of collective wisdom is there? And one of the things I learned, luckily fairly early on, was that steam is a valuable tool in the fight against snot.

This is relevant because the question I’ve been asked three times so far this week is about babies or children having colds. Now, do I need to point out, (do I really need to? I guess so) that I’m not at doctor. I have no idea if you should take your child to the doctor or not. But when my children have colds one of the things that helps is a steamer. You know, a slightly more sophisticated approach than standing over a sink full of boiling water. Which is a perfectly acceptable thing to do except it’s not a great mix: young children and boiling water. And anyway, you get only a short amount of time between the water being so hot you can’t get near it or too cold.

The Vicks Warm Steam Vaporiser, about £30

For the night time, this steamer by Vicks is really worth getting (it makes a great, if boring-looking, new baby present). Don’t be fooled into thinking it’s anything special: it ain’t. It’s a big hulk of plastic that sits on the floor, heats water up and lets warm steam out. There’s a little compartment where you can put essential oils ‘n’ stuff. When the water runs out, it switches off. The lid is sort-of locked down but I still wouldn’t risk it with very young children (what I found was that the steamer was great when they’re babies and trapped in their cots, and when they’re older and you can say “look it’s hot, don’t touch it” but there’s a period in the middle, where they’re mobile but have no sense, where you might not be able to use it). You put it on at night and it fills the room with warm steam, making it easier for them to breathe. It’s not a miracle cure, but it can really help, especially with coughs.

For older children, and adults, this electric steam inhaler by Vicks is a good addition, you put your face right over it and inhale. (Note: I have no experience of the site I linked to, I got mine from Amazon but it doesn’t seem to sell it anymore, or at the moment.) It’s highly recommended if you have sinus problems (I find steam, and sinus massage one of the few things that work when my sinuses are inflamed and I can feel my teeth). And especially useful when you’re pregnant and get a cold/sinus inflammations and can’t take much.

It holds a small amount of water – enough for about fifteen minutes of steaming. It heats it up and lets it out a consistent temperature, and you can control how fierce it is by shutting down some vents. Or something like that. You do have to stand over the counter top (you can’t really do it whilst watching TV unless you get an extension cable out), but it’s really great to do before bed as it helps you breathe. I use it on my six year old when she has a cold but she gets bored after about ten seconds.

I hate to think about the seasons changing and colds a-visiting. But it looks like they might be and when you’re bunged up you can’t really eat or enjoy cake so much.