Tag Archives: cinnamon

Sourdough doughnuts

I first made these in the summer of lockdown 2020, when we would ‘go’ for a picnic each Wednesday, which involved us getting into the car, basically driving into the turning circle on our drive and then getting out and having a picnic.

Listen: you make your fun where you can. My friend T gave me this recipe which I have tweaked a bit. It makes a lot – about eight. And they don’t really keep, they’re not the same even two hours after making them. You can use only half the dough at a time and make the rest the next day. (Note: I have pushed these to a 144 hour prove at 4C and they are delicious, so you can absolutely make the dough, cut into doughnuts and keep in the fridge and make in batches, the 144 prove doughnuts were amazing – they puffed up to life-saving-rubber-ring size and tasted amazing.)


Warning: you need to start these the day before you need them.

This doughnut had a 144 hour prove.

These are the ingredients:

240 ml whole milk warmed to 50C (I use a thermapen for all my kitchen thermometer needs)

1 large egg at room temperature

Four tablespoons of melted butter, cooled slightly

225g sourdough starter, also at room temperature. This should have been recently refreshed – about 5-6 hours ago at room temperature, the day before if kept in the fridge

500g plain flour

110g granulated sugar

1 teaspoon of salt

1 teaspoon of cinnamon

You’ll also need quite a lot of oil for frying (try not to think about it, I am not a fan of deep frying but you need to for this) and some caster sugar mixed with cinnamon for coating later.

Once the milk has reached 50C mix it together with the butter, starter and egg. You can do this by hand or in a mixer with the whisk attachment. Then add the sugar and the flour.

Now with this bit you can either mix it all up and knead on an oiled board, leave for ten minutes, knead for ten seconds, leave for ten minutes, knead for ten seconds, leave for ten seconds until you have a smooth elastic dough (so repeat one more time if needed). Or you can do it all with a dough hook attachment in a mixer for about 15 mins until it all clumps together.

Once this bit has been reached you get a big bowl, oil it and put the dough in, cover it and refrigerate it overnight/until the next day when it’s needed.

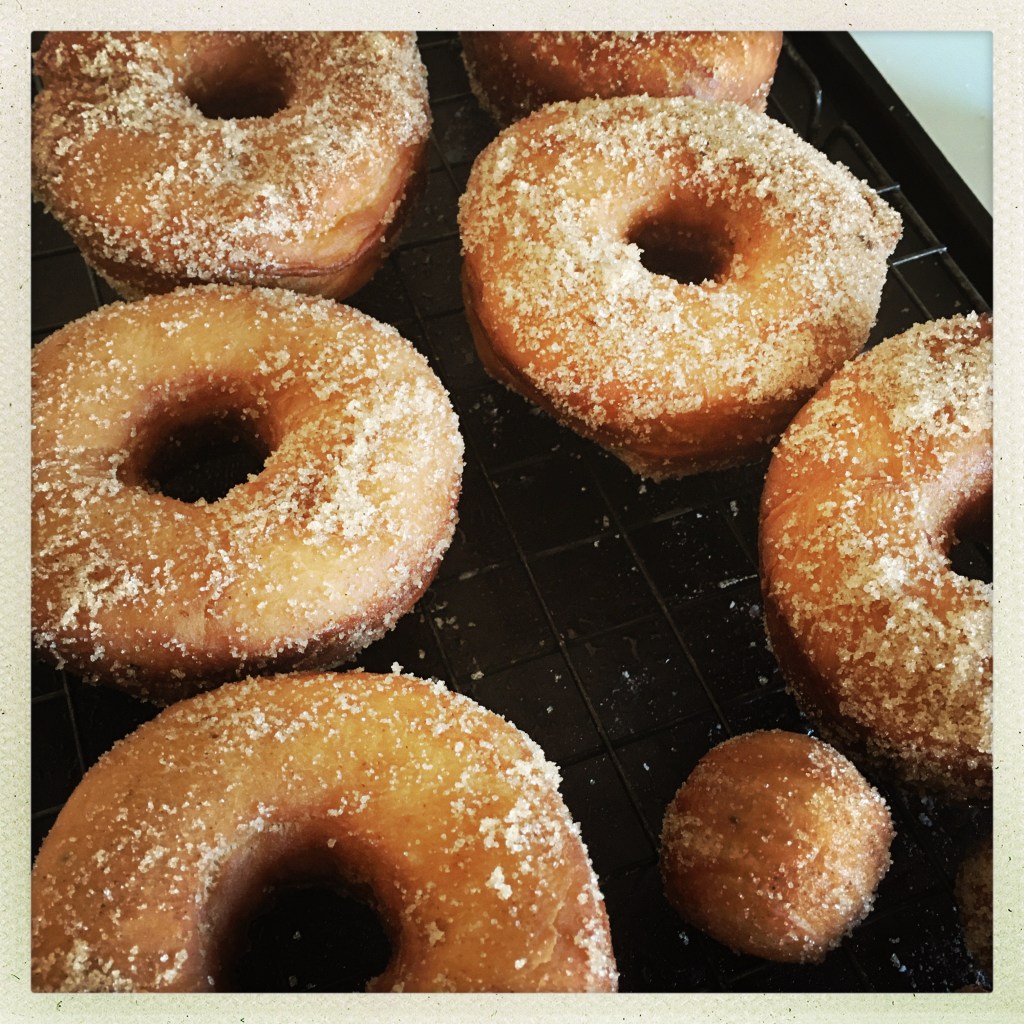
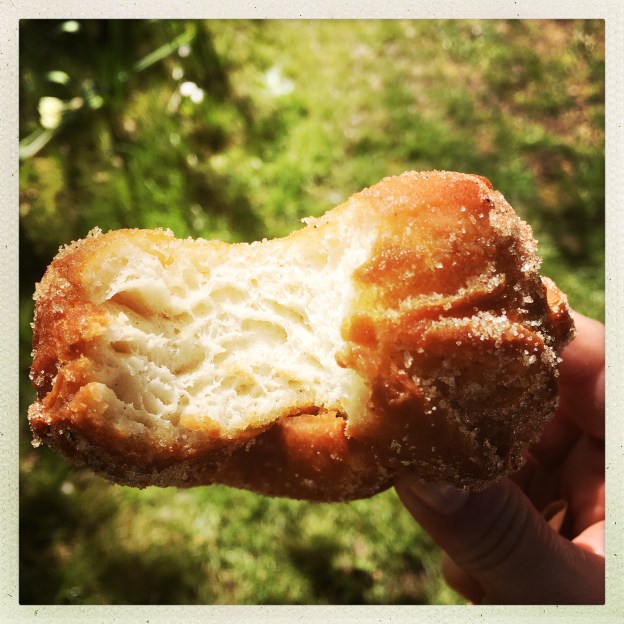
About 2-3 hours before you want to eat your doughnuts, take the mixture out, roll it out on an oiled surface until it’s about 3cm thick. I use a round cookie cutter to cut the doughnuts out, using a small one to make the ‘hole’. See what sort of size you want them to be, mine are about 10cm with the hole in the middle about 2.5cm. You can also do them as round doughnuts but I like ring ones best. The first time I made these I tore the edges slightly and was really upset that they wouldn’t be all perfect but actually, those little tears made (see main picture) something gloriously layered and even tastier! I’ve tried to recreate it ever since and can’t..

Put them on an oiled tray, or one lined with baking parchment and cover with cling film which you can also lightly oil if you are nervous (tbh I cover mine with a tea towel). Leave to rise for about 1-2 hours – depends on how warm your kitchen is. You know the dough is ready when your finger gently pressed makes an indentation but also don’t sweat it.

Fry a pan of oil up (use something light and not highly flavoured: I use a blend of olive oil and sunflower oil). Now here it depends a) how brave you are b) how wasteful you want to be with the oil c) how many you have made and intend to cook d) how many you want to cook at once. I tend to use about a litre of oil in a medium sized sauce pan and cook two at a time. DO NOT OVERFILL and of course be sensible, this is oil you are heating up. When it reaches 175C (use your thermometer) you’re ready to go, using a slotted spoon lower down however many doughnuts you intend to cook. Like I said I do two at a time. They take about 2-3 mins per side, flip with the slotted spoon; the colour is the guide here: you’re looking for a true golden brown. Take out using your slotted spoon and immediately flop the doughnut into caster sugar and cinnamon in a bowl.

Then place on a drying rack. When all are done you’re about to experience something wonderful so take a moment to enjoy it.

And try not to eat more than one.

And try not to eat more than one.

Apricot and cinnamon breakfast muffins.

Of course, you can eat these beyond breakfast time. I made them because I was told I am borderline anaemic the other day, and apricots are a good source of iron. Not as good as a rare-cooked steak served with green leafy veg and washed down with a Guinness and an orange juice, but possibly easier to carry in your bag. These are very filling, not particularly sweet and keep me going if I can’t be bothered to eat lunch. Well, until about 4pm. I love how chewy the top apricot goes.

This recipe is from the free little newspaper Waitrose provides each week.

It makes 12 and you need to allow a little time for soaking the apricots.

You need:

250g dried apricots, I prefer the organic variety here as they have less stuff on them, it does mean they are quite dark though and not all zesty bright.

1 large orange, juice and zest

275g self raising flour (I used some wholemeal too)

2tsp baking powder

2tsp cinnamon

75g porridge oats, plus a bit extra for sprinkling

150g caster sugar

285ml buttermilk or kefir milk if you make it

2 medium eggs

50g butter, melted

3 tablespoons of apricot preserve

You also need a muffin tin lined with muffin cases.

Method

Reserve 12 of the apricots. Roughly chop the rest and put them to soak in the orange juice and zest. I do this the night before, but 30 mins is fine.

Preheat the oven to 200C. Mix together the flour, baking powder, cinnamon, oats and sugar. In a separate large bowl mix together the buttermilk, eggs and butter and add the soaked apricots sand orange zest/juice. Now add the dry ingredients and mix until must blended.

Divide amongst the paper cases – you’ll find the mixture is quite up to the top but don’t worry as it doesn’t rise much (despite the self raising flour AND baking powder). If you like use those fancy tulip-shaped muffin cases that look like someone artfully folded some baking paper, the ones that cost about £20 for ten (exaggeration).

Place a whole apricot atop each muffin and sprinkle with some porridge oats (this makes the muffins look good!). Cook in the oven for 18-20 mins. When still warm, mix the apricot jam with a tiny bit of boiling water and brush over the top for a lovely glaze. I wish I could tell you my children loved these. They didn’t. But my partner did!


My breakfast smoothie

Seriously, like we need another picture of a green smoothie. But, nevertheless, here is mine.

But I wanted to share this because I think it’s so nice, it’s healthy but it’s not so scary that it alienates perfectly ordinary people, like me and you. I absolutely love it and will either have it first thing (after my mad Italian woman habit of lemon and psyllium husks in hot water), or after I’ve had a ‘proper’ breakfast and at about 11am. Depending on what time I have it I will vary the ingredients. I don’t add spinach if it’s too early because WTF am I turning into? But. My big discovery is frozen spinach. The one you get chopped up in ‘pods’. This way you don’t have bags of fresh spinach going off in the salad drawer (yuk) mocking you; it’s always fresh, and adds a nice cold element to the smoothie.

There are three key ingredients, to my mind, to make this smoothie really nice and friendly. And those are the almond butter, the cinnamon (who would have thought I’d become obsessed with cinnamon?) and the dates which must be those lovely expensive medjool dates. I buy mine from the market and £3 worth last me, easily, all week. I would probably also add banana as a must have. Remember that if you don’t fancy a whole banana, you can freeze it, chopped up in pieces, in a box in the freezer to add to subsequent smoothies.

So this is my basic smoothie:

One and a half medjool dates, two if you like

One banana, nice and ripe if possible

One teaspoon of cinnamon – don’t skimp on this

A big old tablespoon of almond butter

Handful of blueberries

200ml or so of almond milk or milk of your choice. I fill it up to the ‘max’ on my Nutribullet container. If you like a thicker smoothie add less, if you like it runnier add more etc.

You can blend it up now for a minute or so until smooth. But, if you want to ramp up the nutrient content you can add any, or all, of the following.

quarter of a teaspoon of spirulina

half a tablespoon of linseeds

big pinch of hemp seeds

1-2  tablespoons of oat flakes

some kefir if you culture it – I add two tablespoons

a pod of frozen spinach

The spirulina makes everything go really green. Don’t be scared. And you don’t have to add it if you don’t want to.

Just remember to blend until really smooth. I do it for about 30-45 seconds in my Nutribullet.

This fills you up for, ooh, maybe 30 minutes. Seriously it doesn’t fill me up for long in that ‘full up’ way. But I do feel REALLY good after drinking it. Until I pollute my body with a cappuccino. Sssh.


Sticky cinnamon buns

Buns is a word you simply can’t say enough. If it’s not already, it should be a control word, used by psychologist in experiments, to put people in a good mood. It is a fabulously English word and, even though I try, there isn’t really any alternative in Italian. We have the rather more catch-all phrase meaning, simply, ‘pastries’.

Although we don’t really celebrate Mother’s Day (I really don’t need a day to tell me to appreciate my mum), if you were so minded, these would probably go down a treat if you made them today (as I write, tomorrow is Mothering Sunday), put them in the fridge to prove overnight, then cooked them in the morning.

They take almost no kneading. I got the initial inspiration from Edd Kimber who won the Great British Bake Off five years ago, but I’ve cut the sugar down (with no ill effect) and changed the kneading process so there isn’t really any, Dan Lepard style. I also don’t use currants or any dried fruit because my children don’t like them. I’d never thought of using cream cheese in an icing before but it’s wonderful and entirely Kimber’s idea, not mine. I am not a fan of sugar/water icing and the addition of a protein-rich food really takes the teeth-janglyness out of the icing. It doesn’t make them any less delicious, only more so.

These are life-affirmingly good about half an hour out of the oven, I’ve just eaten one and am in a seriously good mood. I’ve done a lot of gluten/dairy free baking recently and was just about to put up a recipe for a green smoothie, so thank goodness for these. My inner Nigellas and Gwyneths are still fighting but, for today, Nigella wins.

This made 20 for me.

For the buns, you will need:

250ml whole milk (I don’t suppose the world would fall in if you used semi skimmed)

50g unsalted butter

500g strong white bread flour

30g caster sugar

1 teaspoon of salt

7g fast action yeast

1 large egg, beaten – the egg should be at room temperature

vegetable oil for greasing

For the filling, you will need

100g light brown sugar, smash any lumps out

3 tablespoons of cinnamon – yes tablespoons. It seems a lot, but these are cinnamon buns

60g butter, melted

For the topping, you will need

50g soft cream cheese

50g icing sugar

This is what you do

Warm the milk and the butter up in a small pan until the butter has melted then let it cool until it is just luke warm. (If you haven’t taken your egg out of the fridge yet, do it now and set it aside to warm to room temperature.)

The milk/butter is ready when you put a clean finger into it and you can’t really feel hotness or coldness. If it’s too hot or cold it won’t activate the yeast efficiently. If you want to speed up the cooling process, take it out of the pan and put it into a wider-lipped vessel like a bowl.

In the meantime, in a large bowl, mix together the: flour, sugar, salt and yeast.

When the milk and butter mixture is lukewarm, make a well in the middle of the dry ingredients (the flour etc) and pour the milky buttery liquid in, followed by the beaten egg. Mix this all up as best you can using a fork. You’ll have a lumpy dough that will look most unpromising.

Leave it for ten minutes.

Turn out onto an oiled surface and knead gently for a few seconds, cover with a bowl and leave for another ten minutes. Knead again for a few seconds. You should now have a smooth, soft-ish dough (it won’t be super soft and may seem a tad dry). If not, if there’s still obvious ‘bits’ to it, give it another 5-10 minutes rest and another quick ten second knead.

Now, put  it into an oiled bowl and cover with cling film and leave it until it’s doubled. This may take much longer than you think. In my kitchen (which is kept at a Spartan 18C and a humidity level of under 50) this took nearly three hours. In a hotter kitchen it can take as little as an hour. I know this bit is scary – knowing when the dough is ready always used to scare me – but what I do is I put it in a large bowl, so that the dough fills up about half the bowl. This is because, as the dough rises, you can never remember what height it was, can you? So it’s difficult to judge when it’s doubled. But if you choose a bowl where the dough comes up about half way to begin with, and then cover with cling film, you know it’s done when the dough starts to push up the cling film.

At this point tip onto a lightly oiled surface and roll out the mixture until it’s about 40cm x 50cm. It should roll out really quite easily. You may need to oil the rolling pin – I did. You will get rounded edges, no right angles. That’s okay.

Now the mixture: mix together the sugar and cinnamon and set aside for a momentino. Now, with a pastry brush, brush the melted butter all over the slab of dough, right to the edges. This is quite meditative. Think of all the people who have done you wrong whilst you do this and think that they won’t be getting any of your cinnamon buns, the bastards.

Now, on top of the dough, sprinkle the sugar and cinnamon, making sure to go to the edges as best you can. You will spill some onto your work surface, try to pick these up and put them back on or, at the end, gather the up with a clean hand-sweep and sprinkle them on top of the made up rolls.

Now, with the filling all spread, roll up the dough, with the longer end towards you so you get one long cinnamon bun roll. With a sharp knife, trim the edges off, then cut slices of about and inch and a half or so. Place the buns flat down on a lightly oiled tray measuring about 23cm x 33cm (you can even got a bit bigger, but no smaller). There will be a little gap between them, see picture.

IMG_1712

(If you have any sugar/cinnamon stuff left on the work surface, don’t waste it but gather it up and sprinkle it on top at this point.)

You now have a choice. If you fancy eating them soonish, cover them with cling film and leave until they have doubled in size. Anything from 45 mins to a couple of hours. But. I put them in the fridge at this stage and leave them all night. (Also, see update, below.)

Whenever you cook them, you need to a) preheat the oven to 180C b) brush the cinnamon buns with melted butter before they go in the oven (this is important). If you prove them in the fridge you can cook them straight from the fridge, or leave them at room temperature just until the oven warms up. No longer.

Cook for 20-30 minutes (mine took 25).

Whilst they are cooling make the icing, just mix together the icing sugar and the cream cheese until it’s pourable but not too liquidy. It will really seem like it’s not going to work for a bit but then it all comes together. Drizzle on top of the buns (it’s okay to do this when they are about 20 mins out of the oven). Then, prize them apart with a spatula thing and eat with a good coffee whilst making whimpering noises.

(Have napkins handy, these are sticky.)

UPDATE 20 April 2015

Having now made these a few times, I offer these observations:

These buns are fabulous when freshly made, but they go stale disappointingly quickly. Unless you plan to eat them all in one go (!) then what I suggest you do – what I do – is I now cook these in two batches. You can easily keep them in the fridge for that final stage of proving (i.e. the bit just before they go into the oven) for two days. I divide mine up onto two smaller trays and cook them over two days, thus giving me fresh buns for breakfast two days in a row. Just mix up 25g cream cheese and 25g icing sugar for each batch. Which brings me to my next observation:

I think that 50g of cream cheese and 50g of icing sugar is AMPLE icing for these in total so I’ve amended the original recipe above.