Monthly Archives: September 2013

Window vacuum, a brilliant thing.

231575442A while ago, as I fell asleep half delirious, I caught an ad talking about a wondrous looking thing called a window cleaning vac by Karcher. It was a vacuum, with a small cylinder attached to it that sucked the water up after you’d cleaned the windows, via a squeegee attachment.

Because I thought I’d dreamt it, I looked it up the next day and lo it really did exist. The reviews were fab. It was a gadget. We’ve long been looking for something that makes window cleaning a bit more efficient – it wasn’t the cleaning per se we found difficult, but how to achieve a smear free finish (even as I write those words, I am mocking myself). So of course I bought it.

It’s brilliant. You use it after you’ve cleaned the windows with soapy water. It takes a bit of technique but not much. My partner immediately seized it as his and started cleaning the windows in quite a frenzy. He even used it on the stainless steel cabinet fronts in the kitchen (brilliant, but I still think baby oil does a better job, he agreeth not). You can use it to mop up condensation if, like us, you have single glazed windows.

Buy the most basic model, the WV50. You don’t need the spray bottle (but buy it if you want), you don’t need anything else save for a cloth and a bucket. If you have teeny tiny windows you may want to buy the smaller squeegee attachment but that’s it. Save for replacements blades when you need them. It’s rechargeable. It’s fab.

Mud loving mats

This is another boring but kinda useful post. And it may not apply to you at all if you live in a city and you don’t get muddy.

But, if you have children or dogs and/or live in the country, you may find this of help.

Last autumn when it was really wet and therefore muddy, our wooden floors got unfeasibly dirty. The entrance hall comprised of dirt, wet foot prints, mud, bits of grass. No doormat could deal with the amount of detritus that was coming in.

When I was out and about in London one wet day, I noticed some rather fine establishments would put out these particular mats inside their doors, when it rained. I looked into it and they were by UK Mats.

Now, UK Mats has great customer service. I know, I used it a lot last year as I tried to work out what to get; the great thing is that it makes mats to order so in almost any size you want.

But in the end, I didn’t get my mat from there because I realised that I really needed a mat that could be machine washed. After some research one name kept coming up: Turtle Mats. These are not cheap (neither are UK Mats) and there are lots of ones out there that look the same but aren’t. People who have a Turtle Mat do rather go on about how good they are. Which both annoyed and heartened me. Annoyed because I really didn’t want to be spending nearly £90 on a doormat. Heartened because it seemed that if you did, it was worth it.

We went for the largest size (hence the price, you can get them from £23) and ours is from the Classic collection. There are lots of others in the range and I’m sure they work brilliantly, but I don’t do patterned doormats.

Anyway. We’ve had ours for a year now and it is, indeed, brilliant. It seems to suck water and mud from your feet, it doesn’t slip and when it gets too dirty you can put it in the washing machine.

I was so impressed I didn’t buy the company, but I did buy a Mud Hog to go outside, too.

(I’ve tried, but can I take a decent photo of this? Course not.)

Lost bunny

IMG_3319

Obviously this isn’t any old bunny. It belongs to my youngest’s best friend, E. And thus, it’s personal.

E lost her bunny two weeks ago in Brighton. So it’s a really long shot. It may have got lost in the hotel (The HIlton) and got wrapped up in the laundry. Do you know someone who works there who you could prompt to have a good look. It may have got lost in the streets. You may think it’s just a bunny, but it ain’t.

E’s had this bunny all her life. She’s five. It’s been in and out of hospital with her. It’s listened to all her dreams, fears, stories, what she’s done. E starts school on Monday and Bunny won’t be there. If you see it, let me know.

Thank you.

Hugh’s ten minute cookies

IMG_3314

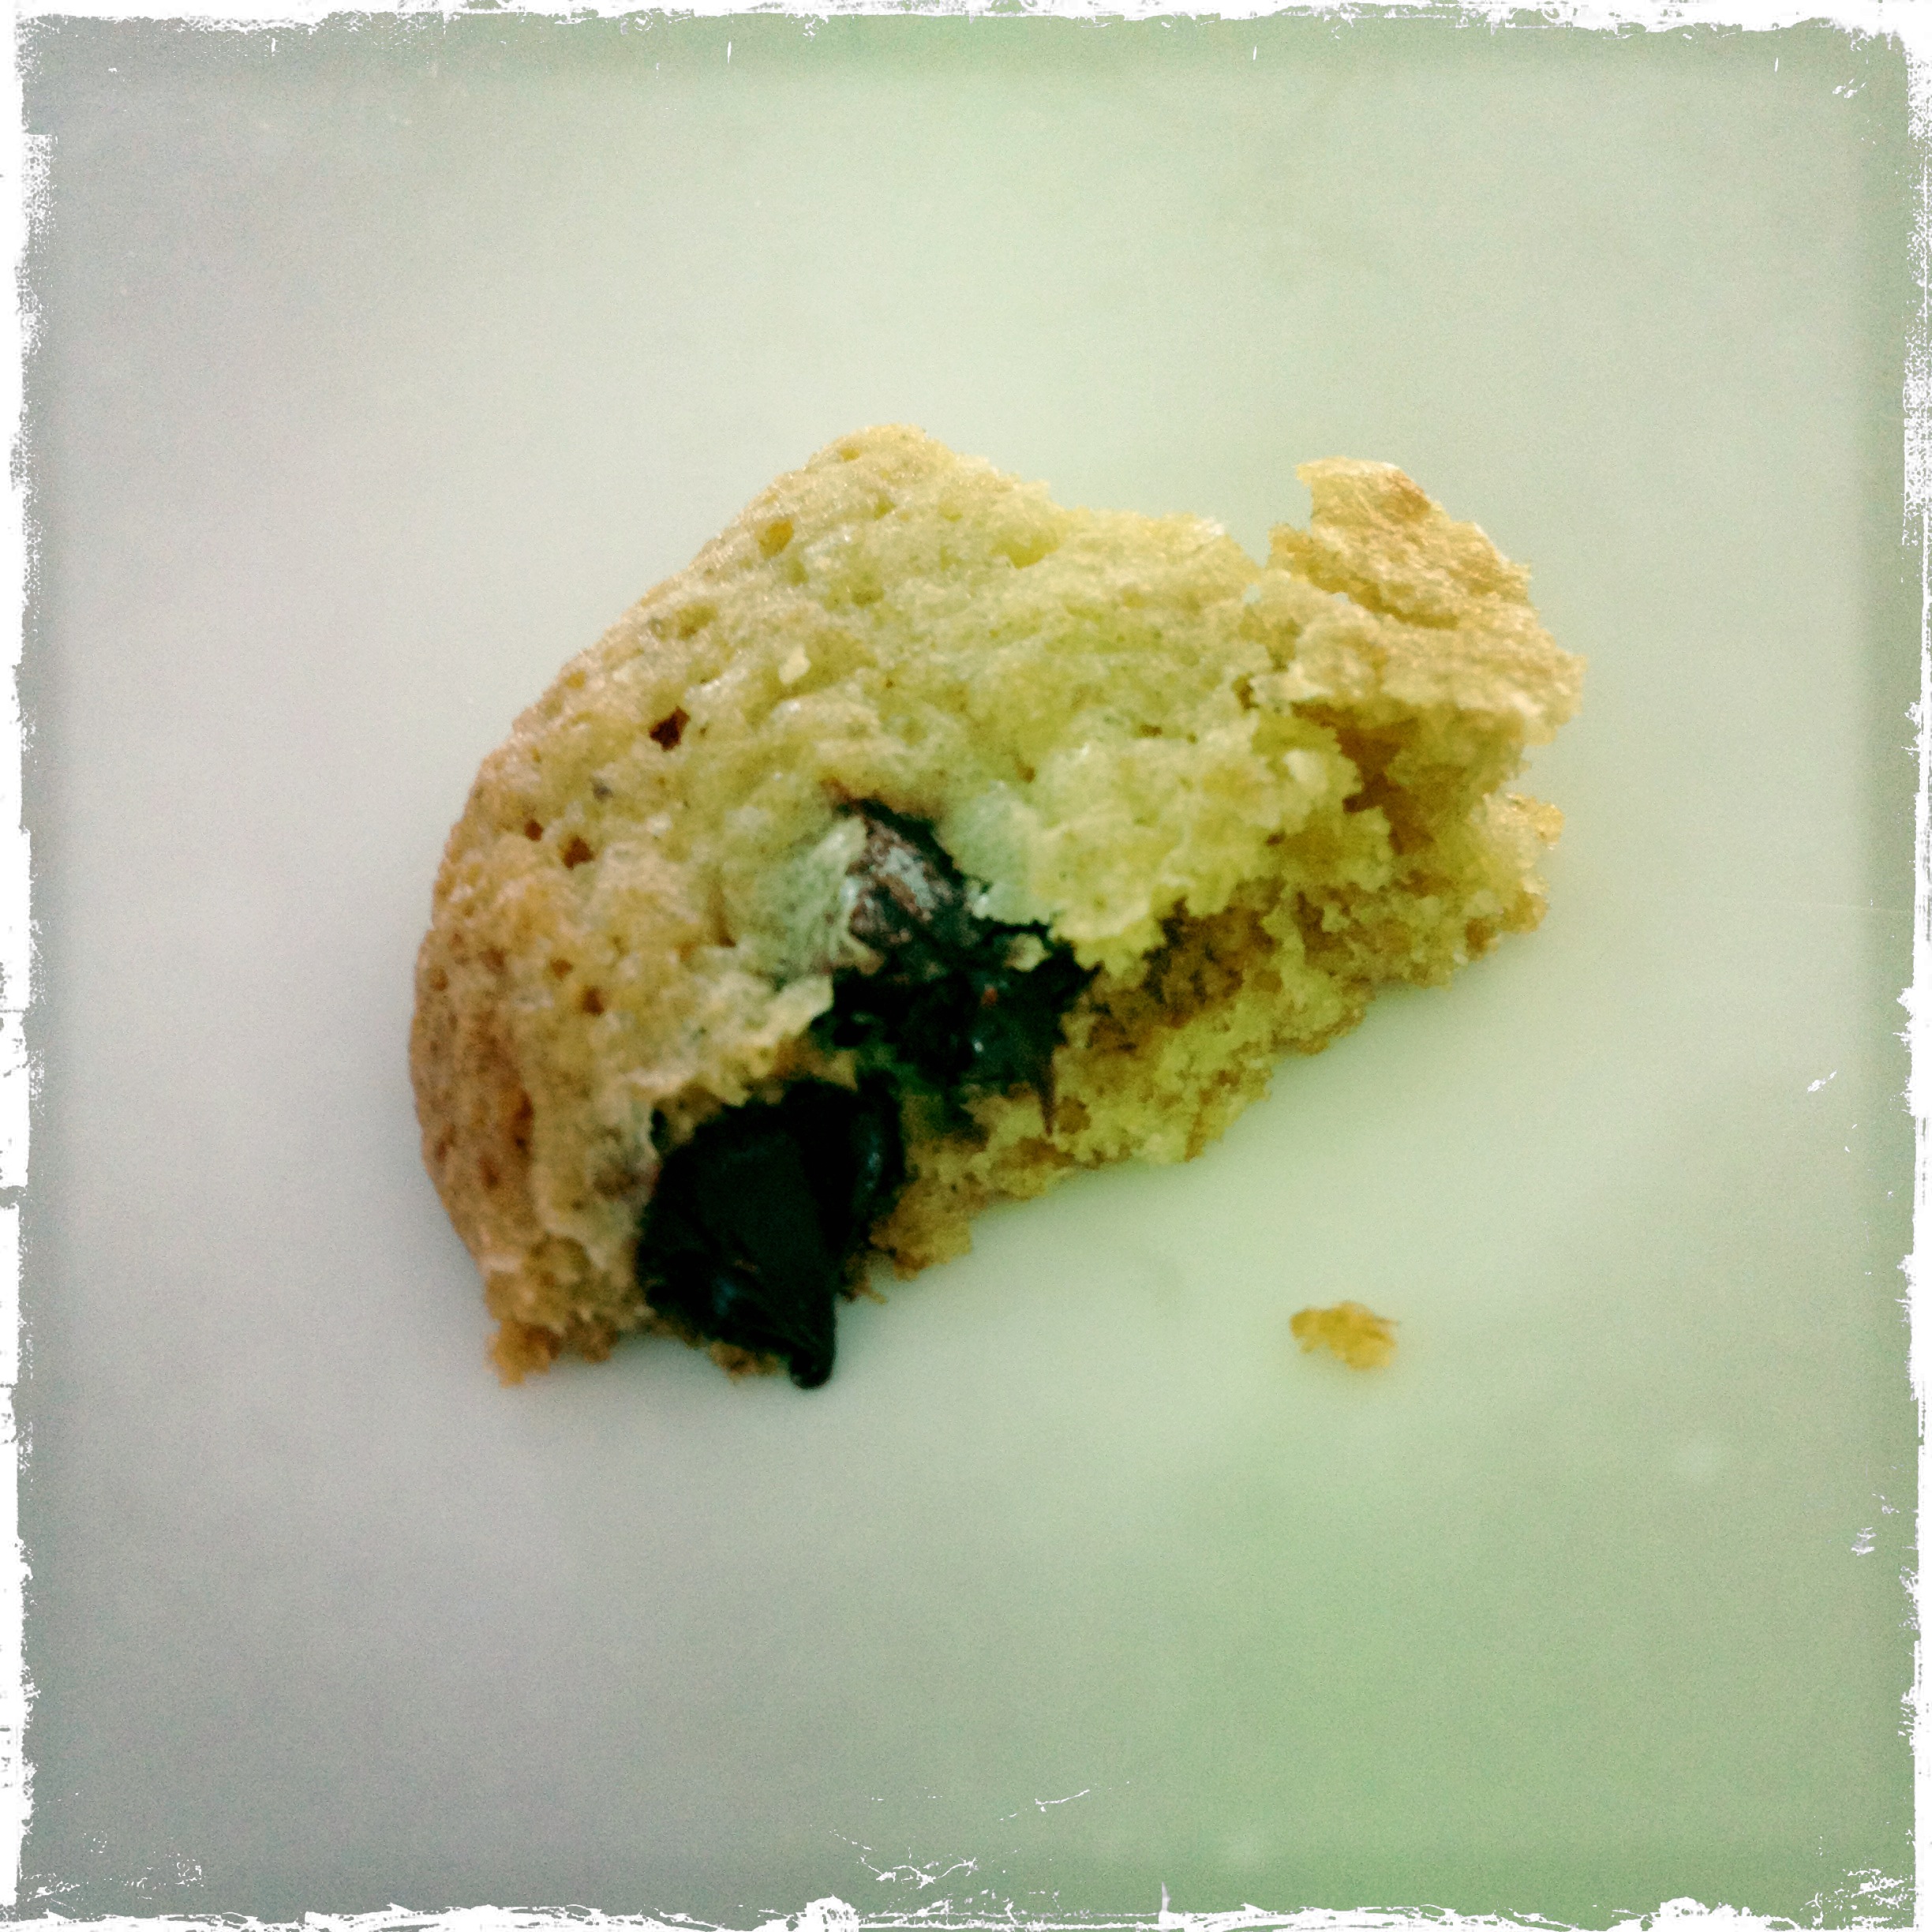
I don’t know why I haven’t posted this recipe before. Its is the most made biscuit recipe in our house and the most loved. I prefer these biscuits with nuts added, too (macadamia, hazelnuts or almonds, lightly toasted, lend themselves particularly nicely, I think) but although my children go mad for nuts as a separate snack, they prefer these biscuits with just chocolate chunks added.

I do confess, here, to having packets of ready made chocolate chunks in the cupboard, because chopping chocolate is one of my least favourite things. But if you like really big chunks of chocolate, or are really precious about the sort of chocolate you use (as I am for presque everything else) then best to choppahoppa the chocolate yourself. However, I get a rather perverse pleasure from snipping open a packet of chocolate chunks and just chucking them in.

The added bonus these cookies have is that you don’t have to wait for the butter to soften to room temperature – you melt it – before you can start mixing, so these really are super quick to make. They’re still biscuits. Not broccoli, but at least you know they’ve not got hydrogenated fats in them or other crap.

I’ve adapted Hugh Fearnley-Whittingstall’s original recipe by upping the chocolate needed (he originally asked for 100g, but I like a chunk or a chip in at least every second bite) and I add at least half wholemeal plain flour. I’ve made these with all wholemeal flour and you really can’t notice, it just lends a certain, lovely, nuttiness. But in order not to get too worthy, the best approach is probably half and half, which is what the recipe asks for here.

So this is what you need:

125g unsalted butter

100g granulated or caster sugar *

75g soft, light, brown sugar *

1 egg

2 teaspoons of vanilla extract

150g of plain flour in total. I use 75g white and 75g wholemeal

(I have also made these with 50g white, 50g wholemeal and 50g ground oats and they were delicious)

half a teaspoons of baking powder

A pinch of sea salt

150g chocolate (I use half white, half plain)

[If so wish, 100g toasted macadamia/hazels/almonds]

Preheat the oven to 190C (I use fan on 175 I have to say)

Gently melt the butter. You really do want to be gentle and take it off just as soon as it’s melted. If gets too hot then let it cool slightly before using it. Otherwise the chocolate will melt before you even get the mixture into the oven.

Put the butter into a mixing bowl and to it, add the two types of sugar. Mix together. Now add the egg and teaspoons of vanilla essence. Now mix in the flour, baking powder and salt. When all well blended gently stir through the chocolate chips (and nuts if using).

Onto lined with baking paper biscuit trays, put a tablespoon of mixture per biscuit. I sometimes make these giant, and sometimes make them small. So see how you feel. Leave good space in between. I get about six onto my baking tray when I go large with these. I couldn’t possibly tell you how many these make exactly, since I vary the sizes and often a number of them get eaten before they’re completely cooled, but I’d say about 14-18. As a rough guide.

Bake for 7-9 minutes. If you like them crispy then bake for longer. I like mine chewy so take them out after seven and leave them to cool on the tray for a bit (or slide carefully – baking sheet and all – onto a cooling rack).

That’s it. Now all I need is a really nice cookie jar.

* I like to experiment with cutting down the amount of sugar in things. Sometimes you just can’t though because something magical goes on with certain proportions of sugar/butter/flour. But. I have made these with just 100g of sugar – 50g granulated/caster and 50g of soft brown – and they are delicious and, I think, plenty sweet enough. The consistency changes slightly though. Give it a go and see what you think.

note:  you don’t have to bake these all at once. The mixture will keep for a good few days in the fridge and you can put spoonfuls onto a baking tray and have fresh cookies on the table in minutes. That way you can have freshly baked over more days.

I add a substantial amount of nuts to this mixture for when I make them for grown ups. Roasted, chopped, almonds and hazelnuts work best. I also put the mixture in the fridge as this gives me thicker, squidgier biscuits which I like.

I now have a nice cookie jar.

Vacuum sealing

IMG_3262

One of the single most useful things I have in my kitchen is completely unattractive to look at and completely unattractive to talk about, and yet it’s really valid (I’m looking for another word for useful and I cant’ think of one). Especially at this time of year if you have lots of produce to freeze. It’s my vacuum packer. I got it last year when I briefly considered getting into sous vide cooking (to cook sous vide – or under vacuum – the food needs to be vacuum sealed). Of course to begin with, I was looking at vacuum packers that were all gorgeous and stainless steel. Until I discovered that the reviews on them were not good.

So I got this one. Which I’ve been using for nearly a year now and can report is excellent. But it has, from what I can see, two features that this one doesn’t and I don’t think you need these two extra features (the extras being that the more expensive one holds the bag in the machine – you don’t really need this, and it has an extended vacuum button which I’ve never used).

So I would do yourself a favour and buy the cheaper one. They are ugly, ugly machines. But that doesn’t matter. What they do is useful and I promise you that if you get one, you will be vacuum sealing everything in your path.

Why do you need a vacuum sealer? Why let me tell you.

By taking the air out of food, it keeps longer. But I don’t really vacuum pack food for the fridge, because no food in my fridge really stays there for that long (although I did once vacuum pack a doorstep of parmesan cheese which I kept in the fridge). No, where vacuum packing comes into its own is for food you store in the freezer. By sucking the air out of a bag of food it takes up less space, you end up with a freezer of what looks like industrial space food which I think is COOL and it doesn’t suffer from freezer burn. Seriously you will be vacuum packing every single item in your freezer.

Here are a few tips. You can’t vacuum pack liquids unless you have a chamber vacuum sealer. These are expensive. So you do need to have a bit of technique if you seal something with liquid in it or that’s soft. You can either just seal it, vacuum part of it but stop before it’s squashed your bread rolls into pancakes (this takes practise), or freeze the item in a normal container first, and then vacuum pack it (I did this with the blackberries you see above, I froze them on a tray first and then vacuum packed them). You can’t seal anything if there is any liquid breaching the seal.

You can, if you are so inclined, also vacuum pack stuff like shampoo bottles before you go on holiday so they won’t leak. But that’s a step too far even for me. I have, in the past, vacuum packed some nuts that my partner couldn’t stop eating with the words STOP written on the packet. And I have vacuum packed jumpers to stop moths getting at them. It works brilliantly.

You do need special bags for vacuum sealing – and the most economical are on a roll, so you can cut them to size. Just make sure they will fit into the width of sealer you have (most do). But you can also ‘seal only’ so you could seal a packet of peas, for example, in their shop bought bag rather than clipping it shut.

Those of you with whom I’ve shared my sourdough starter in the last year, have also had it sent to them vacuum packed. You lucky, lucky bastards.


The perfect baguette

IMG_2932Although I’ve  been baking bread, by hand, for three and a bit years now, I had yet to crack the perfect baguette. Or indeed, any sort of baguette. I suspected – and I was correct – that you needed a couche cloth to make a sourdough baguette and after I got a couche cloth as part of my birthday presents (I’m not a girl who needs an underpaid worker to go into a mine and get me a diamond) I set to work.

The first thing making baguettes taught me is that you really do need to nail your shaping. If you don’t properly prepare the dough for shaping (give it a final knead, then let it rest for about 20 mins before shaping it) it won’t shape so easily and if you don’t shape it properly, it won’t have the surface tension to hold its form. If it can’t hold its form properly then it will be hard to slash and if all those things happen you will get bread that is perfectly lovely and edible. But it won’t look good as it could be.

IMG_2308

My first four baguettes, tasted great but shaping and slashing not great.

IMG_2403Next two. Better but not there yet.

Dan Lepard and the lovely Joanna from Zeb Bakes helped me with shaping and other tips. Joanna linked me to some shaping and slashing videos on line. Dan reminded me to put the bread into the hottest oven possible for the maximum amount of oven spring.

[The shaping video is here and the baguette shaping starts at 2.25. The scoring baguettes video is here.]

Because I really do think a baguette has to be made of white flour, I don’t really attempt to make it too healthy. But I did have, what I thought was a master stroke of genius and (because I just really struggle with adding 100% white flour it seems so unhealthy) I added 50g-ish of rye to my 450g of white flour. Okay so it’s not much but it stops it being made completely from white flour. I say this is a master stroke of genius in this way because after I did this, I read that Dan also recommends doing this to add a bit of nuttiness and flavour to an otherwise white loaf. So, you know, I felt really very clever.

Adding a bit of other flour doesn’t detract from the white-ness but it does add a certain something. I also find that sprinkling both the baking tin with polenta (so that it coats the bottom of the baguette), and the top of the baguette, lends even more certain somethingness.

The other thing to note is that with baguettes, I’ve found I really do need my grignette. So I had to find it in the back of my drawer. The videos I link to above show you how to do the slashes, as they’re quite particular. I can’t use a bread knife slashing baguettes.

Anyway. I’ve now got it so that I wouldn’t say I’ve perfected the art of the baguette, not by any means, but I’ve got it so that I can make a pretty good one which, with some butter and apricot jam and a bowl of caffe latte, makes a pretty perfect breakfast. A bit naughty, without descending into something so bad for you, you want to start slashing at yourself.

IMG_2425

Do look at the videos for shaping and practise. It’s really worth it.

[The recipe I use is Dan’s standard white sourdough recipe from his The Handmade Loaf book, with 50g of rye added to the 450g of white bread flour instead of 500g of white bread flour.]