Monthly Archives: April 2015

Farinata and Friday night Tray of Treats

We used to do our main shopping on a Saturday as this is how things naturally fell, and it coincides with market day. And I do love a market. This meant that, come Friday, the fridge was a little bare and, often, my partner would be away on Friday. He is really good at conjuring something out of nothing in the kitchen, a skill my mother also has but not one that I’ve inherited.

I’m not bad at cooking but I need to a) be in my own kitchen b) have ingredients c) have a plan. Thus it was that, often, on a Friday, I would want and need to pull together a dinner for me and the children made out of not very much. And this is where I invented the Tray of Treats.

This is basically a fun and slightly misleading name for leftovers and bits dragged out of the depths of the fridge and cupboards. Although, these days, it’s become such an institution that we do tend to shop specially for Tray of Treats, back in the day it was crudites, bits of cheese, ham, bread sticks and whatever else could be cut up and look small and canape sized.

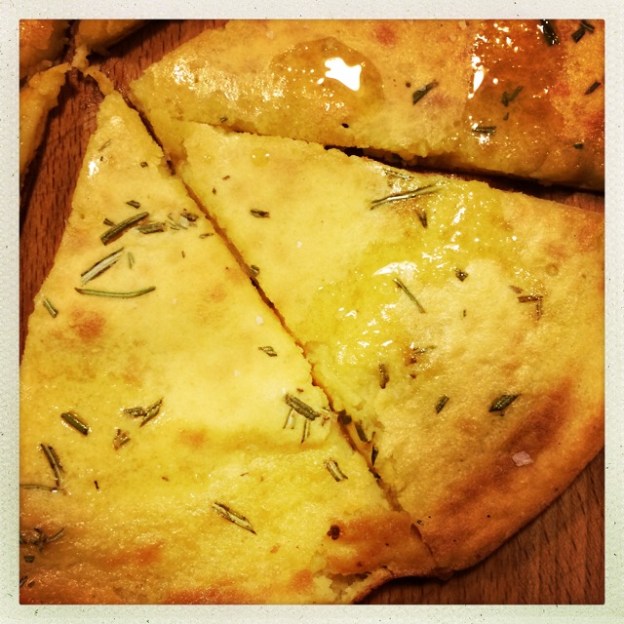
This is where these farinata come in. (Farinata literally means a ‘flouring’.) They are great as last minute bread, easy to make, gluten free and need almost no prepping. The slathering of extra virgin oil and salt makes them, so don’t skimp on this bit, because that would be to miss the point of them.

I use a 26cm skillet and it makes two big ones, which you slice up into wedges. Chickpea, or gram flour, is high in protein so these are gut-bustingly filling. These are also great little snacks to serve with a drink of an early evening.

150g chickpea flour

Two tablespoons of extra virgin olive oil plus extra for drizzling and cooking – use the best you have

half a teaspoon of baking powder

One teaspoon of salt, plus sea salt for sprinkling

Fresh rosemary sprigs, chopped

Pour the flour, the two tablespoons of olive oil, baking powder and salt in a mixing bowl and, using a balloon whisk, whisk through 300ml of cold water. I use filtered water. If you use normal water be aware you might get a bit of scum on top of your batter after resting, if so, just skim it off. I never get it, and you may not.

Whisk this up until you get a batter. Now if you want to make the farinata now, rest the batter for ten minutes and heat up the oven to 240C, if not, put it in the fridge for later and just remember to heat up the oven before you start. The batter keeps for a day or so so you can also make one pancake today and one tomorrow (they are delicious with curries).

When ready to cook, put some extra virgin olive oil – about a tablespoon – in a frying pan that can go in the oven. I know it seems wrong to use extra virgin to fry with, and I don’t normally, but it works here trust me. Spread the olive oil around so it coats all of the pan, let it heat up and then pour half the batter in. When the mixture starts to bubble, scatter over the snipped up rosemary leaves and cook until the sides are golden, then transfer to the oven for ten minutes.

You know it’s ready when it’s crisp at the edge and has a soft centre. Flip it out of the pan (it should come out easily) sprinkle with sea salt and drizzle, generously, with the extra virgin olive oil. And marvel, at how few ingredients can make something so delicious.

My lovely Italian friend Sonia, who is a very talented chef, and from Livorno (where farinata originates, although it’s called torta di ceci there and they sometimes have it in between two slices of bread!), contacted me to tell me that the way I make it isn’t authentic: you shouldn’t use rosemary or extra virgin olive oil as it ‘overpowers the delicate taste of the chick peas’. This is apparently how you do it properly (it’s in Italian, sorry). But I love my way so will continue to do it like that, but, you know, authenticity is important so it’s good to know what one is mucking about with…

Lovely, nutty tasting (but with no nuts) poppy seed oatcakes

These are wonderfully nutty tasting, and you’ll be convinced there are nuts therein. But there are no nuts. They are very frangible, so don’t roll them too thin, and when cooked don’t be too rough with them. Lovely with some cheese, of course, but I also sometimes have them for breakfast with some almond butter and a smidge of apricot jam on top.

Being full of oats ‘n’ seeds, they are particularly good for you, too.

(Note: I’ve put these under gluten free, oats are naturally gluten free but some have gluten in due to the manufacturing process so look at the packet your oats come in.)

These are from Hugh F-W’s Light and Easy book.

150g medium oatmeal

150g porridge oats (not the jumbo variety, if you have those, give them a quick spin in a food processor)

One tablespoon of ground linseeds

One tablespoon of poppy seeds

One tablespoon of sunflower or pumpkin seeds, or half of each

half a teaspoon of salt

75ml of sunflower or other tasteless oil

You will also need 100-150ml of boiled water

Baking parchment


Oven to 180C.

Put all the ingredients, save for the oil and water, into a bowl. Make a well in the middle and now add the oil and mix the ingredients around. Add 100ml of just boiled water and mix to a sticky wet dough, if you need to, add up to 50ml more but try not to if possible. This will seem like an unpromising dough and won’t be like a smooth dough, such as you may be used to.

Now you need two sheets of baking parchment to roll the dough out. Not too thin. Cut into squares – just free form with a knife, you don’t need to be madly exact. Hugh recommends cutting the square in two so you get triangles and I like this shape, too.

Don’t be tempted to use a cookie cutter. But do ball up and re-roll any off cuts. I shaped the last one by hand, in a butter-patting style.

Put on baking parchment lined baking tray and cook for 20-25 mins until just coloured. These give out a lot of steam (cos of the water) so be careful when you open the oven. You don’t want them too cook too much and be too dark, but equally they do need to be cooked so if your oven is temperamental, check after 15 minutes. The surface should be dry – no bubbling bits of steam – but not too coloured. Mine took about 22 minutes in a quite fierce oven. You may need to cook in two batches, I did.

This makes about 20-24, depending, on course, on the size.


Making your own almond milk

Although we all eat everything in this house, we do also try to mix things up a bit. In smoothies, especially green ones, I stay away from dairy, but often want something a bit more luxurious than water.

Enter almond milk. You can buy almond milk, of course, and we do, but it tends to be full of stuff I don’t recognise and it contains just 2% almonds. So we make our own when possible and it’s really easy, nutritious and super tasty but not, I should add, cheaper than buying ready made. I like to use this in iced coffee (even though the base is dairy) to add a lovely nutty dimension to the finished drink.

Anyway, this is what you do:

Get 250g almonds, skin on and put them in a container that will fit in the fridge, cover with water and leave overnight. When you are ready to make the almond milk, drain the almonds, give them a rinse then put them in a powerful blender with 700-800ml of clean fresh water and blend up until all mushed up – it takes about 30 seconds.

Take out this sludge and place it on a muslin, in a sieve, over a bowl. Let it drain and then gather up the muslin and give the nuts a squeeze to get the most out. What comes out is almond milk (and you can use this method to make hazelnut, cashew etc milk too) – store it in a big jar/bottle in the fridge and it will keep for a few days (probably up to a week but I’ve never kept it that long). Stir it up before you use it and if you like, you can add a bit of vanilla extract to it for an extra bit of flavour.

The nut residue you have left in the muslin can be used in bread, biscuits, soup, smoothies, porridge or ice cream. If you don’t use it straight away put it in the fridge for a day or two or even freeze it to use later. Whatever you do don’t throw it away!