Monthly Archives: June 2010

Slashing – do you need special tools?

The subject of slashing is big in the bread world. Before I started baking bread, I had no idea that those slashes were there for anything other than decoration.

Oh how simple my world must have been.

If I’ve understood it correctly, and it’s entirely probable I haven’t, you slash your bread so that it can rise to maximum height without exploding. This is because the heat of the oven causes something caused “oven spring”-  that final push upwards. Because the bread has a certain surface tension, you want the bread to rise as much as possible before the crust bakes hard and doesn’t allow any further growth. So in this respect slashing helps, (but so does causing a moist environment in the oven – steam. More on this another time).

If you slash, you control where the bread expands. If you didn’t and it needed to expand, it might burst in an uncontrollable fashion. So slashing can be decorative and serves a purpose. Btw, you only really need to slash with certain types of bread. Some bread that don’t rise much, such as a pure rye, don’t need slashes.

But how to slash?

People are nervous of slashing the dough, with good reason. You’ve spent the best part of a day making your sourdough baby and when you tip it out on a (preferably pre-heated) tray or stone you don’t want to muck about with it anymore than you have to. Slashing takes a bit of confidence and good slashing also depends on the proving. If you’ve overproved, slashing is more likely to make your bread deflate, for instance.

When I first started slashing I used a really sharp knife. I found this dragged and it made me panic, because the bread seemed to deflate (although it seemed to recover fine in the oven).

I never need a reason to buy a new gadget or a specialist tool so I looked up what you could use.

  • A razor blade – no good for me as I have young children and I wasn’t going to risk a naked blade escaping from the drawer.
  • A grignette or lame – a posh Stanley knife.

Naturally, I decided, I needed one of the latter.

You can get ones with rotating blades (so you can use both sides, although there’s nothing to stop you swopping hands and doing it but I guess that requires some dexterity), ceramic blades, steel blades, replaceable blades. They are used “by the professionals”.

I got this one:

Mure and Peynot Panette Professional Grignette, £9.99, close up of curved blade


Same, seen side on and full length and with safety cover.
 
 
It has a replaceable blade and a safety cover as seen above.
Hugh Fearnley-Whittingstall, in his lovely little book on bread suggests you can use a bread knife. If you’ve ever tried to slice a tomato with a regular (even really sharp) knife and a serrated bread knife, you’ll know the latter makes the job so much easier.
Surely a bread knife couldn’t be as good as, or better, than a special tool?
Well actually yes it can. I’m sure if you’re a proper artisan baker who makes all sorts of fancy patterns on their bread, then I’m sure that a grignette, in your hands does amazing things. But I can’t get the slashes to go deep enough.
The bread knife does a far better job.
Slash made with grignette on potato bread. Nice, but see how shallow it is? Although you’ll see the bread knife is already starting to muscle in.
 
This morning’s bread, white sourdough, slashed with a simple bread knife. Better, no?
 
Yesterday’s bread: three flour mill loaf, with bread knife slashes. 
 

Conclusion: it may not be a wallet-busting exercise, buying a professional grignette, but I think a bread-knife does the job better. With the money you save you’d be better off buying a banneton, which is worth the money. But, more on this another time.

Ice-cream makers

Those that know me in real life will know that my father opened up an ice-cream shop when he turned 70. As you do.

I wrote about him, and ice-cream for The Economist’s Intelligent Life magazine. If you look carefully at the collage you can see a picture of me in a school photo, and one of my dad by the round pond in Kensington Gardens, holding me next to our giant pram (actually I think it may be my sister, but I couldn’t find many pictures of me with my father because, being the second child, the novelty of taking pictures of me had obviously worn off).

He sold the business about four years ago. But I’ve kept the ice-cream making going on a domestic scale, inspired by the creations my father made.

Making ice-cream is really easy. I’d say “you don’t need an ice-cream maker” but let’s face it, you do. If you want to pour your ice-cream into a container, put it in the freezer, and then take it out again every few hours to break up the ice-crystals, then please do so. But if you do that you’ll think making ice-cream is as real faff and will, quite understandably, just go and buy it in the supermarket.

But I like making my own ice-cream for two main reasons:

1) I am nearly always avoiding a deadline
2) I  like knowing what’s gone into it. Because ice cream really doesn’t need the input of things like xanthan gum and emulsifier.

Ice-cream makers come in two types. Ones that cost about in the £40 range, with these you need to pre-freeze the bowl; or ones that cost about £300 and have an inbuilt freezer. These are the pros and cons:

Pre-freeze ones:

  • take up less space
  • are cheaper

BUT

  • you need to either be organised to put the bowl in the freezer (to pre-freeze it)
  • so you need to have room in the freezer to do this
  • the capacity is often less than those of the bigger, more expensive models
  • they tend to take longer to make the ice-cream

Built-in freezer ice cream makers:

  • are quicker
  • have a bigger capacity
  • require no pre-freezing of the bowl

BUT

  • they take up a lot of space on the counter top
  • are very heavy so really you need to keep them out, because also..
  • when you move them you have to then keep them level for 24hrs
  • can be very noisy, although remember they’re fast so you only need put up with the noise for about an hour.
  • some of them need priming of the bowl with alcohol

The best ice-cream maker on the market, that sort of straddled the two, was the Panasonic BH-9441P. It was a brilliant little machine that didn’t look bad either. But the beauty was that it was battery run, so no need for pre-planning. You just made your ice-cream, popped it into the machine and stuck the whole thing in the freezer. It cost about £35 and I recommended it many times but it’s no longer easily available and the demand for it has pushed the price up to over £50 when you can buy it.

Philips, Magimix and Cuisinart all make models of the former for about £40 (with the odd model costing nearly double that), and they get good reviews. Have a look on Amazon (which is what I would do) before deciding which one you get. Remember that if you have a food mixer, you can often get ice-cream maker attachments to go with them. I have no idea how they work.

Because we make ice-cream regularly in our house we have three models:

two Panasonics because I bought one for my dad when he ‘retired’ and have since nicked it back from him.
one Cuisinart Professional Ice-cream maker.

 The Cuisinart Professional Ice-cream Maker. A distinct lack of buttons to press but a lovely machine.
 

The latter is the one we use most now because since we swopped our giant American fridge freezer for a smaller freezer/fridge freezer I rarely have the room for my Panasonic. The Cuisnart PIM is very beautiful, rather monolithic and stainless steel. I mention this because I think it’s important how they look, but not so important that looks is everything. I very carefully researched it before buying it. It needs no priming. It’s super simple to use. In fact when you get it (if you do) you might be disappointed with the number of buttons to press. There aren’t any, just a timer dial to turn.

You have a little bucket (1.5l capacity) which you put the ice-cream mixture into, then attach the arm/lid and turn the clock timer to how long you think it’ll need (maximum an hour but it stops automatically if it’s ‘done’ before then and there’s nothing to stop you running it for longer if it still needs it, just put the timer back on) and that’s it. It has a plastic churner turner that turns as the machine freezes the  mixture.

It’s very noisy however. The noise doesn’t bother me so much as all my kitchen appliances can be hidden with stainless steel shutters so that buffers the noise somewhat. Then you take the bucket out, decant the ice cream into a freezer container and put it away to harden up/for later.

Home made ice cream is very soft when just made. Lots of people don’t realise this and think it’s not done properly. You can absolutely eat it straight out of the machine and it’d make a great after dinner-party dessert justlikethat.  And this is how I rather like it. It’s very velvety and you can really taste the flavours. I made a ricotta ice cream recently which was so tasty out of the machine. It’s very dangerous however as you can eat LOADS like this.

So be careful.

Or you can freeze it and it makes a lovely made-in-advance dessert, so one less thing to think about when you have guests. It keeps for ages in the freezer.

The  machine is not cheap: about £250, although you might be able to pick up a very good second hand model for less. It comes with a five year guarantee. The Gaggia Gelateria is another model that some friends have, but I’ve never used it so can’t comment on it with any authority. If you have it let me know.

I’ll post up some ice-cream recipes up another time as I’ve spent years trying to finesse some of them. Note: I didn’t like the recipes that came with the Cuisnart. In fact finding good ice-cream recipes is a bit of a bug-bear of mine. I am an absolute snob about it and only consider it to be proper ice-cream if it’s made from a custard (egg yolks, milk, cream, sugar) base. (Obviously you can also make frozen yoghurts and sorbets which is a different thing.)

I’m lucky because my father can get me ‘tasting cones’ (tiny cones) from his ice-cream industry contacts. This means that if you have children coming, or just people who work in the fashion industry who don’t each much, they can have a miniature ice-cream cone. But for everyone else, serving home made ice cream in a sugar cone is a lovely way to finish a meal, however posh the rest of it was.

Update February 2015: I wrote the avoe nearly five years ago now. I now have lots of ice cream recipes on this blog. I still use my ice cream maker regularly in the warmer months, although have also now got some recipes on here (see link) that don’t need them. The Panasonic ice cream maker comes and goes; sometimes you can buy it, sometimes you can’t. Heston Blumenthal has also brought out an ice cream maker as part of his Sage range which is meant to be very good, although I’ve never tried it. And the Cusinart Professional which I have (although it’s been redesigned), is now available, new, for under £200.


The most fantastic child’s quilt ever

Liberty patchwork quilt by Charlotte’s Cot Blankets, £110, buy buy buy.
A few days ago, my boyfyhusband (see, readers, this is what you’re reduced to calling your boyfriend of THIRTEEN YEARS and the father of your TWO CHILDREN when you’re not married. Learn by my mistake and insist on an engagement ring within two years of dating, or else. I do have an engagement ring, presented to me about four years ago, but by then it was TOO LATE) took a real awwww picture of our youngest asleep, and covered with her Liberty patchwork quilt, like the one above except obviously with her details on it. I would post it up here except it shows her name and those that know me know that I never name my children in print. Anyway, I sent the pic around the globe to family and friends and have been besieged by requests ever since asking Where Does the Quilt Come from. Even my sister, who is able to crochet, sew and knit like (*insert name of extreme crocheter, sewer and knitter here*) asked me.

Imagine how tempted I was to say “I made it!” and leave it at that. But I just couldn’t take the glory. Even though a) I love patchwork and b) I’m rather good at it. Or I was aged 14 when I last made anything in patchwork and that something was a pencil case.

But let me tell you what I really loved about that pencil case: I made it using scraps of fabric that really mattered to me, from items of clothing no longer in use but that evoked something. I couldn’t ever wear anything patchwork, but I think, as a method of using up bits of sentimental clothing, you can’t beat it. One day in the future, when I have loads of time on my hands, I intend to make a big patchwork quilt using up clothes that once mattered.

The Liberty Patchwork quilt from Charlotte’s Cot Blankets, was given to my youngest by her Godfather. Well I say her Godfather, but I know that the idea came from his wife, aka my best friend Emma. It’s made, by hand, in Norfolk, so the county just up from me (local produce!). It’s really beautiful and would make a wonderful Christening present or ‘new baby’ present.
You can also get it in blue-y colours, but this combination is just lovely.

Pane e amore

I’m really pleased with the loaves I’ve made so far. Whilst they may not all look as presentable as those I’ve bought in (proper, artisan, baker) shops, they’re really delicious. So delicious I have difficulty believing I’ve made them myself.

But the more I learn about sourdough, the more I realise it’s a bit like hi-fi’s (or whatever they’re called theseadays). You can get to the point where you finesse, finesse, finesse so much that you’re still going long past the point anyone else stopped caring.

I remember standing in a hi-fi shop with a hi-fi geek friend of mine, who was trying to show me the difference between one system (and we’re not talking those vertically racked systems, please, we’re talking individually bought and unmatching components) that cost £5K and one that cost £7K. “Can you hear the difference?” she asked.

No, I couldn’t. This is where I feigned an epileptic fit and asked to leave the shop.

There are a couple of questions I have at the moment about sourdough. I’ll have so many more, but at the moment a few are really bugging me. What I want is a really technical, but hand-holdy book (and if you know of one, please let me know) that will explain the science in a bit more detail than The Handmade Loaf.

And as I try to find these out on the web, I get more drawn into super-geek bread sites (trust me they make this look like Grazia) that make me feel like a miserable failure.

Even though, I have to remind myself, I think my bread is great and it does everything a good loaf should. It rises, it looks lovely and it tastes wonderful. What more could I want? At which point does it get good enough and people stop wondering if the addition of one extra ice cube will make for that super-perfect crust, or if they’d just turned the dough another 180 degrees during their crumb improvement proof, it would have had elongated holes to rival a natural sea-sponge.

Does it matter? I’m beginning to suspect it does. But I also want to scream at some of these sites and say:

“Are you shagging enough?” because surely you can’t be. I can’t believe anyone who is having enough sex can get that into bread.

And I include myself in this. But look. I have an excuse.

Must go now, have a loaf in the oven.

A completely gratuitous picture of Sofia Loren NOT baking bread.

Children’s cutlery

I get really cross with children’s cutlery. Growing up, we happened to have a fork that was smaller than the rest, like the runt of the cutlery drawer. For some known-only-to-me reason, I called this fork “Bluey”…anyway, it was MY fork and I used it for every meal my mother made. Even pizza. Which she used to make for me without the tomato sauce on top as I had a bad experience at school involving giant plum peeled tomatoes, which I’ll detail another time.

Children’s cutlery invariably consists of blunt-ended forks with chunky handles, knives that cut nothing and spoons that are so wide, said child would have to have a letterbox for a mouth to get them in. Useless. Or super chunky, plastic-handled crap with stupid designs all over it. When what you surely want is a plain, simple, stainless steel set of cutlery that is just smaller. How hard can this be to find?

Hard.

When my eldest was born, my mother produced, with a flourish, a set of cutlery that belonged to me as a child and which had been given to me by an erstwhile next door neighbour. It consisted of fork, knife, spoon and teaspoon (the latter has been mislaid somewhere, probably under the new kitchen), perfectly normal, perfectly functional just scaled down for children. I have no memory, whatsoever, of ever having used this set of cutlery. Probably because, in the way of Southern Italians (which my mother is) she was dazzled by the inlay of ‘gold’ each piece had along the handle, saved it for ‘best’ and then promptly forgot where she’d put it.

Here it is, childhood fork. I have no memory at all of ever using it.


When she gave the set to me for my eldest, my first thought was “I’ll hide these in a drawer somewhere”, but it became apparent quickly that it was actually really useful. Number 1: my daughter loves having her own cutlery (although I daily remind her that it’s MY cutlery), number 2: it makes sense for her to use something scaled down. Number 3: I actually love that my mother kept them all these years.
So I was able to dispense with the other, totally useless, totally rubbish, children’s cutlery I had accumulated since my daughter was born in an attempt to find Scaled Down Cutlery That Actually Worked.
I’d tried the Miniamo melamine children’s cutlery: totally crap. The fork’s prongs were so rounded as to render them totally useless.. They have anyway now been recalled, not because they are a crime against the trade descriptions’ act, but because fragments of the fork can break off and pose a choking hazard. 
Then I bought the So.Eat set from Waitrose. A knife, fork and spoon for £10, which seemed a lot, but they looked like good, solid specimens and the only child-related insignia was a smiley face at the base of the stem of each piece (why, why, why?), which I could live with, just about. 
Don’t buy these.


I was full of hope as I got these home. But immediately it became apparent to me that they had, to my mind at least, there was a design flaw. Each piece was really heavy. When I take these out of the cutlery drawer, I have to almost engage my abdominals. And the spoon! You can probably see from the pic above that the ‘bowl’ of the spoon is huge! And this is meant to be for a little mouth!
I was really pretty cross by this stage. My youngest, who is just over a year now, feeds herself and always has (honestly, don’t bother with all that spoon-feeding of pureeing stuff, no need). Sure she very often throws her cutlery on the floor, but when she does want to use cutlery she doesn’t want to be hindered by weight-lifting. 
Anyway today, I was in our local kitchen store, which I go to on a weekly basis, wondering round the aisles aimlessly, sure that I need at least one new gadget (I have the best stocked kitchen ever, probably only Martha Stewart beats me). Then I saw it. The answer.
An oyster fork. 
An oyster fork, (okay, two) slightly Georgian in feel, I feel, and the answer to all my prayers.
Okay I haven’t sorted the knife problem yet (you can get small butter knives, but they aren’t right). But let’s face it, mostly my youngest, dexterous though she is, doesn’t actually cut up her own food yet. She’s fine with a regular teaspoon but what she needed was a small fork. This is perfectly sized for her. There was another one, slightly bigger, with four prongs, which I’ll probably buy in a year or so but this is great for now. It cost £2.50 and it’s fucking brilliant (sorry); it’s really good quality stainless steel and I’m sure I’ll find a use for it (other than oysters, one of the few things I really don’t like, like having some gob into your mouth excuse me) when she’s outgrown it.
From L to R: a regular sized fork, my child-hood, gold embossed fork and the soon to be famous oyster fork, so you can compare sizes. Look, this is important.


Rye and Wholemeal bread

Rye and wholemeal, supposed to be Barley and Rye bread, cept I got distracted.
Proved in two whicker 600g baton bannetons for ten hours at 4 degrees. Cooked on preheated tray at 250 for ten minutes then 220 for ten minutes. Slashed with a professional Mure and Peynot grignette with a curved blade. One worked more successfully than the other. Not sure why.
Today’s bread was supposed to be Barley and Rye bread from Dan Lepard’s The Handmade Loaf. I’ve rather overdosed on white flour bread and even though sourdough is low GI, and I use stoneground, organic white flour, I really started to feel I needed to make a loaf that wasn’t just white flour.
The majority of sourdough bread has a tendency towards white flour use. White flour does the work in keeping the bubbles of sourdough up in a way that other flours can’t. This recipe called for a rye leaven, 300g white flour and then 100g each of rye and barley. I’d just had a chat with another budding baker friend about wanting to use more wholemeal so that’s what was in my head and that’s what I reached for instead of the barley flour. Anyway, it’s no bad thing. As you’ll see it still uses mostly white flour. *sucks teeth*
I’d made this loaf (using the correct ingredients) before and it’s delicious. A really subtly delicious loaf and great for sandwiches (what I also love about sourdough, because have I mentioned that I love it, is its keeping qualities).
Rye and wholemeal crumb, second slice, it will only get better as I get further into the loaf.
 Barley and rye bread made with proper ingredients and an 11hr rise at about 12 degrees. Dan Lepard described this loaf as having a “bold beauty”.
 

Mr Potato Bread

 Potato bread. 
Proved in a 400g round whicker banneton with linen lining for 13hrs at 4 degrees.
Cooked on a preheated baking tray at 250C for ten minutes then at 220 for a further ten minutes.

A couple of years ago, at the excellent Whitecross Street market, I bought a Tortano bread from The Power Station. This was a large ring shape and it had potato in it. The potato wasn’t obvious, but the flavour of the bread was exceptional.

I’ve dreamed of it ever since, buying it when I can, but that hasn’t been often. When I saw Dan Lepard had a recipe for potato bread in his book The Handmade Loaf, I decided to try it.

The recipe calls for honey and grated potato. This was my first long rise (prove) at such a low temperature (I usually prove my bread for about eight hours at about 15 degrees), and I was dubious it would work. My suspicions were deepened when I got the dough and it didn’t seem to have risen as much as my bread usually does. It had spring to it, and I tipped it out onto a preheated, polenta dusted tray (I always use Mermaid trays) and it still deflated slightly. I had two shapes on the go, one in a 400g round (which you can see above) and one in a 600g baton (which you can see in a minute). The slashes on the round one didn’t really have much effect and the loaf sort of burst out of one end. The recipe had called for a central fold, rather than slashes, but I hadn’t done this (tut, see what happens when you go off piste).

The baton shape I’d slashed on the top but also along one length.

Both breads rose beautifully, with a fabulous (I think anyway) crumb. The baton ended up being more successful in terms of loaf-look because of the beautiful fanning open of the long cut I’d made. I must warn you that this bread is just superb tasting. I had some for lunch with griddled peppers and a tomato salad. You can taste the sweetness of the honey, but not in an off putting way at all – even if you didn’t like honey I reckon you’d still love this. My boyfyhusband is currently eating his way through the second loaf whilst I remind him that it’s fodder for our daughter’s lunch box. I can’t even begin to think how delicious this bread would be if used for a bacon sandwich, with some chilli jam. Be warned.

The potato bread baton slash. Bootiful.

First fumblings with sourdough.

The reason sourdough, or natural leaven bread means so much to me, the reason I go on about it so, is that bread is the final frontier in cooking that I’d never been able to master. I’ve baked since I was seven (I used to make the cakes for my parents shop on the Bayswater Road in west London, probably illegally but there you go). But I’d never been able to make bread. I never worked out why. When I was a child I couldn’t wear a watch, they’d stop when I put them on. And if I ever tried to make anything with yeast in it, it’d die.  My bread was awful. I tried things like Danish pastries, thinking that maybe cos they were a cakey thing, I might have more luck. But no. It was actually hard to take failure, over and over again and I felt like you do when computers give you problems. Like it’s personal.

Some years ago, I went diving and fishing with a Michelin starred chef. I told him about me and bread. He laughed. “Anyone can make bread” he said, sounding like the chef in Ratatouille. “I can’t” I answered mournfully. “Come to my kitchen,” he offered. So I went.

He made the dough for the day and put it in this huge mixer. Then he asked me to shape it or something. I can’t remember now, but anyway, I touched it. We were making the bread for the entire evening’s covers. To cut a long story short, cos you must surely know what’s coming,  the bread I’d touched failed. The fact that I’d told him this didn’t appease his temper. He looked at me like I was a witch and not long after I found myself on the pavement outside, crushed.

Eventually bread makers came onto the market and I even failed with those, but I realised that’s because we had a shit bread maker. Our downstairs neighbour, the lovely Sarah, used to produce these huge loaves for her and her husband Ben. Her bread machine was a Panasonic (still the only make of bread maker I’d recommend) and eventually we bought one and what do you know, as long as I stayed away from the mixture with my hands – very easy to do with a machine – we were okay. As time went on, I got confident again. I really don’t know if bread senses fear but maybe it does. Because as I got more confident, I started making bagels and pizza, using the machine to make the dough and then shaping it myself. Success was mine. I don’t know, perhaps having children changed whatever freaky wiring I had going on that was such an efficient killer of bread dough. Perhaps the hands that had always been so cold, but made great pastry, were starting to warm up. The point is, I was able to make bread.

But my eye was always on the big prize:  sourdough. Proper Italian bread is sourdough bread: made without yeast but by using a starter of, basically, flour and water which uses wild yeasts that are present in the air and on the flour. In Italy we call this leaven a ‘biga’. Some bakers call it ‘La Mamma or La Madre’ – the mother. Fitting because the starter you, yes, start with, you make all your subsequent bread from. You use a bit of your starter every day to make your bread (or discard it if you’re not making bread) and then feed (or refresh) it with more flour and water. Some starters date back many years. It’s said that the starter that makes the famous Poilan bread dates back to 1932. Certainly the longer a starter has been going, the better it is and the more flavoursome the bread.

Sourdough bread is big, holey bread which you can’t squash into putty. It is deeply flavoursome, has a low GI (thus very satisfying) and can make a meal out of the most humble of ingredients. Add a squash of Brie and a few roasted peppers in olive oil and I’m happy. If you live in a big City – certainly London – you can buy sourdough bread pretty easily. But here, in Suffolk it’s not so easy.

Every weekly trip to London saw me coming back with something from Flour Station or Paul’s and I’d text my boyfhusband on the way home and say “we have good bread, we have a meal.” But I wanted to be able to make this bread myself.

I’d bought Dan Lepard’s The Handmade Loaf some years previously. I’d started a starter from his instructions which had looked promising, but then I got pregnant and other things occupied my mind. My friend Lucy gave me a bit of her starter but I’d let it go off in the back of the fridge. Then finally my friend Emily offered to send me some of hers. This seemed such an act of friendship and I liked the fact that Emily – whom I’d only ever got to know on line (I used to co-run a parenting forum), could send her starter across the country, in the post, and I could make bread from it.

It came. I tipped it into a Kilner jar, fed it for two days and opened the first recipe in Dan’s book, which was for white leaven bread. Dan’s recipes are deeply prescriptive: 8am, do this, 8.10am do that. They had put me off at first because it seemed you had to spend all day making bread. Maybe this was why sourdough loaves cost so much. But in fact it wasn’t so. It suited me perfectly. I found the bit that took the most time was the beginning, and refreshing the starter. Otherwise you hardly kneaded it at all – 10/15 seconds at a time. Leaving it to rest for 10 mins, 30 mins, an hour…it meant I could do it in between feeds/reading to my children/preparing dinner etc.

The first loaf I made I started just after school pick up, which is still the best time for me to make bread. I had already decided to be Master of the sourdough in terms of this: the final rise called for a time of 4-5 hours. I knew I could never stay up that long, so I decided to just leave it to rise overnight in a bowl lined with a teacloth on the concrete floor of the laundry room. At a temperature of about 15 degrees. I decided that the bread either had to cope with this, or it had no place in my life.

The next morning I got up and very clumsily took the bread off the teatowel, which it had stuck to, and wobbled it onto a cold baking tray (my technique finessed incredibly fast, fear not). Dan said an oven temperature of 220 for 50-70 minutes. After 30 minutes my loaf was frazzled.

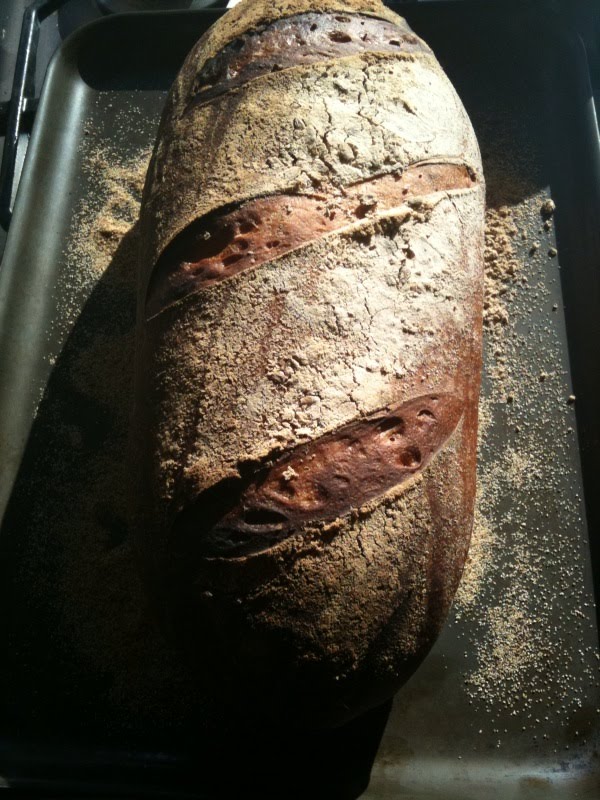
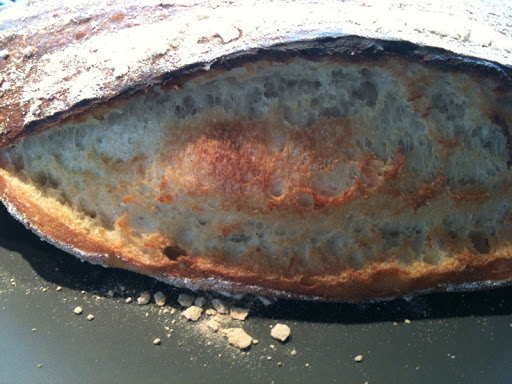
I was upset, of course, but as I cut into the loaf I realised that there inside was proper sourdough. What’s more, as it cooled, I realised the crust had this wonderful taste. I was so excited that I sent a picture of it to Dan (whom I don’t know, but I figured he’d not be too freaked out as we work for the same newspaper) and he replied saying he thought it looked great and it looked better than his first sourdough. He probably says this to everyone, but I chose to believe him.

We – boyfyhusband and I, not me and Mr Lepard – ate it with a poached egg (Burford Browns) topped with herbs from our garden. I almost died of happiness that morning. I told everyone, all day, all week, that I had made bread. With my hands. I think I sent a picture of my sourdough bread to everyone with an email address. Finally.

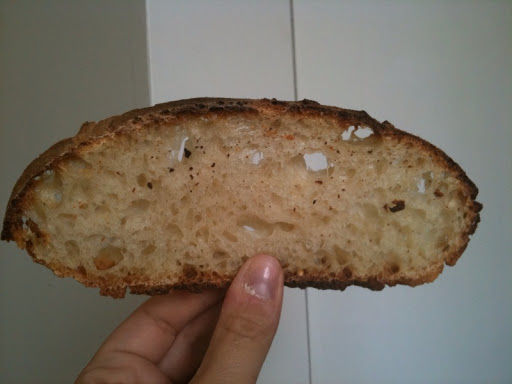
First ever sourdough. Look at that crumb! This was proved in a bowl lined with a teatowel for nine hours at 15 degrees. I didn’t slash it, I cooked it for 30 minutes at 220.
And it worked.

Mummy’s Chocolate Mousse

Chocolate mousse, detail from.
Chocolate mousse was a big thing in the Barbieri household when I was a bambina. Mostly, I have to say, because my mum would serve it in those saucer champagne glasses – the sort that very few people use now (they let the bubbles out too fast, but how long does one hold a glass of champagne for??) but growing up, in the 1970’s, you used to see them far more.
I fully intend to serve my chocolate mousse in those glasses just as soon as I can nick them from my folks’ house. In the meantime I serve them in little white pots – Gu desserts used to come in them when Gu desserts first came out.
 
Having a six year old meant it was only a matter of time before I’d have to revive the tradition of chocolate mousse. We used to have it only occasionally when I was a child, but these days, we have it after Sunday lunch, every Sunday. Rituals are important to small children (and me). This is also a great dessert to make in advance and stick in the fridge, so it’s one less thing to think about if you’re entertaining.  It uses raw egg, which I guess I must point out you shouldn’t eat if you’re pregnant/old/young/allergic to eggs. Etc. Otherwise, this is the recipe and how you make it. And yes I will stop talking about food soon-ish.
 
This is a bastardisation of my mother’s recipe and Nigella’s. I’ve tried many others but this makes for a really nice, light, mousse that has zero added sugar, has all the natural goodness of high cocoa content chocolate, has a good chocolate hit without alienated small children or making them fly around the room afterwards. 
You will need:
 
For four people (this makes quite a small amount, the idea is that you have a good hit of chocolate so you don’t need to pig out on it). It’s easy to double up on if you need more.
 
50g 70% cocoa chocolate (I use Waitrose Continental Plain Chocolate, 70%. I recommend you do too, it’s excellent).
50g 37% cocoa chocolate (I use Green and Black’s Cooking Milk Chocolate)
2 eggs at room temperature separated. It doesn’t really matter if they’re medium or large, whatever you have. Remember it’s the white of the egg that changes with the size of the egg, not the yolk. So it figures that if you use large, or extra large eggs you’ll have more white of egg, ergo more whisked egg whites, ergo more mousse…so it’s quite a good way of making less go further or ending up with a slightly lighter mousse. *
a pinch of salt
 
Put the chocolate in a bowl above a simmering pan of water. When melted, take off the heat and leave to cool for a few minutes. In the meantime whisk the egg whites in a clean bowl, until they’re stiff and you can turn the bowl upside down.
 
Beat the yolks and the pinch of salt into the chocolate mixture, then gently fold in the whisked egg whites with a metal spoon. I find it works better with a metal spoon.
 
Poor into suitable receptacles: small espresso cups, ramekins, small pot things and chill overnight or for a few hours. I’d personally not keep this for more than about two days.
* update March 2013. If I need to make this mousse go further, or I just want to make it lighter, I just add more egg whites.
A nice topping for this is the white chocolate cream.

Saturday morning pancakes

 Saturday morning pancakes. And yes I know I posted this on a Sunday.

I saw Jamie Oliver doing these on the television just before Christmas. He was making them with his two eldest daughters. I’m not short of pancake recipes, but I’ve never been wholly pleased with the result. Not least, most pancake recipes need you to rest the mixture overnight or for an hour. Despite being really organised in many respects, I just get annoyed at the thought of having to make pancake mixture in advance like that. But I guess I’d have been able to get a*** into gear if the result had been worth while. And, have I mentioned, it’s not been.

Three things struck me about the Jamie pancake recipe that made me want to give it a try:

1) Its immediacy: you mix it up and away you go

2) You don’t have to weigh anything, you just use a cup – any coffee or tea cup – and that’s the measure you use for both flour and milk, so it’s great if you haven’t got scales/can’t be bothered with them.

3) It has grated fruit in it. This could only be a good thing. Then I made them and they were so delicious that they’ve become a regular Saturday morning fixture ever since.

Here is the recipe:

One cup of self raising flour (update, to make these more ‘wholegrainy, I now make them with half a cup of self raising flour and half a cup of wholemeal plain and then add half a teaspoon of baking powder)
One cup of milk (I use semi skimmed since that’s what we get)
One egg
Pinch of salt
A nice pear or apple or banana

to serve: blueberries, maple syrup and live yoghurt. (Jamie’s recipe called for yoghurt and honey, I prefer to serve them slightly differently.)

Here is what you do:

Whisk together the flour, milk and egg. You can use an electric whisk if you want, or a hand whisk or even a fork. It doesn’t need much, just enough to make a smooth batter. Add the pinch of salt – I use Maldon sea salt. Take a nice ripe pear or apple and wash it, then great the whole thing into the mixture, peel and all. Jamie did it pips and all, I fish those out, or grate around them. Bananas work well too but it makes for a very strong banana flavoured pancake and we’re not so fond of them done this way in this house. Pears and apple are, I’ve found, the best. They impart a sweetness with no obvious presence. I don’t say this as one who believes you have to hide fruit from children. I don’t like subterfuge like that. But what I’m getting at is you end up with a really delicious pancake that just happens to have fruit in it.

Once the mixture is mixed together, heat a frying pan with a tiny bit of oil (I use sunflower, any relatively flavourless oil would do) and a tiny bit of butter. (You’ll need to repeat the oil and butter for each batch, but you only need tiny amounts.) Then I use two tablespoons per pancake and in my pan I can fit three in in one go. They don’t take very long to cook on each side – about a minute or so, just use your common sense – you’re looking for golden brown to fairly dark brown. Flip and repeat. I put mine in the warming drawer whilst I’m doing the rest but if you don’t have one then wrap them in silver foil or pop them in a very low oven. The whole batch is fairly fast to make and I’ve never had to ‘sacrifice’ the first few, like you do with regular pancakes. Using a true cappuccino cup (which I can measure if anyone is interested) I get about 12 pancakes done this way.

I serve with live yoghurt, blueberries and maple syrup and they are truly delicious and a great way to start the weekend.

ps: I’ve just enabled comments on this blog as I get quite a few emails/comments on Facebook. If you have a comment on this blog, please can I ask you put it here so I don’t look like Noddy Nomates. Thank you.

An addendum to this, written on 29th November:

I’ve since experimented with adding half wholemeal and half white self raising and it makes for a really delicious pancake, slightly nuttier in taste but not at all off-puttingly ‘worthy’. But it fills me up for longer because the GI (glycaemic index) is lower in wholemeal flour than white. If you can only find plain wholemeal flour, then add half a teaspoon of baking powder to the mix as well.