Monthly Archives: March 2020

Ratatouille and halloumi tray bake

This recipe came from an excellent and surprising source. My friend Lynda recommended it and it’s The Fast 800 Recipe book. But don’t let it put you off, honestly it’s become one of my most used and loved books for its simple, healthy, quick recipes which you can augment or add to if you’re not fasting. Which I so rarely can…This serves four which you can eat with lovely crusty bread if you’re not carb-avoidant. And who is these days? It’s surprisingly delicious. TBH I’m not a huge fan of ratatouille, or beans and yet this is…yum.

Ingredients

2  peppers – not green sorry, de-seeded and cut into chunks

1 medium aubergine or two courgettes

1 onion cut into chunks

3 tablespoons of olive oil

2 garlic cloves, peeled and crushed

Basil leaves, a small handful sliced into shreds (don’t cry if you don’t have)

1 x 400g can of chopped tomatoes

1 teaspoon of oregano (or use a tin of tomatoes with herbs)

225g block halloumi cheese – slice into eight

A tin of 400g of drained and rinsed cannellini beans

Method

Oven to 220C. Place the peppers and aubergine/courgette and onions onto a tray, drizzle on the olive oil, season with salt and pepper (but not too much salt as the halloumi is quite salty). Mix everything around and roast for 30-35 minutes, turning half way through if you can be bothered.

After this time, take out, stir in the garlic and basil, tomatoes + oregano and beans. Arrange the slices of halloumi on top and back in the oven for about 15 mins. I tend to give it a ‘top oven’ blast for a few minutes at the end. The halloumi should be lightly browned.

Scatter over more fresh basil if you remember and serve with a crisp green salad.

Pasta with roasted red pepper and walnut sauce

This is a super simple, super tasty little dish which you can prep beforehand and then, after cooking the pasta, assemble at the last minute.

Ingredients

3 red peppers (you can also use an orange or yellow one but the red adds a good colour; don’t use green peppers)

75g walnuts, lighted toasted

1 garlic clove mashed

1 tablespoon of pomegranate molasses (nice but not essential, I’ve made it without)

zest of one lemon

20g parmesan

pinch chilli flakes

25g chopped flat leaf parsley

four tablespoons of extra virgin olive oil

300g pasta – linguini or tagliatelle are a good shape here


Method

You need to roast the peppers for 30 minutes at 220C, and you can do this bit the day before or earlier in the day. Once roasted and cool, skin, de-seed and finely chop the peppers. As you can probably see from my pic, I chop mine very inaccurately and have tiny pieces and sometimes the odd larger piece. It is better if you take the time to really chop the pepper quite finely – so don’t be like me.

I’ve often thought about keeping the juice the peppers exude and mixing it into the pasta later, lessening the amount of oil, but confess I’ve yet to do it because I forget.

If you haven’t already, lightly toast the walnuts for five minutes but watch carefully because we know how readily nuts burn. Finely chop these too.

Once the peppers are all cooled and de-seeded and chopped, you can add in the rest of the sauce ingredients – which is basically all of the rest of the ingredients above save for the pasta. What I tend to do is do the peppers and walnuts and assemble the rest just before dinner time.

But whichever you do, at some point, you need to mix together the other ingredients to make the sauce and then season it. I forget to season something and it’s also okay. The chilli flakes lift it but I add those over the plate as my children don’t like them.

Cook the pasta, or have it cooking whilst you mix together the sauce. Then when the pasta is ready, drain, plonk into a big serving bowl and put the pepper sauce on top. Serve with extra parmesan/chilli flakes if you like. Voila.

Super fluffy pancakes with cherry berry compote

There are a few reasons this blog exists. Doing the day job I do, it’s nice to have somewhere to write fluffier (all puns intended) pieces. It’s a nice repository for recipes I’ve tried and liked (hence all the notes to myself, at times) and it’s also somewhere for my children to look up family recipes.

I didn’t have that. All the things my grandmothers (nonne) or zie (aunts) made have gone with them. My mum is still alive, thank goodness, but she now doesn’t really remember what she put in what. None of my female relatives ever wrote anything down. (The men in my family didn’t tend to cook. Although my dad made the best fried eggs and he did show me his tricks!) Perhaps they didn’t have time, perhaps they wore the whole “I don’t follow a recipe” thing as a badge of pride. Perhaps it helped them regain control in a world where they they had little control, with no economic independence (not talking about my mum here but those before her) and having to push out baby after baby all in the name of religion. Perhaps having ‘no recipe’ to follow meant that, were they mightily pissed off, as they must have been at times, meant they could at times sabotage things. Adding more or less of an ingredient that someone did/didn’t like.

You take it where you can.

But I am lucky. Thanks to my feminist mum I am financially independent but I do need to follow a recipe and as my eldest starts to grow up, and thoughts of her leaving home settle on the horizon, it’s nice to think that she can, should she so wish, look up recipes for things she enjoyed at home.

These super floofy pancakes as we call them are beloved of my youngest who isn’t a fan of super thin crepes or my oatmeal pancakes so occasionally I make these just for her and every time I have to hunt the recipe (originally from BBC Good Food) down.

Ingredients (This recipe makes enough for about ten regular sized pancakes, enough for three of us, if you want an abundance or there are more of you, then make double. The mixture keeps happily in the fridge for a day or two).

for the pancakes

175g white self raising flour, don’t even think about adding wholemeal here

1 teaspoon of baking powder

A sprinkle of cinnamon

1 teaspoon of caster sugar

1 large egg

75g of buttermilk or yoghurt

165ml of milk

for the compote if you wish

A tin of 150g cherries and berries in natural/light/syrup – don’t sweat it you can work with any of it. You can of course also use fresh or frozen berries if you have them, just cook the latter for longer. If using fresh add a tablespoon of water into the pan.

Method

the compote

Empty the tin of cherries and berries into a saucepan and warm through until gently bubbling. Depending on the juice the berries came in you may need to put half a teaspoon of cornflower to thicken it up. What you want to ideally end up with is a thickish syrup. Tinned fruit takes the least amount of time, fresh a bit longer, frozen the longest. None of it should take too long though, you want the fruit to still have shape but be soft and the syrup to be thickish.  Set aside to eat in a moment. I make the pancakes whilst this is bubbling in the background.

for the pancakes

You literally just tip all the ingredients into a bowl one by one as they are listed and give it a good whisk until there are no lumps or bumps.

Heat up a skillet or frying pan, I dribble a tiny bit of oil on and then brush the pan with my silicon pastry brush. Note a natural pastry brush will melt so don’t do that. You can just try to get the oil to cover the pan. You really don’t need much oil at all. Perhaps on a non stick pan you need none at all, but I don’t use non stick pans.

When the pan is hot, you dollop about two tablespoons (I have a small ladle from Muji which is perfect for this) onto the frying pan, on mine I can do three pancakes at a time. They don’t need much time at all to cook, maybe two mins per side. I like how the second side tends to puff up as you turn onto it.

HipstamaticPhoto-605271267.053553 2

I have mine with Greek yoghurt and the compote, my daughter has it with chocolate hazelnut spread, my husband has his with compote, banana and chopped nuts. My eldest doesn’t like them.


All about the crust

I make bread almost every day. I put it in for final fridge-proving overnight and get up early (with the oven on a timer so it is up to temperature by the time I get up and a baking tray in the oven so that the raw dough goes onto a hot tray) to bake it.

I know. How lucky is everyone in my house.

There are many great things about baking your own bread but you can also custom-bake the crust so it suits you/what you’re going to use the bread for.

I usually bake sourdough bread at 220C for thirty minutes. This is how I’ve been doing it for years and it affords time for the bread to bake, and cool, in time for making sandwiches for packed lunches. And the first packed lunch leaves the house at 7.30am so you can perhaps work backwards and work out how early I get up.

(No-one makes me. I like to get up early and as the bread bakes I tidy up and get ready for the day.)

The crust on a 30 min loaf is quite thin, golden brown, it wouldn’t stop the room at a party but it’s good for anyone who can’t, or doesn’t like, very crusty bread.

But lately I’ve been craving really thick, dark, chewy crusts. To do this you need to bake for about 45 mins minimum but the longer you go the thicker the crust.

Of course if your oven is too hot it will also be too burned so you need to play with the temperature. However, what works for me is this:

250C ten minutes

220C twenty minutes

down to 200C for another ten if it’s looking too burnt, if not keep it at 220 for another ten minutes.

Yes I know this is 40 mins but timings are really tight in the morning which is why I blast it with a 250C heat to begin with.

My shelf is on middle and my oven is on normal oven (not fan) setting

The crust is amazing. I love it with butter and apricot jam.

I also stick an ice cube on a tray under the bread to allow for maximum oven spring (rising). Nothing beats the bread when it’s first baked – but cooled as I hate hot bread – and I will fight anyone for the crust-end, or ‘il culo’ (the bottom) as we say in Italian.

Chocolate rye cookies

The desire for these was fuelled after visiting the excellent Wooster’s Bakery in Bury St Edmunds. There is, to my mind, only one bakery which tops Wooster’s for excellence and that’s Pump Street Bakery in Orford (there used to also be an outpost at Snape Maltings which has gone much to my chagrin). If you ever go to Wooster’s be sure to buy the morning buns. If you ever go to Pump Street the gibassiers are what I aim for.

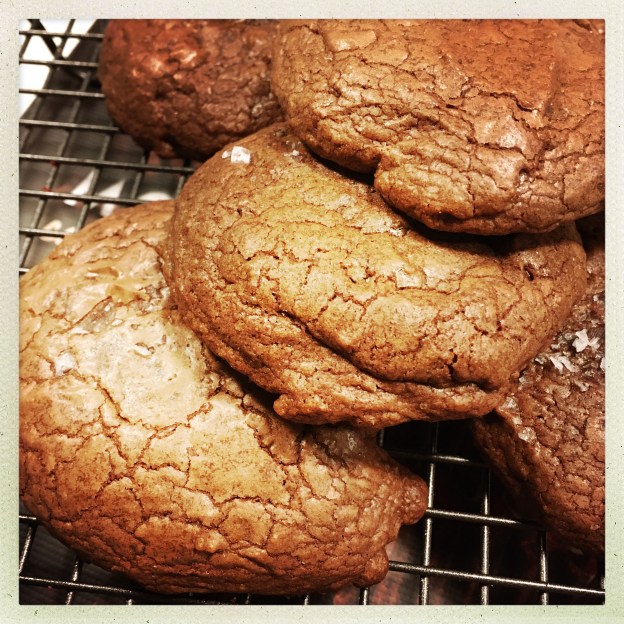
We went to Wooster’s the other day and I saw giant chocolate rye cookies. But as I was busy ordering a morning bun I didn’t feel I could also have a giant chocolate rye cookie.

But I thought of the rye cookies all week and finally gave in and made my own after looking up a ton of recipes on line. It also helped use some some of the staggering amount of chocolate I’d accumulated in the house.

This is an alteration to a Donna Hay recipe, I adapted it have it contain rye flour: you can up the quantities of rye to normal flour if you want to but I do half and half. Try not to look at the terrifying amount of chocolate there-in and the butter. When I melted the chocolate and butter together one of my daughters said: “there’s a heart attack in a bowl”…this made about twenty cookies. I like to think it spreads the risk. You can of course make them even smaller. I’m afraid I ate nearly three on the day I made them for testing purposes. This I don’t recommend.

I also used a mish-mash of chocolate I had in the house, even including some with pretzel pieces in it. I think as long as you don’t veer too far from half of the chocolate being around the 70% mark you can’t go too wrong. You could also bung in some nuts if you wanted to. (I think macadamias would work really well or pecans or…) But these are perfect, and very popular, just as they are. Don’t be temped to overcook them. They come out of the oven looking very soft in the middle but they harden up.

250g unsalted butter cut into a few pieces

400g of chocolate varying from 40-70% (but you know, if you have a bit of 30% don’t sweat it but you don’t want to go too milky for too much of it). Don’t go too high either and definitely no 100%, this isn’t a masochistic biscuit.

4 eggs

220g granulated (note granulated) sugar

175g soft brown sugar

(this is a lot of sugar, I know. In time I may experiment with lowering it slightly but these are biscuits and if you muck about with the sugar quota too much the biscuits won’t have the proper structure)

Two teaspoons of vanilla extract

150g of plain flour (you could also put a bit of wholemeal in there if you fancy a ‘meatier’ biscuit)

150g dark rye flour

sea salt

Oven to 180C – I used fan so I could bake two trays at once.

Melt the butter and all the chocolate in a large bowl in a bain marie or in a bowl atop a saucepan of simmering water.  Take off when nearly all melted and continue to stir until smooth.

Whisk together the eggs, all of them, the sugars, both of them, and the vanilla. I confess I did this in a freestanding mixer whilst the chocolate was melting because I’m lazy and like leaving a trail of melted chocolate everywhere. I whisked it for quite a long time, very absent mindedly, on low. When the chocolate has melted set aside for five minutes whilst you get the flours together.

Then, add the chocolate to the eggs/sugar mixture – mixing all the while, gently. Now add the flours a tablespoon at a time.

Now put this in the fridge for ten minutes and line your baking sheets with parchment and find an ice cream scoop or a two -ablespoon-measure or similar.

After ten minutes in the fridge, take out the mixture and, using your scoop or spoon, dollop your cookies one at a time on the baking tray which has been lined with parchment. I did six on one tray, five on another. Don’t over cram them. Sprinkle with sea salt before they go into the oven, don’t panic if you forget – you can do it when they are just out or omit it all together.

Put the mixture back in the fridge whilst you bake the cookies for 8-9 minutes (know your oven but do not overbake). They come out and seem quite molten in the middle. Don’t panic.

I use reusable baking liners so I need them asap after the first batched has baked so I very, very carefully fish-sliced the biscuits off the tray onto the cooling rack, placed the baking liner back on the tray and loaded up again from the cookie mixture just out of the fridge. If you are not so confident, then either give the cookies ten minutes on the tray to firm up before transferring to a cooling rack. Or if you are using re-usable baking parchment slide the whole thing onto a cooling rack with great adeptness, tear off some more parchment and start loading on more cookies to bake.

My eldest, who accompanied me to Amsterdam last year, said these were on a parr with the Van Stepele cookies.

Don’t have a heart attack.