Category Archives: Birthdays

Home made bourbon biscuits

Although I make almost all the biscuits and cakes we eat, I do think there are some things that are just better shop bought. Shop bought custard creams are just what they are and impossible to replicate at home. (This doesn’t mean I won’t try but I won’t expect to get them to compete with shop bought and compete is the right word here.)

But a few weeks ago, I was out for brunch and gossip a very important business meeting with my friend Fiona Hughes and we went to the Orchard Cafe in London’s Holborn.  On the way out, after we’d devoured extremely good scrambled eggs with home made bread and smoked tomato ketchup, I spotted a giant bourbon biscuit, filled with salted caramel goo.

Now. I don’t eat biscuits and cakes ‘n’ stuff like that, during the week, only at the weekend. And as this was a Tuesday, I couldn’t justify it.

However, because I am a greedy thing at heart, the memory of these biscuits scratched away at me, like a sticky out label on a T-shirt, and eventually I decided to try to make my own.

I finally found a mention of an edition of Jamie Magazine that had a recipe for home made bourbon biscuits and so determined was I, I tracked a back issue down, paid for it and waited for it to arrive.

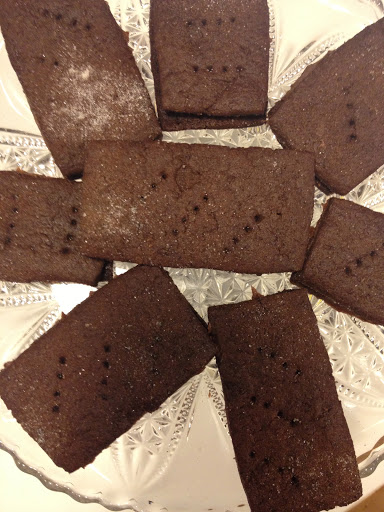
These biscuits are great. Really, really good. I do of course want to get a specialist rectangular cutter and maybe a Barbieri stamp. [Update: believe it or not, I now have both of these.]  But until then, I just cut a line of these, and then cut the rectangles by hand. It made for a very artisan finish but no less impressive.

You need:

For the biscuits:

50g soft butter, unsalted
50g soft brown sugar (I used dark)
1 tablespoon of golden syrup
110g plain flour
20g good cocoa powder (don’t go using any of that ‘bad’ stuff)
half a teaspoon of bicarbonate of soda
a bit of caster sugar for sprinkling

For the filling:

75g icing sugar
50g soft butter
1 tablespoon of cocoa powder
1 teaspoon of cold, strong coffee (use milk if you don’t like coffee, but the coffee really, really adds something)

Put the oven on to gas 150C. You need a baking tray lined with baking parchment.

Either cream the butter and sugar for the biscuits by hand, or use an electric whisk (the recipe calls for latter, I did former). Do this until pale and fluffy. I love the word fluffy.

Then beat in the golden syrup using a wooden spoon (even if you’ve used an electric whisker you’re now instructed to STOP and use a wooden spoon and put your arms to work). Then sift in the flour, cocoa powder and bicarbonate and beat into an even dough. You may need a few drops of milk. Try not to use it but if you do, literally put the milk in half a teaspoon at a time, you want a fairly dry, low hydration dough not something really sticky.

Turn it out onto a piece of baking parchment and top it with more baking parchment so you roll it out between two sheets of baking parchment. Roll until about 3mm thick. Because you want the biscuit to be crisp, don’t make it too thick, although you can’t make it too thin either. Get the ruler out, this is biscuits for goodness sake. It’s important to get it right.

Cut the dough, however works for you, into about 24 fingers of about 5cm x 3cm. I cut long rectangles and then cut into smaller rectangles. Place on parchment lined baking tray, with about 1cm gap in between (they do rise a bit but not much). I prick with a fork for a birruva pretty pattern.

Sprinkle with caster sugar and cook for 8-10 minutes. Make sure they are cooked, not soft as they won’t harden up much and you really do want these to be crispy not cakey. But of course, don’t overcook (am I being too bossy? I want you to get these right you see).

When done, wipe the sweat from your brown, transfer to a wire rack etc. Cool.

For the filling mix the sugar and butter together, add the cocoa powder. At this point it will look pale and unpromising and you may start to panic. Have faith! When you add the milk (a scant teaspoon, just to bring everything together), it will go dark and glossy and glorious and you will be SO pleased with yourself.

Spread on one biscuit, sandwich with another. Daintily arrange. Eat and be amazed.

A white chocolate lolly ‘cake’

I don’t even like white chocolate, but let me tell you, these were so good I almost ate them all in ‘quality control’ before the actual day.

Yesterday was my eldest daughter’s first holy communion. I made her a cake made entirely of white chocolate lollies. Since first experimenting with chocolate lollies last year, I’ve really moved on with them and by investing in a few things: proper moulds, sticks and a stand, you can really make something quite simple and easy to make (but ssssh, don’t tell anyone) into something that looks spectacular.

I made these the day before, and just assembled them on the day (i.e. slotted them into the holes in the stand). Once I’ve had an alcoholic drink, my guests have to pretty much fend for themselves so anything that can be pre-made plays to my great organisational skills and my weakness for being a dreadful, drunk, host.

I usually make chocolate lollies in 70% cocoa chocolate. But a few months ago, my friend Lucy (who is the only person in the whole of East Anglia who possibly has more baking gadgets/biscuit cutters than I) mentioned that she had made some lollies in white chocolate using crystallized violets. I stored this bit of information away in my brain, thinking white lollies would be lovely for a holy communion, instead of a cake, say. We had some crystallized violets that my partner and the girls had made for mother’s day (every aspect of that sentence sounds smug, but I don’t mean it to), I used Green and  Black’s white chocolate (which is, I have to say, absolutely superb). And this is what I did.

Melted the white chocolate.
Poured it into the moulds.
Put in lolly sticks.
Scattered on some crystallized violets or freeze dried strawberries (from Waitrose, they come in a tube, in the baking aisle).
Put in fridge to set.
Removed from moulds after a couple of hours.
Tasted one for quality control purposes.
Decided they were so amazingly good I had to have more.
Cycle to Waitrose to buy more white chocolate.
Repeat process.
And then, when time comes, slot the lollies into the holes in the stand and da-dar.

A note about the stand. I bought mine from Amazon. It doesn’t appear to be sold anymore, but I’m looking out for other stockists as it’s really lovely and minimalist and classy.

Pate de fruit

Fruit pastilles or pate de fruit. Not chewy, just soft set jellied sweets. Mmmm.
Each Christmas my eldest and I make Christmas cards that you can eat, or use. You know the sort of thing: gingerbread men, bath bombs etc. To give out to her school friends. I get an inordinate amount of pleasure from making cards with my daughter. And it’s very useful deadline-avoiding fodder. Please don’t let this make you tense, it’s not everyone’s idea of fun, but it is mine. (Even as a child Id make cakes to avoid doing homework. Then I’d flog them to my dad who had a café.) 
So anyway. This year I had the fanciful idea of making a sheet of fruit pastilles, then cutting them into Christmas tree shapes and putting them in clear front photo bags (I got them in bulk some years ago, which was in part what started this Christmas card project thing as I was determined to find a use for them). 
This was the idea anyway, making Christmas tree shaped red fruit jellies. In the end, I realised that you’d need an enormous amount of fruit to make the number of fruity Christmas trees we’d need, to enable her to give one to each of her school friends. I’m keen, but not that keen. 
But I made the fruit pastilles anyway and cut them into cubes. If you fancy whiling away half an hour, these make a pretty present (although they don’t really last long) and are intensely fruity (don’t expect Haribo chewiness, these are like fruit jellies, or pate de fruits). I haven’t yet experimented with other fruit but I know people who make them with all sorts: rhubarb, apple, blackberry, mango etc. The only thing I will suggest is that you think of the final colour and use the fruit accordingly. You want something that looks appealing so if you use a wishy washy coloured fruit (apple, say) don’t let it dominate. Personally I think berries are ideal as the main ingredient.
This is what you need:
Some fruit – you really need to start with about 300g of it to make this worth your while. I used raspberries and apple for the ones here. About 90% raspberries to 10% apple.
Preserving or jam sugar (the one with pectin in it)
Put the fruit into a saucepan – chop up if necessary. Obviously that doesn’t apply to berries and if you’re interested I used frozen berries.  Squeeze some lemon on them, I squeezed a wedge on my 300g of fruit. It doesn’t have to be precise, as you can probably tell.
Cook over a gentle heat until sludgy. If you’re using a mixture of fruit (say, like I did apple and raspberry) you may want to start the harder fruit off first. Cook until mushed up. Towards the end, I help break everything up with a stick blender.
Now, take off the heat and sieve into a bowl or other saucepan. Be aware you’ll need to weigh the resulting puree. If you have chickens, you can feed them the sludge left in the sieve.
Whatever you’re left with, weigh it and add the same amount of sugar. I think I was left with about 150g of fruit puree so I added 150g of the preserving sugar.
Put the puree and sugar in a saucepan, and heat gently. Stir until al the sugar is dissolved, then keep heating gently for about 30mins. Stir occasionally. You know it’s done when it’s thickened and if you take a spoonful out it will dangle off the spoon as you drip it off (this will make sense when you do it) instead of just falling off. You want it to be glutinous.
Line a suitable tin/tray with baking parchment. I used the bottom of a loaf tin. It’s easier if you have nice straight sides as they’ll be less to cut off and straighten up later.
Put in the fridge and let it cool. Mine were done after about three hours. You can leave it overnight.
Turn out onto a chopping board. It should be one solid mass. Tidy up the sides but cutting (I use them as fruit snakes), and cut into cubes or whatever damn hell shape you want. Roll in caster sugar and let them air dry for about an hour to set. Personally I store them in the fridge as they can go a bit sludgy (gosh, I’ve overused that word today).

Lovely little cakes for a celebration

The perfect, je pense, small celebration cake.

I first came up against the possibility of making a ‘celebration cake’ when my eldest was baptised at eleven months. I’d seen (and heard) of heroic cake making efforts by other mothers. It usually involved icing. And I’m no good at icing. Not that fancy pants icing that is all super smooth and then you  make little characters to stick on the top.

This isn’t me being coy. I’m pretty fucking fantastic at cooking (look, I’ve long said: there is no immodesty in the truth), and baking in particular. But I know my limits, and mine don’t reach to the royal icing aisle (I don’t really even know what royal icing is, please don’t try to tell me either, I’m not listening).

I knew that I could make some pretty good cakes but they weren’t really up to ‘celebration standard’. So I decided to make lots of little cakes instead, figuring that if a few got spoiled, it wouldn’t really matter. I guess the same thought goes behind laying carpet tiles, the wretched things. So, for the baptism, I made some fairy cakes with fondant icing and iced my daughter’s initial atop each one. And, for extra flourish, put a silver ball – those tiny things that break your teeth- on top. I say this, contained in a cuppla sentences, but the reality of it involved several packets of icing sugar, a neighbour’s flat (thanks Sarah) and lots of beads of sweat on the forehead. Fairy cakes tend to cook to a peak – no good for a smooth finish. So each fairy cake had to be beheaded. This involved lots of eating of the remnants. Anyway, the important thing – of course! – is that they looked spectacular all piled up. People could eat one or two or FOUR (that was my brother in law).

They were an enormous, runaway, apron-lifting-in-triumph success.

Ever since then, for big gatherings, I’ve made lots of little cakes. As my eldest got older, and I acquired cake stands, I started buying things to go atop the cakes, like little roses. By the time my second was born, and baptised, I was on a roll. For that, I made the same cakes you see  here, but with a brown paper cases, which worked really well – not least you can’t see the drips of icing, not that you get many with this glorious icing.

This is a Nigella recipe, hidden in the depths of one of her books, there is no picture to accompany it so you may have missed it. Now is its moment.

Chocolate cupcakes

Nigella says this makes 12. I say it makes 14 and it’s better to make 14 as you don’t want them too high up in their cases (see later). However, because most bun trays come in 12s, this means you have to make the last two separately. You decide if you can be bothered…


The little cakes

110g unsalted butter
155g dark muscovado sugar (the original asks for 225g)
1 large egg, preferably from your own chicken (arf arf)
half a teaspoon of vanilla extract
50g dark chocolate (70% cocoa), melted and cooled
100g plain flour
half a teaspoon of bicarbonate of soda
125ml boiling water

The ganache

175g dark chocolate
75g milk chocolate
200ml double cream
half a teaspoon of vanilla extract

Note: in my experience of making these cakes, which is extensive…this makes far too much ganache.

But that’s okay because you can chill the extra and use it to make Chocolate Ganache Hot Chocolate.

Preheat the oven to 180C. Line your (deep) bun case with 12 muffin cases.

Cream the butter and sugar together. Add the egg and vanilla, Fold in the melted/cooled chocolate, alternate flour and bicarb with water. By that I mean, put the bicarb in the flour, then put a spoon of that into the cake mixture, stir, then add water, then more flour etc. Do not over beat them. I don’t know why, I’ve never dared trying to overbeat them.

This is the ideal height for the cooled cake, so that you can slap on a good layer of chocolate ganache.

This is a fluid mixture, like a batter. Carefully spoon mixture into the cases. I’ve found that it’s best to fill to about 2/3 full which is why you might find you could easily make 14. It’s up to you. If you make 14, you fill them up less, and this leaves more room for the icing. However it’s a faff to leave some mixture and then have to put in 2 extra. So up to you. The icing still works beautifully with a fuller cupcake.

Cook for 30 mins, leave to cool.

You make the icing by shoving all the ingredients into a bowl atop a saucepan of simmering water, melt then whisk til thick (it’s pretty thick anyway, so the whisking is almost unncessary). When the cupcakes are quite, quite cold, take one in a quivering hand and take a spoon, dip it into the icing and spread over the top as thick as you can get away with. Leave to cool, but don’t put in the fridge.

Eat as soon as possible, and that’s an order..

Here they are all lined up, ready to perform.

Mint choc chip ice cream

 Mint choc chip ice cream. I know this isn’t the best picture in the world but it was hard to get a six year old to keep still. It’s presented in a mini cone. 

Here’s the gelato in a bowl. See how delicate the colour is? You can also see I have a LOT of stainless steel in my kitchen!

This is my current favourite ice cream. I would never buy mint choc chip ice cream, because it’s just not my thing, but this home made version is, I promise you, delicious. Unless you really hate the taste of mint, but even then I’d urge you to give it a try.

You can easily leave the chocolate out, but together this makes for a near perfect ice cream in my blog. Which this is.

I tend to make my ice cream in small quantities as the fresher it is, the nicer it is. By all means double or treble the amounts, it’s easy to do. This makes about half a litre, which I find is ample for four greedy people.

375ml of cream and milk. You need cream AND milk. Don’t be tempted to use one or t’other because to make ice cream you need both (i.e. not just this flavour). This has something to do with the way the fats mix up and interact. Don’t ask me cos I never listen properly when my dad tries to explain it to me in the same way that I still don’t really understand about what that white powder is he’s given me to put into sorbets. Because I never have whole milk in the house, but I nearly always have double cream, I tend to use 250ml of double cream and 125ml of semi skimmed milk. If you have more or less of one or t’other don’t worry. I’ve also done it with 300ml double cream and 75ml semi-skimmed milk. You get the idea.
15g mint leaves. Don’t be tempted to use anything else, such as mint flavour. Urgh, forget it.
70g caster sugar
1 egg
50g 70% cocoa chocolate if using

In a blender or food processor (I use the little chopper attachment on my Braun MultiStick thing), blend together the milk, cream and mint leaves. The mint leaves should go down to tiny pieces, but don’t over do it or the cream will curdle (however, you’d have to be really stupid to go this far). Pour the whole lot into a sauce pan, and bring to just below boiling point. Turn down the heat and simmer for 5-10 mins. Don’t let it boil, stir it a bit. You’ll see the cream/milk mixture become infused with the mint colour and it will go to a lovely green colour. However, it won’t be that lurid dark green pretend-mint-colour you get in shop bought ice cream. Think Farrow and Ball hues instead.

Turn off the heat and let it cool for a bit. Now you can either strain it so that the leafy minty bits stay out or leave them in. Try both and see how you prefer it. Obviously one will give you ice cream speckled with tiny green bits, one won’t. Perhaps if you’re adding the chocolate then having the mint in as well might be overkill.

Whilst that’s cooling, get a heat-proof bowl (important) that will fit over the sauce pan (important) and take the whole egg (not just the yolk, which is usual in custard-base ice cream) and whisk up with the sugar until it’s light and thick. Then slowly mix in the (sieved if you’re going to) milk/cream/mint mixture into the egg/sugar mixture. Pour some water into the pan which just had the milk/cream/mint mixture in (doesn’t matter that it’s dirty you’re not drinking it) and place the bowl containing the ice cream mixture on top. The idea is to make custard, so stir as the water underneath boils, and keep stirring until the mixture coats the back of a wooden spoon, which it will do pretty quickly really. Whole process should take about 5-10 mins. Now you’re done, so take the bowl off the sauce pan, let it cool for a few minutes then cover the actual surface with cling film/baking parchment. The reason you need it to touch the actual surface is so a skin doesn’t form.

Let it cool for about an hour, then put it in the fridge. You can keep it for up to 24 hours before making ice cream but once it’s cooled right down in the fridge (say a few hours) then you can whack it in the ice cream maker.

Once that’s churning, chop the chocolate really small. I sort of semi shave it. When the ice cream has finished, you can just stir through the chocolate. The ice cream will be pretty soft still as all ice cream out of an ice cream maker is soft-ish. Either eat it now or put it in a freezer container and let it harden up more for later.

If you want to read about ice cream makers you can do so here.

Chambord

About three years after our eldest was born, I bought my boyfyhusband a cocktail shaker. I searched very high, and very low for one that looked good and would last and finally found it at Alessi, that Italian design emporium that produces some truly wonderful, but also truly awful, designs.

alessi-cocktail-shaker
 This the 870/50 Alessi cocktail shaker in 18/10 matt stainless steel which at the time of writing costs £63. It’s worth it.
 

Thus Friday nights became cocktail nights.  At the end of every week, when our daughter had gone to sleep and I was reasonably sure she wouldn’t want a feed til morning, I’d indulge in some beautiful, hard liquor.

Now my favourite cocktail has always been a vodka Martini, straight up, with three olives. (No idea if shaken or stirred since I never make my own, I just say “my usual” and it’s made for me.)

I love Martinis so much that I wrote it into my birth plan that immediately after the birth of our second daughter, and whilst I was waiting for placental transfusion to stop (the cord to stop pulsating) I was to be offered a vodka Martini. And indeed, I was.

But with a cocktail shaker comes the need for a proper cocktail book. Again, here is a field that is saturated with offerings but I went into a proper old fashioned book shop (okay, the Selfridges book department) to select. I ended up choosing Drink.ol.o.gy, which is a neat little tome with no pictures but lots of smart writing and a very comprehensive list of recipes. It’s the cocktail book I’d recommend still.

What has any of this to do with Chambord? Very little directly. Except when you get into making cocktails you do need to start thinking about having something very grown up: a well stocked drinks’ cabinet. And in that cabinet appeared a very ornate bottle of ‘black raspberry liqueur’ aka Chambord.

The Chambord bottle is hideous, all plastic, gold coloured ornateness topped with a crown. The sort of thing the Pope would drink, if he drank, and he should if he doesn’t. I’ve heard that people feel the bottle is so ‘special’ they don’t know what to do with it when it’s empty. So instead of putting it in the recycling bin, they donate it to charity. Chambord made a feature of its bottle last year, releasing a very limited edition of one jewel encrusted version for $2million.

The world’s most expensive bottle of booze.


Chambord is an excellent liqueur. You can make all sorts of complicated cocktails with it (the website tells you how) but I like it best splashed into the bottom of a glass of fizz. It can turn even a humble Cava into something rather tasty and lovely. It’s very easy to drink and of course you’ll get drunk quickly. But it’s raspberries so it’s one of your five a day.