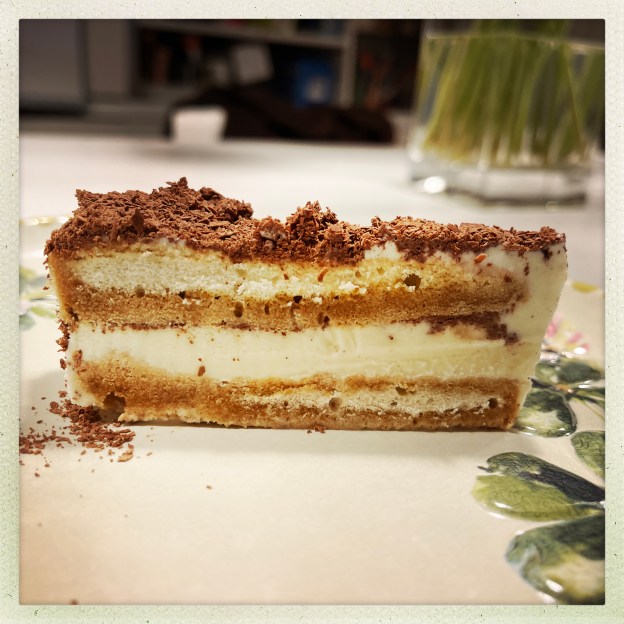
I have dragged this from the depths of the annals of Pane Amore e Cha Cha Cha as it deserves its new time in the spot light. This is ridiculously easy to make and you can kinda make as many layers as you want – just add more of one thing or another.
Ingredients
65ml espresso/strong black coffee 30ml marsala/sherry or Kahlua A packet of sponge fingers, you may or may not use them all Some vanilla ice cream, I used a tub of Yeo Valley Organic Madagascan Vanilla or about half of one batch of this home made stuff About 50g of grated dark chocolate – but I now use hot chocolate flakes which makes the job SO MUCH NICER.
Line small loaf tin (about 6″ x 4″) with some parchment paper.
All you do is mix together the coffee and liqueur. It’s easier if you put it into a shallow bowl. Then briefly dip each sponge finger in, front and back, and lay into the tin. When you’ve covered the base then spread on the ice cream – if you’ve made home made ice cream it’s wonderfully easy to do this at the point of making as it will be ‘soft serve’, otherwise just let your ice cream chambré a bit before using.
On top of the ice cream layer sprinkle on the chocolate flakes, then repeat: soaked sponge fingers, ice cream, chocolate. Finish with either a layer of soaked sponge fingers or ice cream/chocolate flakes. See how you go.
Cover the tin with cling film and freeze. I like to slice these about three hours after it’s been in the freezer so when you want one you can just coax it away from its mothership and easily have a slice. It can become difficult to slice if it’s been in the freezer for ages few days. But if you plan to serve it as a whole dessert then turn it out and leave it at room temperature (I mean be sensible here if it’s 40C then give it less time) for about 15 mins, slice and serve!
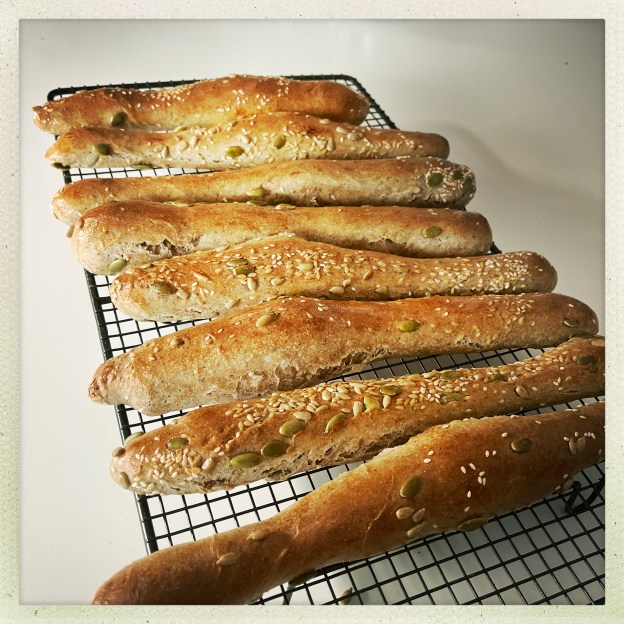
Fair warning that this isn’t a new recipe. I first published it here, but it’s a little hard to find and, in real life, I refer to it a lot so I thought it needed a renaissance. Plus I don’t use a bread machine anymore. But these, made into breadsticks, are my new breakfast obsession.
The idea came because last week after recording a podcast in London, which took an enormous amount of brain power, I had an excellent and enormous chicken salad sandwich at Honey & Co and even though the sandwich was enormous, and fancying something else (but not able to eat cakey things) I spotted a big fat doughy bread stick covered in seeds. I bought it and it was delicious. I managed to save half – the restraint – for my breakfast the next day.
I would imagine that the Honey & Co breadsticks may have been a chollah dough but not sure. It was ‘sweet’ (relatively speaking) and rich and I determined to recreate when I got home.
Which I did the very next day using my years’ old enriched dough recipe.
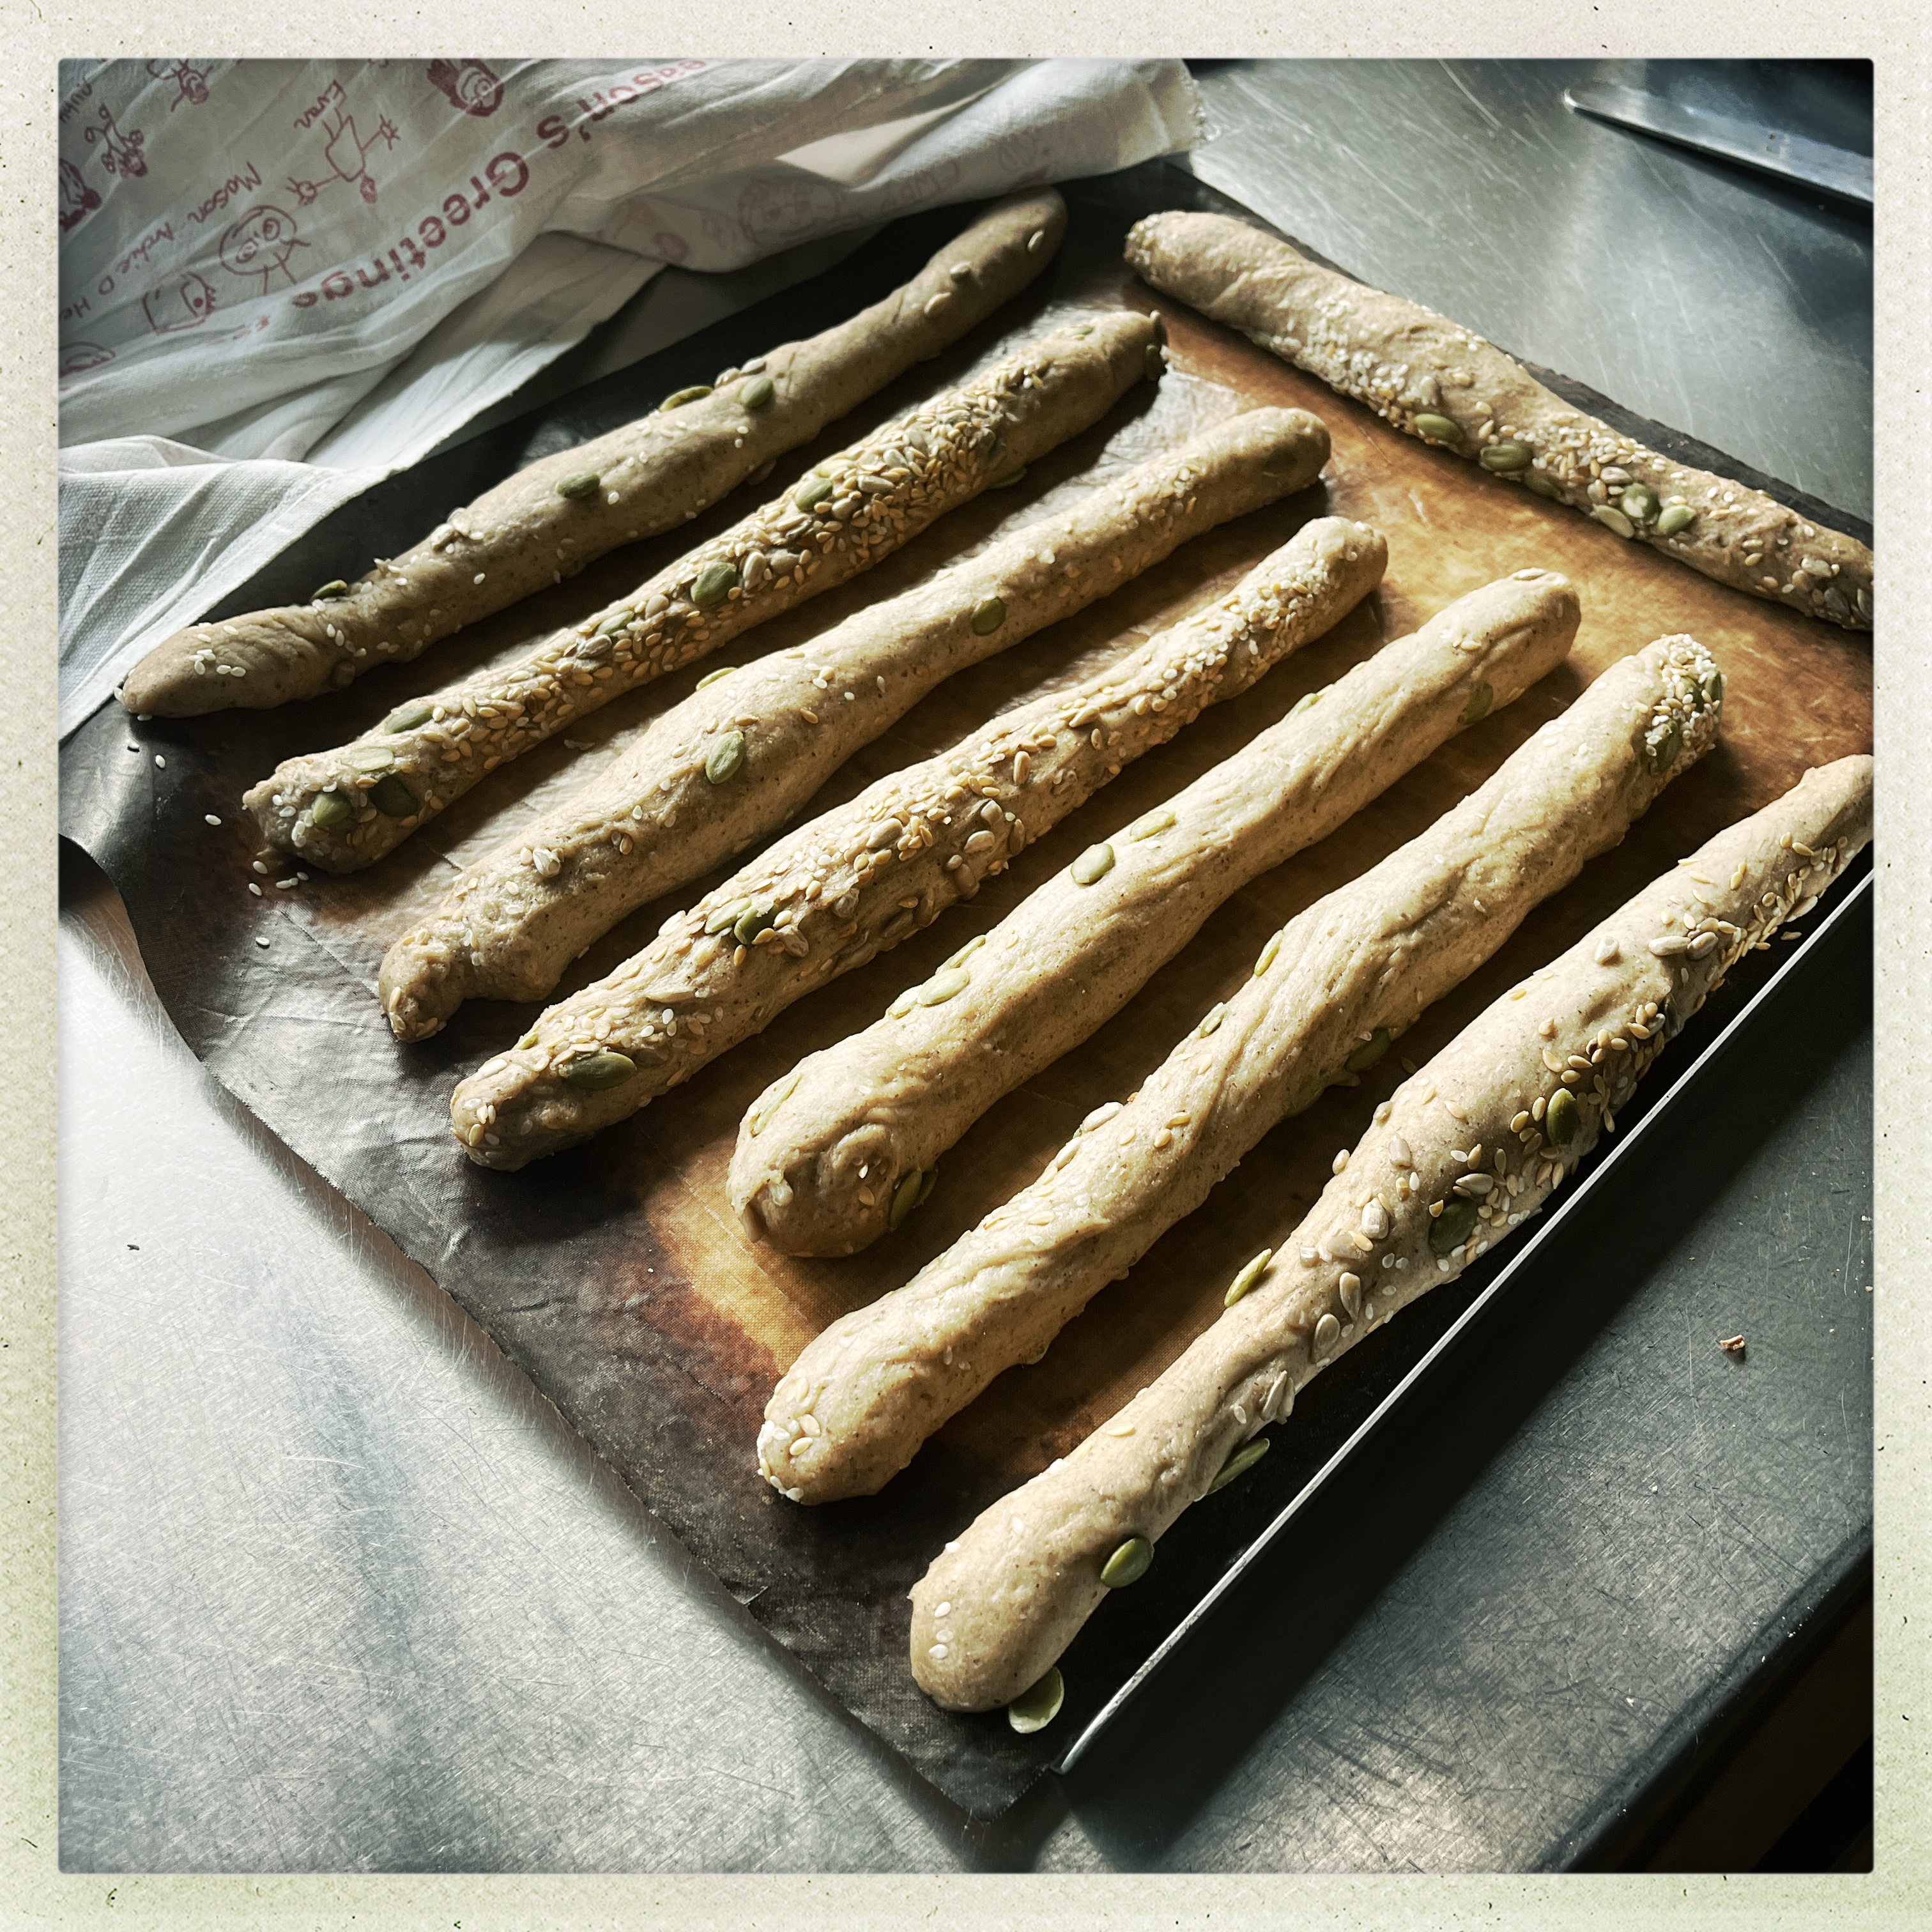
It works very well. You can easily halve this dough, or augment it further but this, for us, makes eight breakfast brioches in mini loaf tins (I use this one and it’s fab) or you could use it to make two ‘stollen’ shaped loaves or I make eight seeded bread sticks.
Ingredients
A teaspoon of dried yeast (I use Dove’s Farm)
500g strong white bread flour (if I want to make these healthier I sometimes add a proportion of wholemeal. I have gone as high as half and half but you do lose something, so 150g wholemeal/350g white is a good compromise)
Two tablespoons of milk, dairy or plant alternative. I use oat
A teaspoon of salt
2 eggs
170ml water
Inclusions: see below.
Beaten egg or milk to brush before baking
If you want to make the brioches you need 160g of chocolate chips. I also add about 50g of flaked, toasted almonds. If you want to make the bread sticks then you need some seeds – hard to say how many, but like a handful of mixed seeds. You can also make this into two loaves and add nuts/dried fruits in which case I’d not go beyond about 160-180g of inclusions.
What you do is put everything into a mixer with a dough hook, except the inclusions which you can add at the last minute. I do this in a food mixer and knead for ten minutes.
You then leave it, covered, at room temperature for about an hour in a temperate room. If it’s super hot it may need a shorter time, if it’s cold maybe a bit longer. I know this is hard to gauge, and hard to explain.
At this point you then shape the dough into whatever you want it to become, what will be its destiny? If using a mini loaf tin I gently oil the tin but otherwise I put the shaped dough – sticks or two loaves – on a parchment lined tray and put in the oven overnight. This is, for me, the easiest way to deal with these babies. I leave the final, shaped, prove to the fridge. But if you want them sooner than that I’d give them another hour or so at room temperature
When ready to cook you do so at 220C for between 10-25 minutes depending on what you’ve made – see below. Brush with beaten egg or milk first.
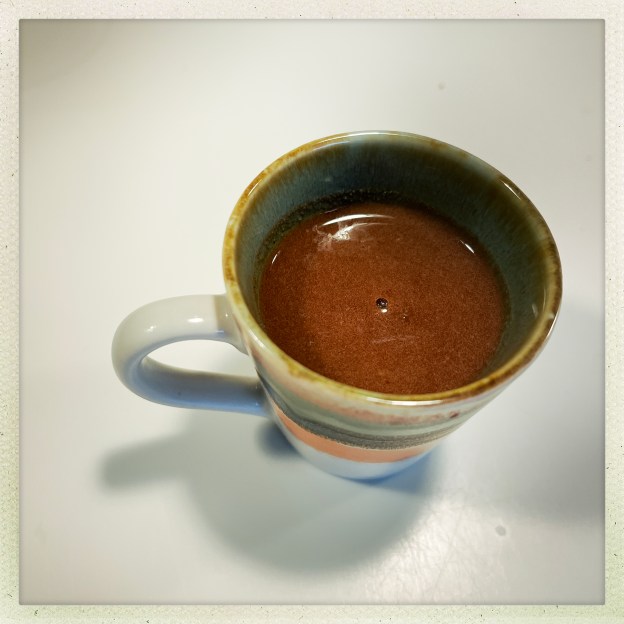
They freeze really well and the breadsticks are great in the morning (I dip mine in my coffee (I’m Italian) and love love love them, for me they are the perfect gentle breakfast and when you don’t eat pastries they are heavenly) or of course you can use them for dips. They make great lunchbox/picnic fare and travel well.
My youngest has the brioches with chocolate chips and nuts most mornings and i used to make these in loaves with nuts and dried fruit for my mamma. I hope you enjoy them!
Small brioches take 10mins, bigger ones take about 14mins. Two loaves take about 20-25 – check after 20 Breadsticks take 12 mins
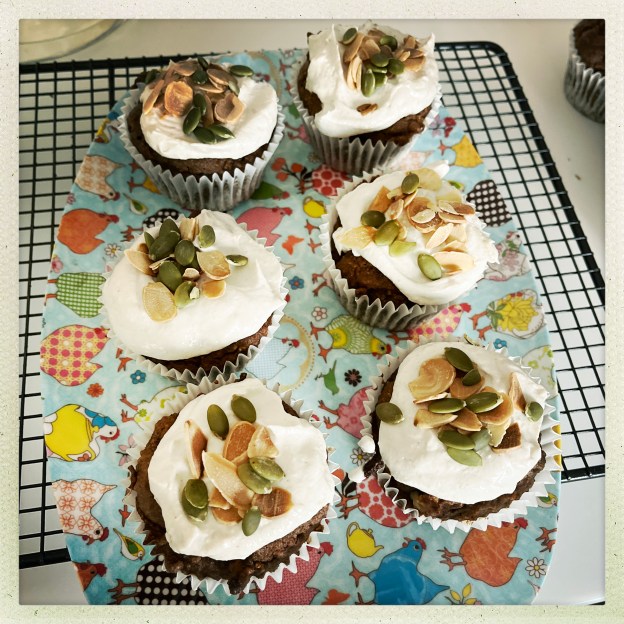
I’ve adapted this recipe from Tim Spector’s The Food for Life Cookbook and make it at least once a month. Everyone in the family eats it and it’s amazing how little sugar you can use and something still tastes great. If you’re used to high sugar this may not hit the spot for you but if you’re like me and eat very little sugar but like a bit of cake then you may love this. This is gluten free and dairy free but not suitable for vegans with the eggs (you can probably sub by using flax seed ‘eggs’ but I never do this). I usually make this as one big cake but I don’t have a picture of it so here is one of the cupcake-size ones I made this week.
You can use honey if you prefer, instead of maple syrup.
Ingredients
For the cake
85ml of extra virgin olive oil 100ml of kefir or plant-based yoghurt. I use coconut yoghurt as I rarely have kefir in. 3 eggs Two tablespoons of maple syrup (you can probably cut this down further, I will experiment but I’ve already cut it down from the four tablespoons Tim has in his original recipe) 50g brown sugar – I use dark, you can use light 285g ground almonds Two tablespoons of cinnamon (yes tablespoons) Four tablespoons of pumpkin seeds or other seeds of choice 50g of walnuts – I toast them first Two teaspoons of baking powder One teaspoon of bicarbonate of soda A pinch of salt 200g of carrots, grated (I do this in the Magimix because my goodness I hate grating things).
For the topping
185g plant based yoghurt – I use coconut Two tablespoons of tahini One teaspoon of vanilla extract One teaspoon of maple syrup Zest of half an orange (this makes it look pretty but don’t sweat it if you don’t have it, I often don’t) Two tablespoons of pumpkin seeds Berries if you like – makes it look super pretty. I also use toasted flaked almonds sometimes.
What you do
Oven to 180C. Use a 20cm lined spring form cake tin or this makes 12-14 cupcakes sizes (use muffin cases).
Mix together the olive oil, yoghurt or kefir, maple syrup and sugar. Then add the ground almonds, cinnamon, pumpkin seeds (or other seeds), walnuts, baking powder, bicarbonate of soda and salt.
Mix together. Now fold in the carrots and put in the tin and bake for about 45 minutes. If making as muffins/cupcakes they take about 20mins.
When done remove and let cool. To make the topping mix the yoghurt, vanilla, maple syrup together then plop on the cake/cupcakes and sprinkle on the seeds/orange rind/berries.
Keep in the fridge. These are also great on their own with no icing and as such can travel in lunch boxes.
I’ve long made bagels and they are a thing of beauty and deliciousness. I have made sourdough ones but not with any regularity. But recently I started making them again. They take a bit more time, in that they need to be left to rise in their own sweet time, far more than yeasted bagels. I rushed them last week and they were dense – still delicious but not so airy and light.
I tend to shape these into little round rolls first and then puncture a hole with a wood spoon handle. I tend to make these with a smaller hole than my yeasted bagels. Who knows why.
Unlike yeasted bagels these can also be left to prove for 48 hours in the fridge (maybe even longer but I’ve never left them that long), so if there aren’t that many of us, I tend to cook a batch up in two lots so we have fresh bagels for two days running. I can’t do that with yeasted bagels as they really have to be cooked the day after making (after an overnight prove in the fridge, ie they don’t ‘last’ that long in the proving stage).
If you want to make them totally vegan then don’t egg wash them.
You can of course use 500g of just white flour, or mix in a bit of wholemeal. I’m always looking for a more gut-friendly diversity so I add Vanessa Kimbell’s Diversity XXX flour. TBH these days I add 10-15% of it into almost all my bakes but here I use 20% (100g of 500g is 20% isn’t it? I failed maths..)
I think this recipe is, at least in part, from Edd Kimber but I adapted it a while ago. (I love Edd.)
What you need:
185g active sourdough starter 250g warm water 1 tbsp of sugar or barley malt syrup 1 tsp of fine sea salt 400g strong white bread flour 100g Diversity XXX flour
I mix everything together in my Kenwood Chef food mixer with the dough hook. I leave it on low for ten minutes. Then I turn the dough out onto an oiled surface, cover it with a bowl and leave it for an hour. After an hour I give it a gentle knead for ten seconds, leave it for an hour and then knead it again for ten seconds. If your house is very cold you might want to do this one more time. I kinda go on dough-feel (and no I’m not very good at it either).
When you’re ready to shape the bagels, when the dough feels lighter and a little more yielding, then cut it into 6/8/10 depending on how many you want to make (this makes eight regular sized bagels for me). I roll into little balls using my hands, then make a hole with the handle of a wooden spoon, stretching the hole out a little.
Place on a parchment lined tray.
I now leave this out, covered with a tea towel, for about another hour before putting them in the fridge overnight. I also think they benefit from coming up to room temperature after taking them out of the fridge but I never have time to do this so I put them straight away into the boil process. Note these really benefit from two days in the fridge (unlike yeasted bagels) so what I tend to do is cook half of them one day and half the next so we get fresh bagels two days running, the second lot being all the more flavoursome for a two day prove.
Boiling and baking
Bring a pan of water to the boil. Some people put things in the water to make them more of a bagel (I don’t know what but stuff that makes it apparently taste more bagely) I can never be bothered. When the water is boiling I plop two in there – if you can get more in without them hurtling into each other than do. I give them a minute or two until they float and puff up a little, and turn them with a slotted spoon, another minute or two, then take them out and rest them on a tea towel. When all are done put them back on the parchment lined tray, brush with beaten egg if you want and scatter with seeds if you want and cook at 220C for 14/15 minutes. Check after 12.
But last week, in preparation for some friends coming round to make wreaths, I decided I’d try to make it again but this time as a no-alcohol version, this was the original plan. This was in part inspired by another girlie-get together a couple of months previously, around the fire pit, where my friend Tracy had brought round some Captain Morgan no-alcohol rum which proved a big hit. I still had some left so I decided to use that as the basis for this no/low alcohol version.
I’m very much not a throw things in a pot kinda girl. I like a recipe and instructions. Sure I sometimes – often – then vary a recipe but I always like a framework to work to. So I was super pleased with how this worked out. I realised, as I started to make it, that I didn’t have the 750ml of liquid the original recipe called for. So I started to panic a bit, looked in the fridge, found some ginger beer, realised that still wasn’t enough to get it to 750ml, panicked some more and added some red wine (hence the low-alcohol title of this post). However you could easily just make this with all no-alcohol rum, or half that and half ginger beer, or what I did. What I did is reproduced below but bear in mind you can, as I did, vary what you use. Add a bit of booze if you like or not.
Chocolate in mulled wine? Don’t knock it til you try it. Don’t be tempted to use anything other than 100% cocoa here. I used Firetree which is the best 100% but you could also use any 100%, most of it is awful on its own but here it could shine. The Fiori di Sicilia essences were, if I say so myself, inspired in this as it adds a wonderfully citrusy note to everything.
Bottled up wouldn’t this make a fabulous present for someone? Shake it up and heat it up before serving. My husband said it was one of the most delicious things he’d ever tasted.
Feeling REALLY pleased with myself over this.
Ingredients:
750ml some sort of liquid, see above. I used 500ml of no-alcohol rum, 150ml of red wine and 100ml of ginger beer. I used this Captain Morgan rum and this gingerbeer. 1 cinnamon stick 1 teaspoon of chilli flakes 1tsp ground mixed spice 5 whole cloves 100g dark muscovado sugar (you can also use just normal caster/granulated) 80g 100% cocoa chocolate of your choice (I used Firetree), broken into pieces. A good few drops of Fiori di Sicilia. Of course you can make this without this ingredient but I use it a lot in my cooking and I really think it’s worth buying, you can use it in so many things and it lasts for ages.
Put everything together in a sauce pan and heat through gently until the chocolate has melted. Then either serve immediately or cool, put in the fridge and heat up as required. This will happily see you through Christmas!
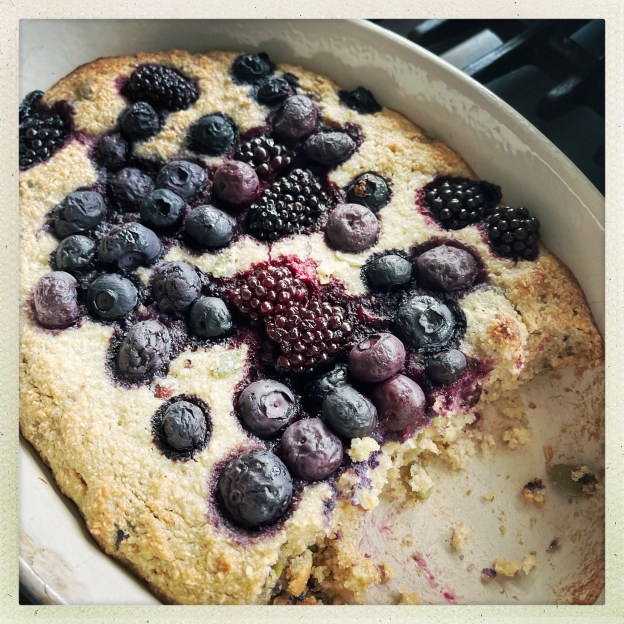
I have a very restrictive and healthy diet (no dairy or soya, minimal animal products, nightshades and sugar). Regular cakes, biscuits n ting are a thing of the past. I do taste chocolate as that’s my job, but in tiny amounts. So Tim’s book (as well as some of the Deliciously Ella books: the first one was awful but they’ve got really good since) is a Godsend for me. I still make yummy things for my family and friends but I rarely have anything for me to eat that’s desserty. Don’t feel sorry for me! I look great, have lost a ton of weight, feel pretty good most of the time and can, and still do, eat pasta and bread because my nutritionist – Pr Valter Longo – is Italian!
I didn’t have much hope for this but I made it for some girlfriends and I really loved it and my friend Katie went mad for it, but I thought I could improve it (sorry Tim) and so this is my adapted version.
55g light brown sugar 3 tablespoons of extra virgin olive oil 1 egg 200g kefir (I use coconut kefir, you can, and I have, also use coconut yoghurt or any kefir/yoghurt of your choosing) 100g oat bran 100g ground almonds 35g toasted hazelnuts (or nuts of your choice, or more seeds), chopped 35g pumpkin seeds half a teaspoon of baking powder Pinch of salt 160g frozen berries or fresh ones (I particularly like cherries when they are in season or if not frozen ones) Zest of one lemon
Oven to 200C, oil an oval baking dish (the sort you might make a crumble in, Tims says 23cm round one).
Basically put everything together, mix well, spoon into the dish, whack in the oven for 25 mins. Best eaten warm, it also makes a rather nice breakfast. Serve with whatever you want/can eat. I have mine with coconut yoghurt or vegan cream but you can, of course, have regular dairy yoghurt or cream.
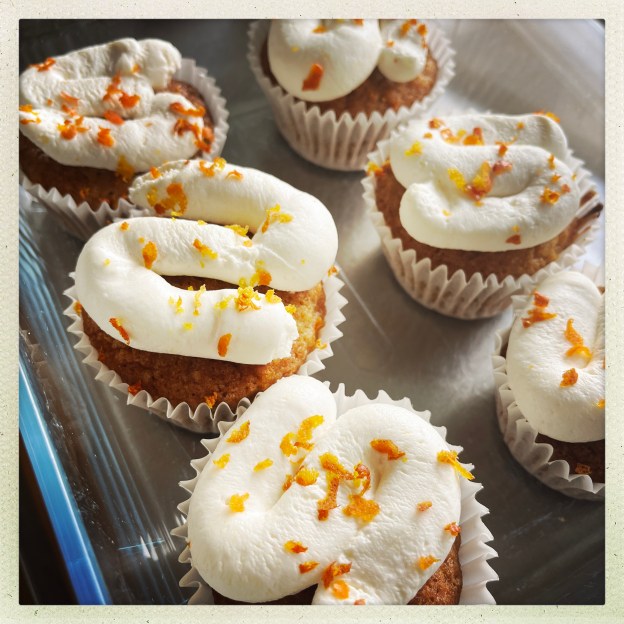
These are delicious, fresh and light and adapted from a Waitrose recipe which you can find here.
I changed the frosting as I can’t bear an overly sweet one and the addition of the Fiori di Sicilia is, if I say so myself, inspired…
Unfortunately they don’t travel well and need to be kept in the fridge – if you can let them chambré at room temperature for a bit before eating. I guess you could make this into one giant cake but not sure why you’d want to…
Ingredients for the cakes
12 cardamom pods 175g light brown sugar 200g self raising flour Half a teaspoon of baking powder Quarter a teaspoon of fine sea salt 2 eggs 150ml of olive oil 200g of carrots, coarsely grated (I hate grating things) Two oranges, preferably organic as you are using the zest. You’ll only need the zest of one for the actual cakes. So if you’re short you really don’t need two but the zest, grated, as a decoration – see later – does look nice.
Ingredients for the icing/frosting
250g mascarpone 85g Greek yoghurt 55g icing sugar Optional but wonderful: a good few drops of Fiori di Sicilia essence. You can also add this into the cake mixture if you prefer.
Oven to 180C.
You’ll need a 12-hole muffin tin lined with muffin papers. Open the cardamom seeds, discard the shells and grind up the little seeds as best you can. It’s good if you’re in a bad mood here as you can really bash away with a pestle and mortar.
Whisk together the sugar, flour, baking powder, salt and the ground up cardamom when ready.
In a separate, larger bowl whisk together the eggs and olive oil then pour over the dry ingredients with the grated carrot and zest of one orange. Gently mix until combined well and then pour equally into the muffin cases.
Bake for about 20 mins until a skewer comes out clean and they bounce back when gently pressed (careful not to burn a finger). When done take out and let cool completely (I take them out of the tin, still in their cases of course, about ten minutes out of the oven).
You can make the frosting whilst they are cooking and put it in the fridge for later. Here you just mix the mascarpone, icing sugar and yoghurt together with a few drops of the Fiori di Sicilia. You should have a fairly thick mixture. If it’s not thick enough for you (and sometimes it isn’t due to the water content of the dairy) then add a bit more icing sugar.
When the cakes are cooled you can ice the frosting on – it looks really good if you can be bothered to do this but I admit sometimes I just can’t be so I just spoon/spatula it on thicky and then, if you had another spare orange, grate zest on top. Voilà.
I’ve made this every Christmas for over twenty years. Last year, I went to look up the recipe on line (it was a Waitrose recipe from Iceland) and it had gone. It was a ‘404’. I panicked. Despite an extensive internet search nothing came up for it.
More panic. This is my pièce de resistance every Christmas, and my children love it so much they have, on occasion, requested it for birthdays.
But luckily – amazingly – I had made a note of it in my Travelling Cookbook which I started up years and years ago to commit my favourite recipes to paper. But if that goes…so finally I’m going to commit it to technology for me, and all, to enjoy.
I won’t say this is difficult. It’s not. But it’s not always perfect and it is a roulade and involves rolling, like a Swiss roll. It’s not super easy but just go with it and don’t worry. It’s delicious and look, no flour.
Ingredients
For the roulade
170g 70% chocolate, broken into pieces 170g caster sugar Five eggs separated 1 teaspoon of vanilla extract Three tablespoons of hot water (see note later) Icing sugar for dusting
For the filling
Three tablespoons of icing sugar 115g unsweetened chestnut purée Four tablespoons of sour cream 100g cooked, peeled chestnuts chopped Two tablespoons of rum (or liqueur of choice but then it’s not rum roulade!) 285ml of double cream
Method
Now, those are the ingredients above. I admit what I now do is buy some vacuum packed chestnuts, whizz some up and use the rest chopped. Because otherwise I tended to get left with lots of left over chestnut purée. But you do what works.
Preheat oven to 180C. Lightly oil a shallow baking tray of approx 34cm by 24cm and then line with baking paper and very lightly, again, oil. TBH you’re probably fine with just the baking parchment/paper but this recipe is from like 25 years ago so just reproducing what they said at the time..
Now melt the chocolate in a bowl, on top of some simmering water and as ever, do not let the bowl touch the surface of the water.
In a separate, large bowl, beat the caster sugar with the egg yolks until thick and pale and creamy. Add the vanilla extract to that.
Once the chocolate has melted and cooled a little, stir in the hot water until smooth then gradually add into the egg/caster sugar mix. Now again, I’m not sure what the hot water does. I’m quite skilled and fearless with adding hot water to chocolate but chocolate can and will seize if the water you’re adding is too hot or cold, so you might want to leave it out. Gently stir the chocolate until smooth and then gradually stir this into the egg and sugar mix.
Now again separately, whisk the egg whites until they hold soft peaks. Quickly and gently fold them into the chocolate mixture and pour the whole lot onto the lined tray, spread evening and put in the oven for fifteen minutes.
Remove and immediately cover with a sheet of baking parchment and a clean tea towel and leave until cold. Don’t leave it too long though or it will crack when rolling it.
Whilst that’s happening, mix the icing sugar into the chestnut purée, followed by the sour cream and chopped chestnuts. Pour the rum/liqueur and double cream and whisk until peaks, then partially fold the rum/cream into the chestnut cream so you have a marbled mixture. You could technically do this in advance and keep it in the fridge but it’s a perfectly good thing to do whilst the roulade is cooling.
Now the originally recipe asks for you to spread out a large sheet of baking parchment on a clean work surface, liberally dust with icing sugar and then gently turn out the roulade onto it, peeling off the baking parchment.
I don’t do this. To me this is adding too much faff and precariousness. So what I do is I take the sponge off the baking sheet – already on baking parchment – and I use that as the base. If you want, trim the roulade of any rough edges but I don’t – it’s all good. Spread the marbled cream on the roulade and then carefully roll up the roulade from the long end. It may crack – do not panic. What I do is I then sort of mould it/hold it together with cling film (just on top using your hands to do this you don’t take the roulade off the plate to do it it just helps keep it together if that’s what it needs) and put it in the fridge until it’s time to serve it. Then I peel off the cling film and then I sprinkle with icing sugar and decorate it. I’ve made this so many times and sometimes it cracks, sometimes it doesn’t and there seems to be little rhyme or reason. It’s always delicious and it reminds us that, even cracked, things are still beautiful.
Many years ago, I co-founded a parenting website called I Want My Mum (so named because I said this a lot when I was pregnant and after I had my first born). It was a small but wonderful little site and many of us are still friends today. Aside from mothering tips we also shared recipes.
From somewhere I got this recipe for flapjacks and they were amazing. I shared it on the board and then lost it and then over the years wondered how I’d ever find it when anyone ever talked about flapjacks…. But a wonderful woman called Sarah Green saved it and started making them.
Recently I asked on Facebook if anyone (I’m friends with lots of ex-IWMMers) just happened to have it. “No,” a few said “but Sarah Green makes the best flapjacks”. Sarah was at choir but when she came back she said “the recipe I use is the one YOU posted all those years ago.” The fact she had kept the recipe (and was so generous, she could so easily have just said it was her recipe, after all it wasn’t actually mine, I got it from somewhere) made me unfeasibly happy.
So to avoid having to hunt for it again, here is the original recipe with Sarah’s additions.
250 unsalted butter Grated ring of one unwaxed orange 325g golden syrup 325g rolled oats (Sarah sometimes replaces 50g of oats for 50g of oat bran which is a great idea) 75g light muscovado sugar
Preheat oven to 180C/350F/Gas mark 4. You need a tin of about 28cm x 20cm which you line with baking parchment.
Put the butter, orange rind, golden syrup and brown sugar in a pan set over a low heat and stir until the butter has melted and everything is coated. The add the oats to the pan and mix it together. Tip the whole lot into the tin and spread evenly.
Bake for 15-20 mins. Don’t overcook or you’ll lose the lovely chewy texture. You know it’s done when it’s just beginning to go golden brown around the edges but don’t panic cos the mixture will be really soft still.
Leave in the tin to cool completely and it will set. Don’t be tempted to take it out before it’s cool. When it is, take the whole thing out of the tin, holding the edges of the baking parchment and cut into slices as desired.
I will make these again and post a picture but in the meantime enjoy them!
I’ll have to add a picture anon and also I can never really decide how you spell houmous so I hope that will do.
Here’s the thing with me and houmous. I’ve never really liked home made, or at least I have never made any at home which pleases me.
But all this has changed. I went to my friend Tamsin’s house; Tamsin is an inaugural member of my Suffolk Chocolate Club and it was her turn to host, and she made this amazing houmous which now I make and it’s, amazingly, still amazing when I make it.
The key is a really whizzy blender. I make mine in my Sage Super Blender, which is not its real name. I find if I make it in my Magimix it needs far longer to make it smooth.
You need (I’m so sorry about the formatting, not sure what’s going on with WordPress atm)
A 400g tin of chickpeas drain the liquid and keep it separate 50ml of the chickpea liquid (but you might need a bit more, I never do though, you can keep it though for aqua faba if that’s your thing – it is mine) 60ml lemon juice, this seems to be about 2/3 of my little organic lemons. Don’t forget you can grate the peel and keep it in the freezer, for something else. 60ml extra virgin olive oil 1 garlic clove, peeled 1 teaspoon of ground cumin Half a teaspoons of paprika 1 tablespoon of tahini 1 teaspoon of sea salt
Blend it all up til smooth, serve with a drizzle of very good olive oil. It’s really good. The recipe says you can add 100g roasted red peppers to make it into red pepper houmous.
What I also do now is halve the houmous (how many ways are there to spell houmous?) when it’s done and then, to one half I add a small cooked beetroot and briefly whizz it up again and it makes for something even yummier.