Tag Archives: blackberries

Berry ripple ice cream (no ice cream maker necessary)

This is a super easy ice cream, but with the luxury of a ripple running through it that makes the most of all the free blackberries available at this time of year. The blackberries used in this were picked by my dad in Wimbledon, SW London. But you can use any berries. I’ve made this with raspberries or brambles.

Anyway, here’s how to do it:

For the ice cream:

A 397g can of condensed milk

450-500ml of double cream. I use an organic cream that comes in 227ml, and I use two pots, but it doesn’t matter if you add a bit more or a bit less.

2 teaspoons of vanilla extract

For the ripple

A big bowl of blackberries, or raspberries or brambles, about 300g. Don’t sweat it though if you have less as you can still make a great ripple ice cream just with less ripple.

Some caster sugar – to taste. I use a couple of heaped tablespoons as the ice cream in this is already very sweet. Don’t make it too sweet and best to add too little, taste and then add a bit more if necessary than t’other way around.

First, make the ripple. Put the berries in a sauce pan and put in the sugar.  Stir so the sugar dissolves and then simmer for about 10 minutes until it’s all mushy. Pass through a sieve to get rid of the seedy bits. Taste and see if you need more sugar but don’t over do it. Put to one side to cool. You can make this part the day before.

Now mix together the cream and the condensed milk, add the vanilla extract and whisk until thick and stiff.

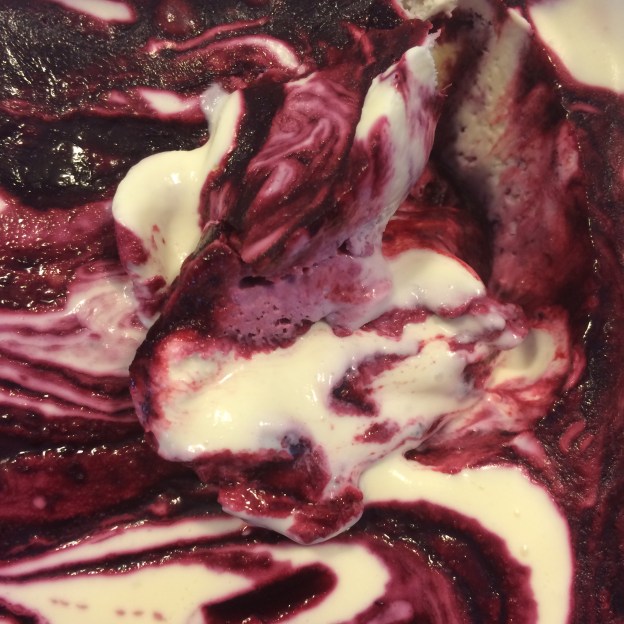
I pour the vanilla ice cream into a large, shallow Pyrex dish (rectangular) so you have a large surface area. Then I spoon the ripple on top and very gently run a knife through it to disperse it.

That’s it. Freeze and eat on demand. It’s delicious. Enjoy the super psychedelic picture. I served a scoop of this with my mamma’s apple pie. My dad’s harvest, my mum’s apple pie and my ice cream. A delicious family team effort.

Baked blackberry and lemon curd cheesecake

I was going to write about iced coffee today, but the weather is so grey and miserable this appealed more.

This came from those recipe cards Waitrose has hanging up, usually near the exit. I don’t know who writes the recipes for Waitrose, but they are an unsung hero – some of my very best bakes have come from unauthored recipes from Waitrose. This is a lovely, lovely recipe that makes a great cake: not too fancy, but fancy enough to make it no ordinary cheesecake. It’s also pretty easy to make because a lot of it is assembly, not technique. Try it this weekend after Sunday lunch and let me know how you get on with it.

The recipe is here, but I adapt it slightly and this is how I cook it:

200g pack essential Waitrose All Butter Biscuits, crushed (OBVIOUSLY you can use different ones but I have found these work well)
60g butter, melted
300g soft cheese
300ml Isigny Creme Fraiche
150g caster sugar
1 tsp of vanilla extract
2 eggs
225g -ish of blackberries
Lemon curd (I really, really recommend Duchy Originals) – as much as you need to coat the biscuit base with a thin layer, I’d say about six tablespoons.
Icing sugar for dusting (I always forget to do this).

First you crush the biscuits anyway you see fit. I do them with a rolling pin, rolled over a sealed plastic bag. Melt the butter, introduce the two and spread this across a parchment base-lined 23cm spring form tin. Chill in the fridge for an hour or two, less is fine.

To make the filling, heat up the oven to 190C. Mix together the soft cheese, creme fraiche, caster sugar and vanilla extract – either by hand or in a food mixer with a whisk attachment. Add the eggs and beat well until everything is incorporated. Set aside for a momentino.

Get out the tin with the biscuit base, dollop lemon curd across the base, you want it pretty much covered by a thin layer. Now put the blackberries over the top. I used frozen ones that had been picked from our garden last year, and it was nice to see them again.

Now drop the cheese mixture over the top, level out, and cook for  40–45 minutes. It’ll be brown around the edges and set in the middle. (The photo above makes it look like it’s REALLY brown, that’s cos of the effects of the film I use, it’s not that brown.) Take it out, leave it to cool and then leave it in the fridge for a few hours. Overnight if possible because this is even better the next day.Because of this it makes a great dessert to serve when you have people coming round as it’s one less thing to worry about on the day. It will easily keep for a few days in the fridge.