Tag Archives: bread

A step by step guide to sourdough

I thought it’d be useful to do an entry with a step by step guide to sourdough.

Not, I will add quickly, because I am any sort of expert. But because I know a few people who are interested in ‘getting into’ sourdough and have been asking me questions about it, so I thought they might find it useful. But also there’s nothing like someone who has just learned how to do something to explain it back to you. I know that I had a few questions when I first started (which was only a few months ago!) so this is really to help those that are even greener beginners than I.

Hopefully, you will have got yourself a copy of Dan Lepard’s The Handmade Loaf, which is the book that got me on this incredibly exciting (je jeste pas) journey into artisan bread-making. You will have your starter, which is explained in great detail in his book. And you will know the basics of what you’re doing. I include the basic recipe that I now use but really  this is to show you what to do regardless of which recipe you follow.

The basic recipe I follow

200g starter

340g water (just from the tap)

500g flour (I use 400g of white bread flour and 100g wholemeal bread flour/spelt)

a teaspoon of salt – I use Maldon

The equipment that I use and find useful:

A large stainless steel bowl, actually two.
A clean, baby muslin
A little whisk that I picked up from somewhere (Bakery Bits does a similar one here)
A dough scraper
A fork

You’ll need (if you don’t follow basic above)

Flour – according to recipe
Cold water – according to recipe
Salt – I use Maldon sea salt ground in a mortar and pestle – according to recipe

All Dan’s recipes ask for X g of starter. It took me a while to work out that if I didn’t have the actual amount in my starter jar, it didn’t matter. I could pour in what I had (not all of it! you always keep some starter to make more out from it), and then top it up with water and flour. But if you do this – i.e. feed the starter in a bowl to make more of it – you’ll need to leave it for a few hours before it’s ready.

For example. Let’s say the recipe calls for 500g of starter. If you have that to spare in your jar, great. Spoon it in to a bowl. But what about if you don’t really have that to spare?

After a while you will get to know roughly how much starter you have in your starter jar in the fridge. For example, I pretty much know I always have 200g of starter to spare, but I’m pushing it to get to 250g and I would never have a spare 500g in the jar.

So I get my bowl, put it on the scales and, for white leaven I measure out 100% of flour to 80% water (for a rye starter it’s more like 100% floor to 90% water). So for example, I’d put in 150g of flour to 120g water, which weighs 350g on the scales. I then top that up with 150g of  actual starter from my jar.

It sounds complicated, and sometimes the calculations do cause me to stare into space and bite my lip and ssssh my children if they try to talk to me, but you do get your head round it.

The easier way I remember it is that the ratio equates to:

100g flour to 80g water or,
125g flour to 100g water or,
150g flour to 120g of water, and I use those three formula calculationy things to muddle me along.

If you’re using starter that’s all straight from the starter jar, you can go straight onto ‘first dough’.

If not then you you now mix up the starter with a fork or a whisk or a spoon until it’s all incorporated (it will be quite thick). Leave it for a few hours until it’s looser looking, more relaxed, with some bubbles. If you imagine that when you first mixed it up it was a bit uptight, top button done up, now it’s slipped into a pair of velvet slippers and a smoking jacket and is having an evening smoke.

Remember to refresh your starter in the jar. I use 125g flour/100g of water or 100g flour/80g of water depending on how much space is in the  jar.

First dough

I call this first dough, just cos. It’s when you add the other ingredients to the starter, which will be

Flour
Water
Salt

according to the recipe that you’re following. You add it all in and mix it around. The dough will look ‘scrapy’, with bits sticking out maybe.

Do not panic. Do not try to mix the dough until it’s smooth. You will be there all day and start to cry. Believe that great things can happen.
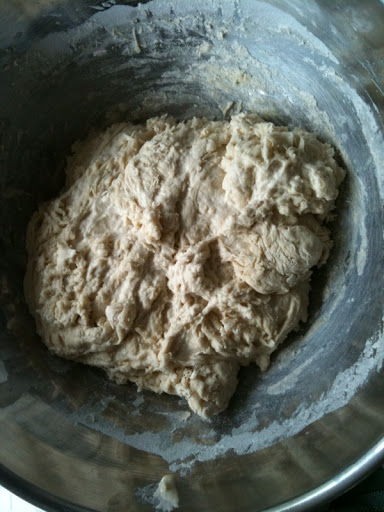
This is a white sourdough dough after the very first mix. Looks pretty unruly huh?

Let the dough rest for ten minutes; all of Dan’s sourdough recipes ask for rests of

10min
10min
10min
30min
1hr
1hr

then it can vary to another 1hr or 2hrs. You’ll need to see the recipe but once you’ve gone past the first 2/3  stages it’s pretty much all of a muchness with a tiny knead and then a rest of X amount of time.

So, first rest of ten minutes. I just let it rest in the bowl I mixed it up in. The bowl will have scraps of dough around it and every time EVERY TIME, my partner says “can’t you scrape them up into the dough”.

And the answer is: no. It doesn’t work like that. So you’ll have a ball of scruffy looking dough, kinda dry looking (DO NOT be tempted to add more water), in a bowl with bits all over it. See the picture above.

Cover it with a dishcloth and bite your nails nervously. Set the timer for ten minutes.

In the meantime, oil a surface. I use sunflower oil and recommend you do too. Dan recommends olive oil, too, but he’s probably richer than you or I. Sunflower oil is just fine. I use a big, big chopping board so that I can move my dough around the kitchen. Remember sourdough bread takes hours to make, so unless you are sure you can remain at the same work station unmolested, or don’t mind clearing up after yourself each time, use a board. I also find a dough scraper invaluable. I got mine from Ikea, it’s stainless steel, it’s great. I use it when I go back to the dough after each rest to pick the dough up with and move it around. I also oil the board before each knead. Oil works great and doesn’t alter the integrity of the dough. If you add flour or water, I found, you can get into a big sticky mess. Use oil, be brave.

After ten minutes, turn the dough out onto the board and start to knead gently. I do 12 kneads, sort of turning the dough in on itself, and around. Amazingly, you will see the dough start to get smoother. Don’t panic if you’ve still got some bits that don’t seem to quite adhere, and it’s not yet as smooth as it could be, although by this stage you should have a dough with promise.

This is the same dough as above, but after its rest of ten minutes and its first knead. Big difference isn’t there?

Now: either oil a bowl and put the dough in it, covering it with a cloth (I use the baby muslins for this, but a dishcloth would do fine, obviously you don’t need to have had a baby and have baby muslins to do this FFS) or put the dough on the surface you just kneaded it on and cover it with an oiled bowl.

If you have lots of large stainless steel bowls, like I do, then lucky you. You don’t need to wash up just yet. Otherwise you’ll need to wash up the doughy-bowl, dry it, oil it and put it to use.

Set the timer for un’altre ten minutes.

This is the same white sourdough dough, after its third lot of ten minute rises.

At each stage the dough will have relaxed a little and started to grown. At first, when you’re only leaving it for 10 or 30 mins, you won’t notice it so much. But when you get to the longer proving times, you’ll see how it stretches out and relaxes. When you first get back to the dough you’ll also feel  how it’s softer and starts to stiffen up as you knead it.

Don’t be tempted to knead it more than 10-15 seconds.
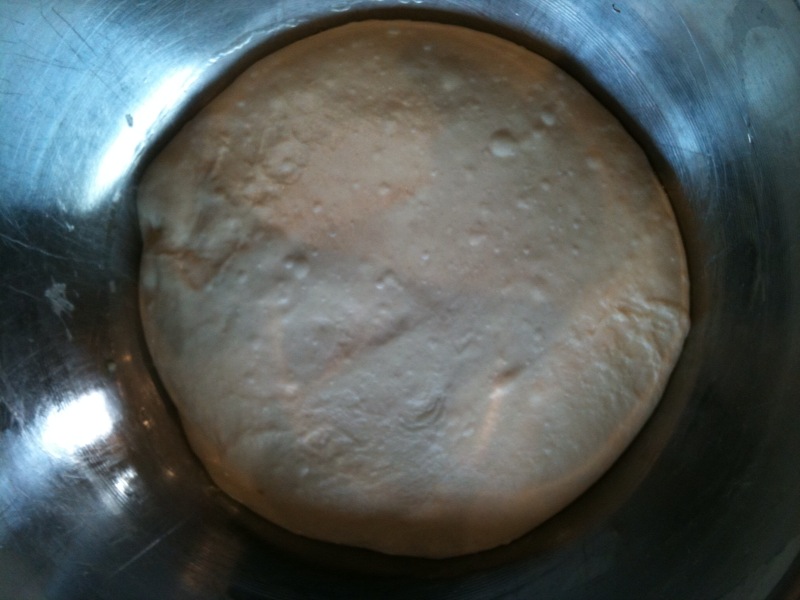
Et voila le dough after the first one hour rise. You can see bubbles on the surface yes? Good sign.
After the second, 1hr rise. The dough is bigger, more relaxed, smoother. A bit like me after Christmas.
Here it is after its 2hr rise. Just before it’s shaped and put into a banneton for its overnight sleep.

I should point out that the bread-heads always say that if it’s warm (like a hot sunny day or just if your kitchen is warm) then you might be able to leave your bread for less time, say 40 minutes instead of an hour. I’ve never bothered with this particularly and always do what time suits me. Equally, if you leave the bread for longer than ten minutes (or 30mins or an hour or whatever rest you’re on), cos the phone goes, or Corrie is on, it doesn’t matter either. Obviously you can’t completely take the piss, but sourdough is a bit like a very loving/drunk parent/partner: it is very forgiving.

When you’ve done your resting and kneading for the last time, you shape it into a ball, let it rest for ten minutes and then shape it into the final shape you want and put it to prove in a lined bowl or banneton for the last rise of whatever the recipe says (usually about 4hrs or so). I always do the final prove (prove = rise) in the fridge, cos that’s what works for me. I leave it for 10-36hrs for white dough, and up to 72 hours for wholemeal/rye etc. I haven’t experimented with longer than that  yet.

These are my little loaves after ten hours in the fridge. They don’t look massively risen, but comparatively, they are. I wanted two smaller baton shapes. Had I put all the dough in one basket it would have been up to the top by this stage.

In the morning this is what I do: I preheat the oven to 220C. I put in two baking trays, the one I will bake the bread on goes on the top shelf. The tray I will put the ice cubes on will go on the bottom shelf. Don’t use your best tray for the ice cubes.

When the oven is up to temperature, fill a glass with ice cubes and get your polenta ready. Take out the top baking tray – the one that will receive the bread – and dust it with polenta. You can’t put the polenta on before this (i.e. at the time of first putting the tray in the oven) or it will burn.

Turn the bread out onto the polenta. This is where the linen lined bannetons really come into their own, because it makes the process easy.

These are the loaves, turned out onto a polenta dusted tray and slashed.

Don’t be afraid to slash the loaves. Even if they look like they’re collapsing a bit when you do it. They will recover in the oven. Use a bread knife: be confident and slash the dough deeply, the deeper you slash the more room the bread has to rise in the oven. Try to cut, rather than push: in other words let the knife do the work, not you pushing down. I do about four slashes for a 600g baton shape. Experiment with what works for you.

When you’ve slashed, put the bread into the oven, and just before shutting the door, pour the ice cubes onto the bottom tray. They will fizz and steam. That’s good. That steam will keep the bread moist. If you have a water sprayer, you should also spray the top of the bread. This is important because once the crust has hardened, the bread can no longer rise, so the longer you can leave it before the crust hardens, the more chance you have of ‘oven spring’ – the bread making that final push upwards in the oven.

Things that really make a difference:

Slashing – your bread won’t be so aerated without it.
Ice cubes –  you won’t get such a good crust or so much rise.
Preheated baking tray – you won’t get such a good crust or such a good rise.
Polenta – you can do without it, but it produces a really professional finish, even if it is only on the bottom.

The finished product

That’s it!

Starting to experiment pt2: potato bread with a 36hr prove

Because we had guests coming for Sunday lunch, I decided to make a double batch of potato bread on Saturday. I had an inkling it would be good, because the dough was really frisky: I could barely contain it on the chopping board I use to knead my dough. It was so alive there was no way I could knead it and leave it on the board, covered with a large stainless steel bowl, as I normally do, because it would have pushed right out from the bowl.  So instead I had to put it back into the bowl, and cover it with a tea towel whilst it rested.

I also discovered that it’s so much easier to fold dough, in the fancy way they tell you to (basically folding the dough into three, so take one third of it, fold it into the centre and then the other side, fold in on top) with so much dough. It was really easy to fold in this way, although not easy to keep in any sort of shape. I practically had to pour it into the bannetons.

I cooked one lot in a 1k round on the Sunday but the other I left in a 600g banneton (in the fridge at 4C) til this morning. It had risen hugely and spread out lots on the baking tray the moment I turned it out. I slashed it four times and it looked very collapsed, but I’m used to that with long-prove breads now and hoped it would revive in the oven. It did.

Instead of what I usually do, which is put it in the oven at the highest temperature and then turning it down, I’ve been experimenting with putting the bread in the oven at 220C for the first 8-10 mins, then putting it up higher to 250C, then back down. This is what I did this time.

The bread rose beautifully, had a great crust (heavier and darker than the one I did for Sunday lunch, probably cos of the shape) and OMG it tastes divine. The longer prove has definitely improved the flavour.

I’d go as far as to say it’s very probably the best tasting bread I’ve ever made. I will try to photograph the crumb later (if there is any left), it’s really good. Not overproved (as I feared), kinda waxy, very white. And so moist.

Swoon.

Starting to experiment pt1: white sourdough 36 hr prove

Now that I’m getting a bit more cocky confident about sourdough bread making, I’m starting to experiment a bit more. I know that the bread geeks might poo-pooh at my experiments, and how tame they are. But I’m new to all this and hoping to help other rookie bakers, not really teach anything to anyone, let alone seasoned bakers. Although if I manage that, too, then hoo-RAH.

I wrote in another post about long proving of loaves. I regularly prove our ‘house bread’ (Dan Lepard’s Mill Loaf) for 72 hours now. But thus far I’d only proved white sourdough for about ten hours regularly, and 24 hours max.

So the other day, my partner (I’m so fed up of saying boyfyhusband, it sounds so fucking twee) was going to London and I decided to send my Italian Daddie – who lives there with my Italian Mamma – a loaf of my bread.  He’s the sort of man who eats bread at every meal and he buys his baguettes from the supermarket, and I think they’re a poor substitute for the sort of bread he grew up with.

He likes his bread to be white and crusty. So I made a batch of sourdough, shaped one into a round for us, and one into a baton for him, proved it overnight and got up at FIVE O’CLOCK IN THE MORNING to cook it as my partner was leaving at 6am. I kept the other loaf and cooked it yesterday morning, after a 36 hour final prove in the fridge at 4 degrees.

I am pleased to report that it was splendid. I cooked it for only 20 mins, 15 mins at 250 and 5 at 220, as I was after a slightly softer crust than the usual blackened, sour crust I go for. It was delicious, delicate and here it is, photographed in the morning sunlight.

White sourdough, cooked after a 36hr prove.

Rye and Wholemeal bread

Rye and wholemeal, supposed to be Barley and Rye bread, cept I got distracted.
Proved in two whicker 600g baton bannetons for ten hours at 4 degrees. Cooked on preheated tray at 250 for ten minutes then 220 for ten minutes. Slashed with a professional Mure and Peynot grignette with a curved blade. One worked more successfully than the other. Not sure why.
Today’s bread was supposed to be Barley and Rye bread from Dan Lepard’s The Handmade Loaf. I’ve rather overdosed on white flour bread and even though sourdough is low GI, and I use stoneground, organic white flour, I really started to feel I needed to make a loaf that wasn’t just white flour.
The majority of sourdough bread has a tendency towards white flour use. White flour does the work in keeping the bubbles of sourdough up in a way that other flours can’t. This recipe called for a rye leaven, 300g white flour and then 100g each of rye and barley. I’d just had a chat with another budding baker friend about wanting to use more wholemeal so that’s what was in my head and that’s what I reached for instead of the barley flour. Anyway, it’s no bad thing. As you’ll see it still uses mostly white flour. *sucks teeth*
I’d made this loaf (using the correct ingredients) before and it’s delicious. A really subtly delicious loaf and great for sandwiches (what I also love about sourdough, because have I mentioned that I love it, is its keeping qualities).
Rye and wholemeal crumb, second slice, it will only get better as I get further into the loaf.
 Barley and rye bread made with proper ingredients and an 11hr rise at about 12 degrees. Dan Lepard described this loaf as having a “bold beauty”.
 

First fumblings with sourdough.

The reason sourdough, or natural leaven bread means so much to me, the reason I go on about it so, is that bread is the final frontier in cooking that I’d never been able to master. I’ve baked since I was seven (I used to make the cakes for my parents shop on the Bayswater Road in west London, probably illegally but there you go). But I’d never been able to make bread. I never worked out why. When I was a child I couldn’t wear a watch, they’d stop when I put them on. And if I ever tried to make anything with yeast in it, it’d die.  My bread was awful. I tried things like Danish pastries, thinking that maybe cos they were a cakey thing, I might have more luck. But no. It was actually hard to take failure, over and over again and I felt like you do when computers give you problems. Like it’s personal.

Some years ago, I went diving and fishing with a Michelin starred chef. I told him about me and bread. He laughed. “Anyone can make bread” he said, sounding like the chef in Ratatouille. “I can’t” I answered mournfully. “Come to my kitchen,” he offered. So I went.

He made the dough for the day and put it in this huge mixer. Then he asked me to shape it or something. I can’t remember now, but anyway, I touched it. We were making the bread for the entire evening’s covers. To cut a long story short, cos you must surely know what’s coming,  the bread I’d touched failed. The fact that I’d told him this didn’t appease his temper. He looked at me like I was a witch and not long after I found myself on the pavement outside, crushed.

Eventually bread makers came onto the market and I even failed with those, but I realised that’s because we had a shit bread maker. Our downstairs neighbour, the lovely Sarah, used to produce these huge loaves for her and her husband Ben. Her bread machine was a Panasonic (still the only make of bread maker I’d recommend) and eventually we bought one and what do you know, as long as I stayed away from the mixture with my hands – very easy to do with a machine – we were okay. As time went on, I got confident again. I really don’t know if bread senses fear but maybe it does. Because as I got more confident, I started making bagels and pizza, using the machine to make the dough and then shaping it myself. Success was mine. I don’t know, perhaps having children changed whatever freaky wiring I had going on that was such an efficient killer of bread dough. Perhaps the hands that had always been so cold, but made great pastry, were starting to warm up. The point is, I was able to make bread.

But my eye was always on the big prize:  sourdough. Proper Italian bread is sourdough bread: made without yeast but by using a starter of, basically, flour and water which uses wild yeasts that are present in the air and on the flour. In Italy we call this leaven a ‘biga’. Some bakers call it ‘La Mamma or La Madre’ – the mother. Fitting because the starter you, yes, start with, you make all your subsequent bread from. You use a bit of your starter every day to make your bread (or discard it if you’re not making bread) and then feed (or refresh) it with more flour and water. Some starters date back many years. It’s said that the starter that makes the famous Poilan bread dates back to 1932. Certainly the longer a starter has been going, the better it is and the more flavoursome the bread.

Sourdough bread is big, holey bread which you can’t squash into putty. It is deeply flavoursome, has a low GI (thus very satisfying) and can make a meal out of the most humble of ingredients. Add a squash of Brie and a few roasted peppers in olive oil and I’m happy. If you live in a big City – certainly London – you can buy sourdough bread pretty easily. But here, in Suffolk it’s not so easy.

Every weekly trip to London saw me coming back with something from Flour Station or Paul’s and I’d text my boyfhusband on the way home and say “we have good bread, we have a meal.” But I wanted to be able to make this bread myself.

I’d bought Dan Lepard’s The Handmade Loaf some years previously. I’d started a starter from his instructions which had looked promising, but then I got pregnant and other things occupied my mind. My friend Lucy gave me a bit of her starter but I’d let it go off in the back of the fridge. Then finally my friend Emily offered to send me some of hers. This seemed such an act of friendship and I liked the fact that Emily – whom I’d only ever got to know on line (I used to co-run a parenting forum), could send her starter across the country, in the post, and I could make bread from it.

It came. I tipped it into a Kilner jar, fed it for two days and opened the first recipe in Dan’s book, which was for white leaven bread. Dan’s recipes are deeply prescriptive: 8am, do this, 8.10am do that. They had put me off at first because it seemed you had to spend all day making bread. Maybe this was why sourdough loaves cost so much. But in fact it wasn’t so. It suited me perfectly. I found the bit that took the most time was the beginning, and refreshing the starter. Otherwise you hardly kneaded it at all – 10/15 seconds at a time. Leaving it to rest for 10 mins, 30 mins, an hour…it meant I could do it in between feeds/reading to my children/preparing dinner etc.

The first loaf I made I started just after school pick up, which is still the best time for me to make bread. I had already decided to be Master of the sourdough in terms of this: the final rise called for a time of 4-5 hours. I knew I could never stay up that long, so I decided to just leave it to rise overnight in a bowl lined with a teacloth on the concrete floor of the laundry room. At a temperature of about 15 degrees. I decided that the bread either had to cope with this, or it had no place in my life.

The next morning I got up and very clumsily took the bread off the teatowel, which it had stuck to, and wobbled it onto a cold baking tray (my technique finessed incredibly fast, fear not). Dan said an oven temperature of 220 for 50-70 minutes. After 30 minutes my loaf was frazzled.

I was upset, of course, but as I cut into the loaf I realised that there inside was proper sourdough. What’s more, as it cooled, I realised the crust had this wonderful taste. I was so excited that I sent a picture of it to Dan (whom I don’t know, but I figured he’d not be too freaked out as we work for the same newspaper) and he replied saying he thought it looked great and it looked better than his first sourdough. He probably says this to everyone, but I chose to believe him.

We – boyfyhusband and I, not me and Mr Lepard – ate it with a poached egg (Burford Browns) topped with herbs from our garden. I almost died of happiness that morning. I told everyone, all day, all week, that I had made bread. With my hands. I think I sent a picture of my sourdough bread to everyone with an email address. Finally.

First ever sourdough. Look at that crumb! This was proved in a bowl lined with a teatowel for nine hours at 15 degrees. I didn’t slash it, I cooked it for 30 minutes at 220.
And it worked.