Category Archives: Sourdough

Sourdough after a 156hr prove

Ever wondered how long you can push sourdough for? I baked these rolls  after a 156hr prove at 2C. They were very dry when they came out of the fridge and I slashed them with a bread knife, not expecting much. Cooked them for 8mins at 250C (fan) then 8mins at 220C (normal).

So you can go away on holiday for a few days and leave some sourdough rolls proving for a good few days. I think if anything, they rose up more than normal…

Sourdough rolls, or panini

Having a bread roll always seems a bit luxurious. Whereas a slice from a loaf is all about sharing, a panino (panino is the singular, panini the plural) is all about you: it’s all yours; from beginning to end.

I only started making rolls last year, when I got a couche cloth for my birthday (I felt lucky). They are so easy to make and I want to encourage you to give them a try, and here’s why:

You can keep the rolls proving in the fridge for days. A batch of dough made using 500g of flour yields about 12-16 rolls, depending, obviously, on how big you make them. This lasts us, on  average, three days. The longer they’re left, the tastier they become.

Thus, you can cook up just how much you need. This is really useful if you struggle to get through a whole loaf in one day. With the rolls, once you have a batch in the fridge, you can have freshly baked bread in less than 20 minutes (cook straight from the fridge) and you can cook up just one or two, or the whole lot depending on how many you want to feed that day/moment.

The longer-proved rolls do deflate when you slash them however, so don’t try – just nip at them deeply with a very sharp pair of scissor (you can see the effect in the pic above), they still rise beautifully in the oven, but you want to be quick and definite with the cutting so don’t faff around with a grignette.

They’re really, really tasty.

With rolls that have only been proving overnight, I do slash at them with a grignette, usually making four little slashes all the way around. This helps keep the round ‘boule’ shape. If you don’t mind about this, two or three slashes with a sharp bread knife is slightly easier, but the dough will expand to give you a more oval shaped roll.

I bake mine for anything from 14-20 minutes, divided up half at 250C and half of that time at 200C, but obviously a bit more or less depending on size of rolls or finish of crust that you want. (I still use ice cubes though.)

If you like to give bread as a present there is something really nice about giving a ‘bag ‘o’ rolls’. I mean even the phrase is great. Buy some brown bags (I get mine from the dreaded Amazon, sorry), because I do love a brown paper bag.

They are easy to shape and it’s also a really good way to practise shaping because if you get one a bit wrong, you have another 11 or so to practise on. Do shape them all up at the final prove stage, don’t be tempted to keep the dough to shape up for later. I can’t find the shaping video I watched now (it was by the people at King Arthur Flour), despite looking for it. But if you put ‘shaping bread rolls’ into You Tube you’ll get a few vids which will give you an idea.

You can bake them longer for a crustier crust, for less time to make a softer one for children/old people with no teeth. Whilst I love a deep, dark crust on a big loaf of sourdough, because the ratio of crust to middle is low, with a roll, I prefer a softer bite.

Have a go, and have fun with it. Just use your regular recipe for sourdough but shape them into rolls. This also means you can make the fabled ‘sourdough burger bun’ (basically a sourdough roll into which a burger has been put) which people queue for in London’s Hackney.

For the rolls with a lesser proving time you will need a planchette, but with the rolls that have been proved for a longer time, they are less frisky, drier, and you can, if you’re quick and confident, lift them off the couche cloth and onto a hot baking tray by hand. But given that a planchette is vital for baguette baking, treat yourself.

The perfect baguette

IMG_2932Although I’ve  been baking bread, by hand, for three and a bit years now, I had yet to crack the perfect baguette. Or indeed, any sort of baguette. I suspected – and I was correct – that you needed a couche cloth to make a sourdough baguette and after I got a couche cloth as part of my birthday presents (I’m not a girl who needs an underpaid worker to go into a mine and get me a diamond) I set to work.

The first thing making baguettes taught me is that you really do need to nail your shaping. If you don’t properly prepare the dough for shaping (give it a final knead, then let it rest for about 20 mins before shaping it) it won’t shape so easily and if you don’t shape it properly, it won’t have the surface tension to hold its form. If it can’t hold its form properly then it will be hard to slash and if all those things happen you will get bread that is perfectly lovely and edible. But it won’t look good as it could be.

IMG_2308

My first four baguettes, tasted great but shaping and slashing not great.

IMG_2403Next two. Better but not there yet.

Dan Lepard and the lovely Joanna from Zeb Bakes helped me with shaping and other tips. Joanna linked me to some shaping and slashing videos on line. Dan reminded me to put the bread into the hottest oven possible for the maximum amount of oven spring.

[The shaping video is here and the baguette shaping starts at 2.25. The scoring baguettes video is here.]

Because I really do think a baguette has to be made of white flour, I don’t really attempt to make it too healthy. But I did have, what I thought was a master stroke of genius and (because I just really struggle with adding 100% white flour it seems so unhealthy) I added 50g-ish of rye to my 450g of white flour. Okay so it’s not much but it stops it being made completely from white flour. I say this is a master stroke of genius in this way because after I did this, I read that Dan also recommends doing this to add a bit of nuttiness and flavour to an otherwise white loaf. So, you know, I felt really very clever.

Adding a bit of other flour doesn’t detract from the white-ness but it does add a certain something. I also find that sprinkling both the baking tin with polenta (so that it coats the bottom of the baguette), and the top of the baguette, lends even more certain somethingness.

The other thing to note is that with baguettes, I’ve found I really do need my grignette. So I had to find it in the back of my drawer. The videos I link to above show you how to do the slashes, as they’re quite particular. I can’t use a bread knife slashing baguettes.

Anyway. I’ve now got it so that I wouldn’t say I’ve perfected the art of the baguette, not by any means, but I’ve got it so that I can make a pretty good one which, with some butter and apricot jam and a bowl of caffe latte, makes a pretty perfect breakfast. A bit naughty, without descending into something so bad for you, you want to start slashing at yourself.

IMG_2425

Do look at the videos for shaping and practise. It’s really worth it.

[The recipe I use is Dan’s standard white sourdough recipe from his The Handmade Loaf book, with 50g of rye added to the 450g of white bread flour instead of 500g of white bread flour.]

Couche cloth proving

IMG_2285

A couche cloth is a specialist piece of heavy linen cloth, made especially for the final proving of sourdough bread (couche = ‘laying down to sleep’). I’d wanted one for ages but for some reason never got myself one. Isn’t it weird how there are certain things that are perfectly affordable and yet they are regarded as luxuries and we never buy them for ourselves? The couche cloth came under this category for me, even though it only cost a tenner and I’ve easily wasted ten pounds on loads of other crap.

You can of course use a dish cloth in a bowl for proving sourdough, and lots of people do. But, for me, it’s not really the same as it’s clumsy and the dough can stick to a dishcloth, no matter how dusted with flour. I have umpteen bannetons now – hence why the couche cloth seemed like a luxury. But I sometimes wanted to make sourdough baguettes and rolls, just some different shapes occasionally, and I couldn’t do those in the bannetons, because the shape of the banneton determines the shape of the final loaf. And most bannetons are round or baton shaped. Here is a pic of my sourdough rolls, after they’d been proved in the cloth, and on the flipping board about to be flipped onto the baking tray, to go into the oven.

IMG_2311

Then one day, I was talking to my mother and she told me about how she and my grandmother  used to make bread when she was a girl, and she was telling me all about how they used to lay the shaped dough down in a piece of linen cloth and pinch the cloth up so that the dough held its shape. And I recognised that of course, she was talking about a couche cloth.

Well. Now I knew it was part of my heritage, I knew I had to get one. And with a couche cloth you need a flipping board or planchette. So I put both on my birthday list and I got both. They were bought from the fabulous Bakery Bits.

I got my couche cloth by the metre, going for the 60cm by 1m length, which, weirdly, ends up cheaper (£10.14) than the pre-cut cloth of the same size (£14.40).

I immediately realised that I’d got my couche cloth too big, but that’s no biggie as I cut it in half. The thing with couche cloth proving is that you then either need to keep the dough out for proving or put it in the fridge. And if you put it in the fridge you need to make sure you have a tray big enough to hold your shaped dough AND that, then, your fridge and your oven are big enough to hold the bread when you prove and then cook it. No point making a 3ft long baguette if you then can’t get it into the fridge to prove and then the oven to cook it.

Here are two great videos, that Joanna from Zeb Bakes put me onto, ostensibly to help me with shaping my baguettes (more about baguettes another time). This one shows you a couche cloth in use and this one shows you the flipping board in action.

I dust couche cloths with rice flour. I find it much better than the usually recommended rye flour – my loaves never stick – and also it gives a lovely contrast on the crust of my cooked loaves. And when I’m done, I brush the cloth with a grouting brush which I keep just for that job (being a grouting brush it has stiff bristles). Then I hang them out in the glorious sunshine to dry.

The beautiful art of getting things wrong. Or, what happens when you use plain flour instead of strong when making bread.

Saturday morning. 6am. I’ve been up for 45 mins because the bird song wakes me up. This is fine. I like the early mornings when everything is new and quiet.

I’m making bread. Later, we will have visitors and will need to feed eight. I’ve made sourdough several hundred times over the last four years. It is only later that I realise that, without the usual distraction of partner and children, my concentration has failed me and I put plain flour into the loaf instead of strong white.

What will happen? No-one seems able to tell me. I ask on Twitter and Facebook. No-one knows. I feel irritated, not because I think this is a mistake of giant proportions, but because my starter won’t be ready to use again for several hours.  I guess that because plain flour – apparently – has less gluten, it will have less of a scaffold for the air bubbles to climb. Ergo the bread will be less raised, less ‘holey’. Worse things happen in Tesco.

I make the bread exactly as I always do, lots of little, light, kneads with increasing rests. I put it in the fridge and the next morning, Sunday, I take it out. Slash it and bake it.

This is what happens when you use plain flour instead of bread flour. Not nothing. Something. You get a beautiful bread that has more holes in it than one of Michael Gove’s speeches, and tastes wonderful.

IMG_1937

Over proving

Can you hear the quiet?

This is the special bit between handing in a big piece and waiting to hear if you have to make huge changes with less than three hours until it has to go to press.  Or, if the whole thing will pass smoothly by, slipping into production with just a few waves of tweaking by me.

And as such, there is very little I can do right now but wait, and listen to the birdsong in my garden and wonder when the sun will appear from behind the thick kapok of cloud.

This part of writing is like the period between O and A’levels, such as they were in my day. I’d done my O’levels, I was waiting for my results, but my A’levels hadn’t started yet so there wasn’t anything else I should be doing but lie, tummy down, on the big window sill at home and stare up the road dreaming of what my future would look like.

So I’m going to do a gentle post today, whilst I sit and wait. And it’s about over proving.

Here are two pictures of the same loaf. I left it out of the fridge, by accident, so it had a 14hr prove at about 20degrees. I note in Paul Hollywood’s book How to Bake, he tells you to leave the sourdough out for what sounds like too long – something like 22hrs – at a warm room temperature, with the dough wrapped in plastic. But his method is all different to the Dan Lepard one I use anyway (has anyone used the Hollywood method for making sourdough? Be keen to hear how it went, I just can’t fathom how the bread wouldn’t over prove, being out for so long).

IMG_1793 IMG_1794

The first picture was the first slice. I feared the loaf had been over proved, but it looked okay at first. Great even (the taste was good), and I thought I’d caught it all in time. But look further into the loaf, at the second picture and you’ll see that great cave of air at the top, which is a sign of a sourdough that has been over proved.

Because I had divided up the loaf into two loaves, I had put the other one in the fridge. Four days at 4C, later I cooked it and this is what it looked like:

IMG_1829

See the difference? It had good airholes, but nothing like the ones in the first picture.

I’ve discovered the really perfect way, for me, to make sourdough is to put it in the fridge for a period of time, so the flavour can develop without the dough exhausting itself, and then taking it out for a good few hours so the crumb can develop large air holes. But it takes planning and time.

ps: I didn’t need to make any changes at all. 🙂

Industrial sourdough. A guest post by Ben McPherson.

Here’s the thing: I’m lazy, and wanted an easy way to achieve perfect results.

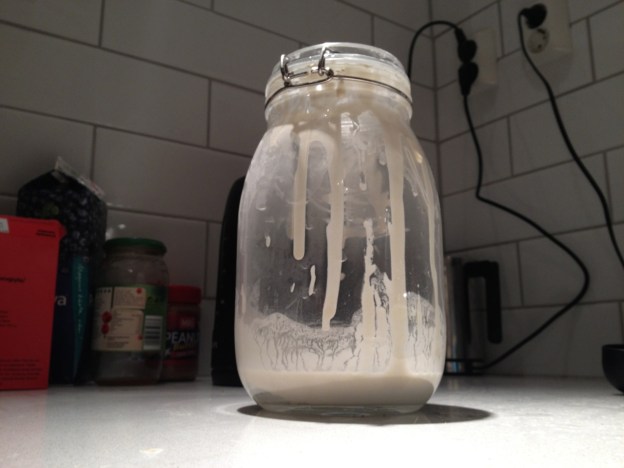
Annalisa sent me sourdough starter two months ago. She also sent me instructions about what to do with it. I fed it and watered it and it grew.

Starter - day one

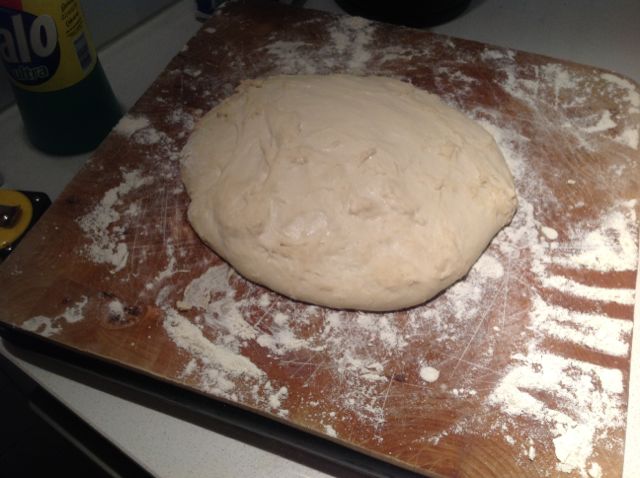
On the day I made my first bread I followed Annalisa’s instructions to the letter: knead after ten minutes, ten minutes, ten minutes, 30 minutes, 60 minutes, 60 minutes and finally 120 minutes.

Floured board - don't do this

The flour on the board was a rookie mistake: I should have used oil. Annalisa put me right on that, sternly but kindly.

Not beautiful, but delicious

Still, the bread worked. Yes, I undercooked it, and yes, the shape was all wrong, but although it wasn’t beautiful it tasted delicious.

Seven kneads, though? Seven? Far too much work, I decided.

Easy loaf in tin

I tried a friend’s easy sourdough recipe, which calls for no kneading. You take your starter, mix in 700ml water and 500g flour, along with a little salt, and let it stand in a bowl in the fridge over night.

Then you add another 500g flour, mix it all up, and spoon the runny dough into two bread tins. You return the tins to the fridge for a few hours. No kneading. Simple.

Easy loaf in oven

The result wasn’t bad. The bread rose well in the tin and the taste was actually pretty good, but the bubbles were small, and the sides of the tin had prevented the crust from darkening properly.

Poor crust on sides

Worse, though: it just wasn’t sour enough, which was the point as far as I was concerned. I’d have been happy if I’d bought it from a shop, but not if I’d bought it as sourdough bread.

I wanted an artisan bread, but with less work kneading than Annalisa insisted on. I had a kitchen machine. So, could I industrialise the process?

The short answer is: sort of. It took a lot of trial-and-error, but it did work.

K-beater

You put the starter into the bowl in the mixer. You put on the whisk attachment and start the machine running slowly. Then you add the water, and then spoon in the flour very slowly until the whole thing forms a smooth dough. If you’re me, you forget the salt. You switch off the machine and wait ten minutes.

Now you change the attachment to the K-beater. You do your three first kneads on maximum power for ten seconds each time. By now you have something that looks like a proper bread dough. After each knead, you scrape excess dough off the K-beater with a knife.

Then, and only then, do you change to the dough hook. After thirty minutes you run the machine on maximum power for ten seconds, and you do the same for the next three kneads, after an hour, and hour, and two hours. Each time you have to scrape the dough off the hook.

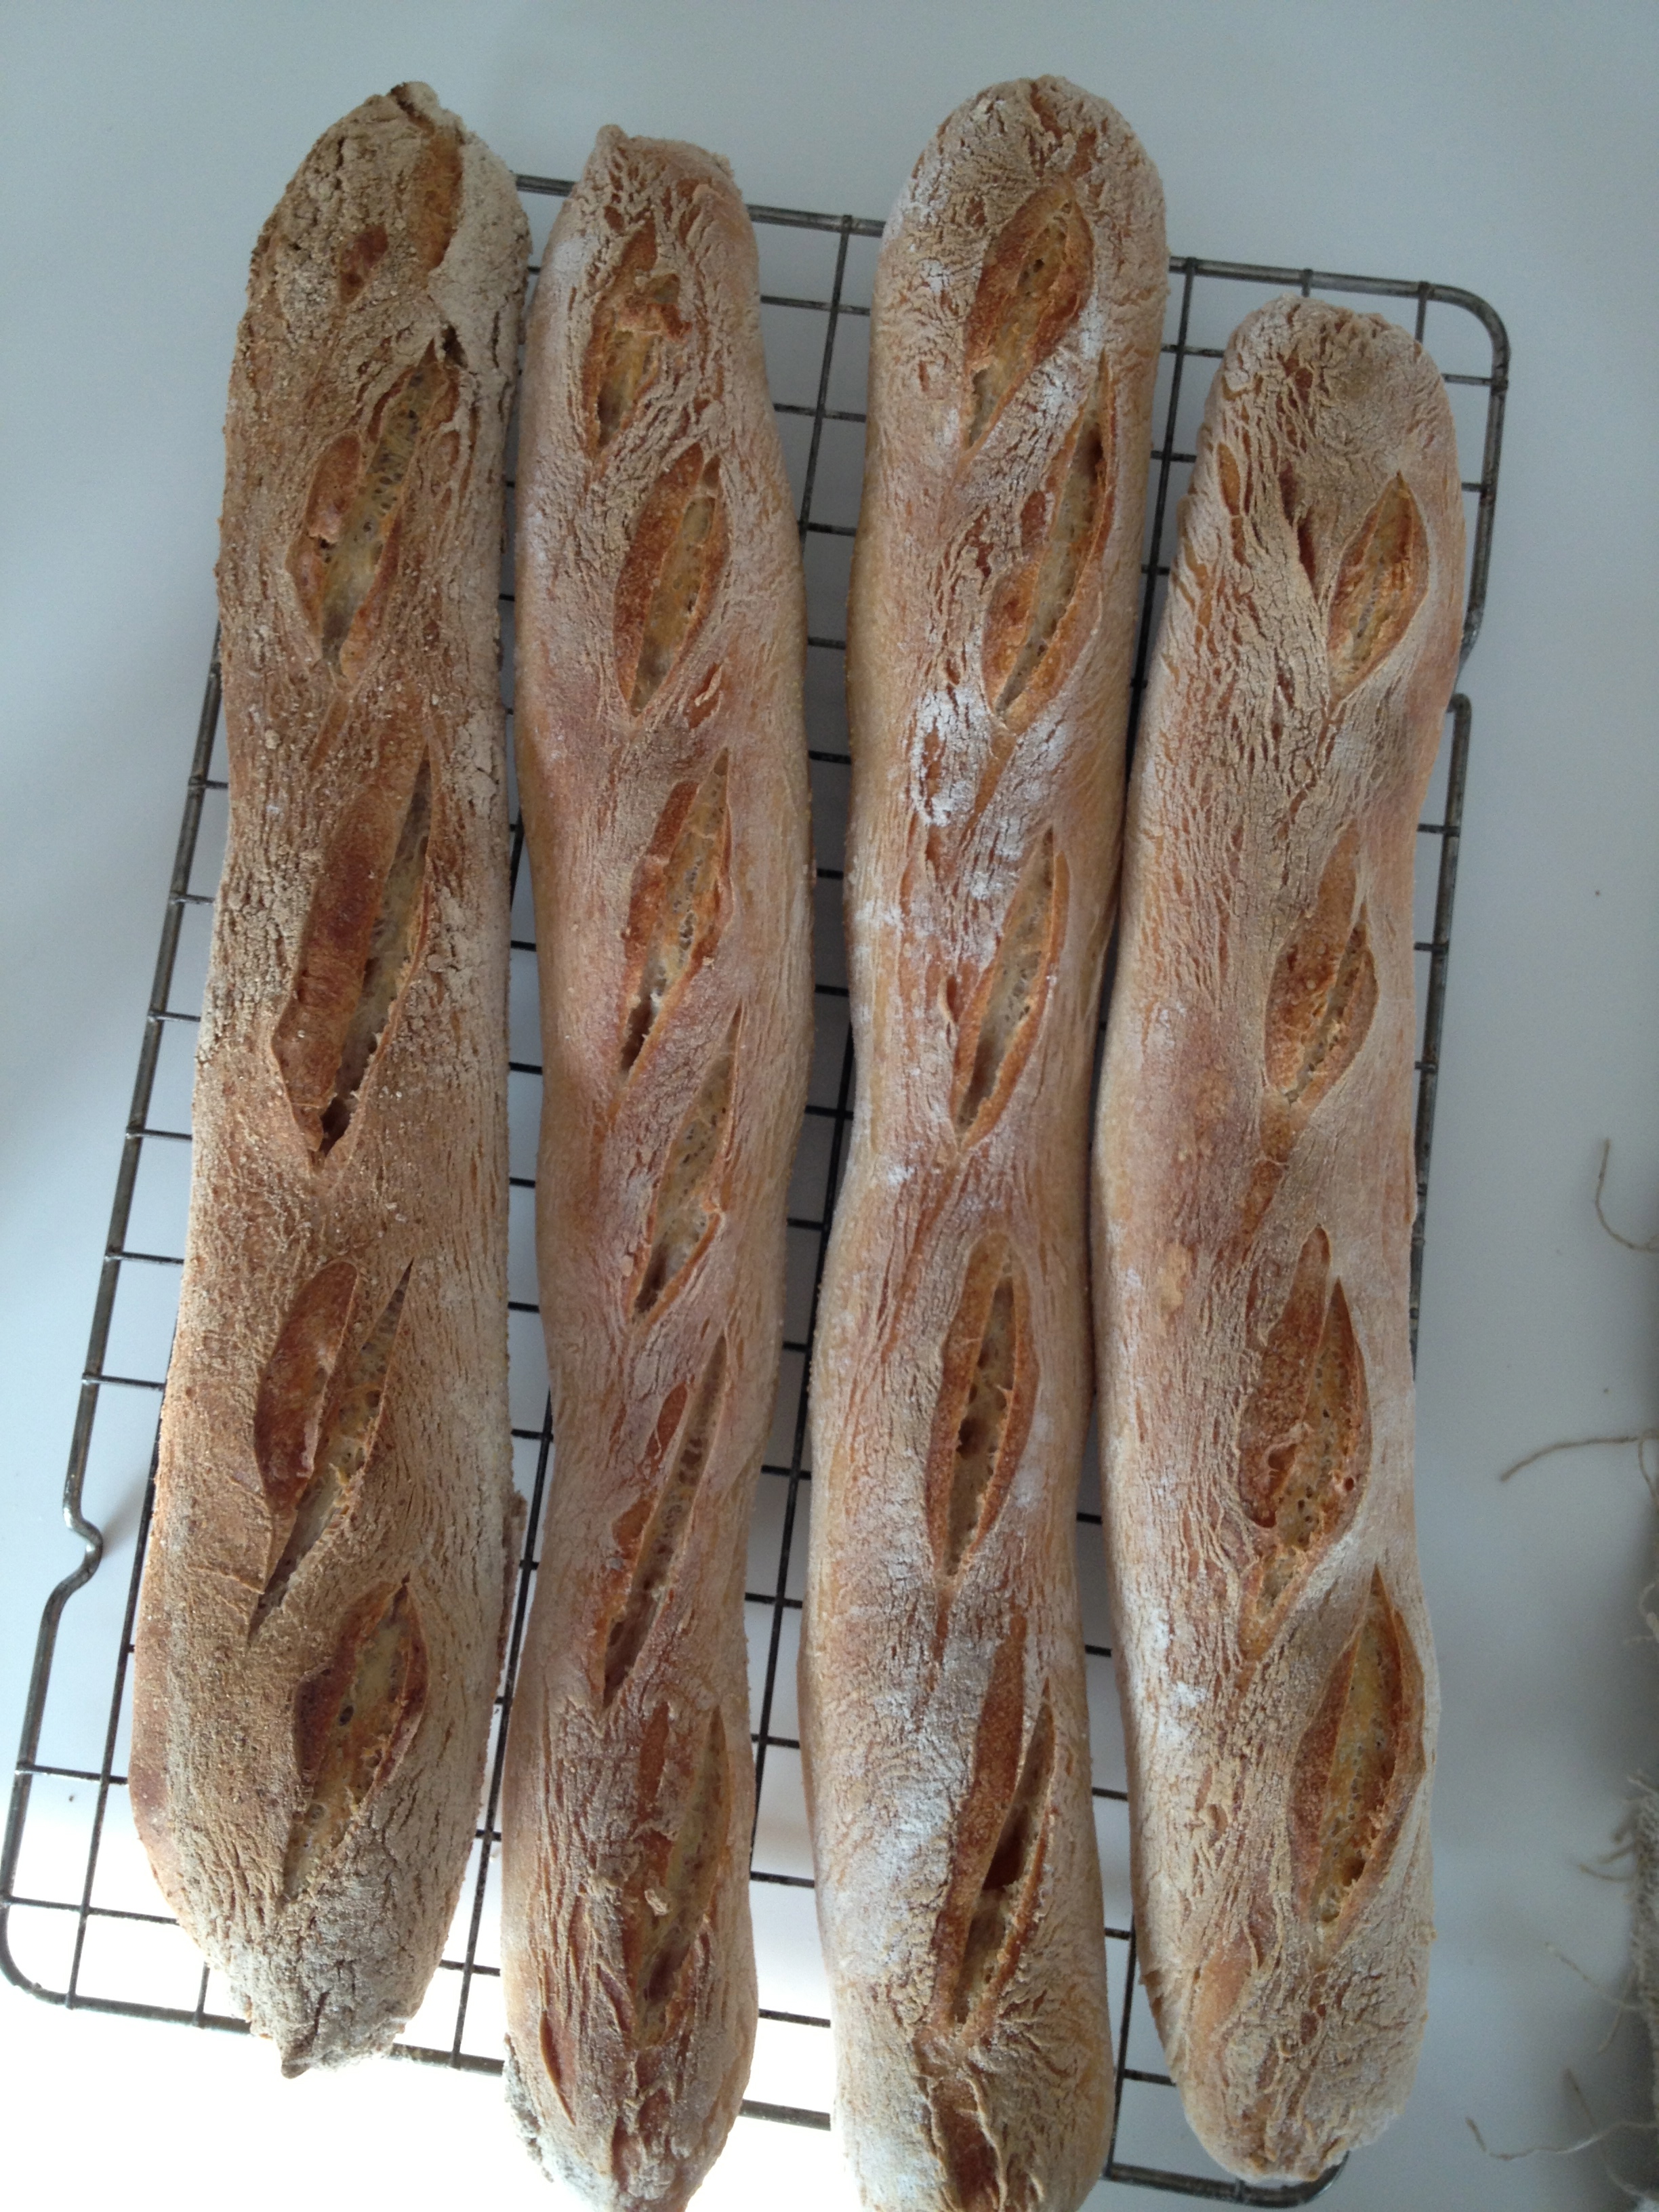
Then you put the dough into your banneton, and from that point on the process is identical to the hand-knead process. It makes a good sourdough, which improves the longer you extend the final prove.

Good industrial bread

There’s only one problem. My industrial method is far harder work than the hand-kneading. It’s messy; it covers everything in a hard sheet of sourdough which is very difficult to clean, and you have to use three attachments. It’s a complete waste of time.

In fact, once you’ve got used to making sourdough by hand it’s easy. You get a sense of how the dough should feel in your hand, and when you need to add a little more water, or a little more flour. You knead for ten seconds a time. That’s it. Suddenly it slots into your life, becomes a pleasure not a chore.

Slices

But laziness has taught me some useful lessons. The best is this: if you mistreat your starter, which I often do, by not feeding it every day, it produces a more acidic taste, which I really like.

And salt – I know they say you need it to get a decent prove, and a decent crust, but you really don’t. After completely forgetting to add salt a couple of times, I can’t detect any difference in texture between unsalted and “properly” salted sourdough. I now add a  fraction of what you’re supposed to use, and the bread is excellent.

I cheat on ice – I just throw a small glass of water into the oven to produce the necessary steam – and I don’t own a proper banetton so I improvise with a cloth, a wire fruit bowl and lots of flour.

But I slash. Always.

Slash

Ben McPherson is a TV producer and writer.

Ribollita

Ribollita means ‘reboiled’. That’s not an attractive title is it? But the name belies just how wonderful this soup is: incredibly tasty, healthy, sustaining, satisfying. I urge you to try it. It’s what you’d call ‘hearty peasant food’ but to us, it’s dinner, or lunch. It’s a great way to use up old, hearty bread, a bit past its best.

We do use this to use up the older sourdough and it makes a large vat. I think it’d easily serve six.

2 tablespoons of olive oil

20g butter

1 red onion, slice finely

4 stalks of celery, chopped and de-‘stringed’ (don’t worry if you can’t be bothered to do this but we do)

3 chopped carrots

500g Swiss chard or cavolo nero. What you need to do here, with your hands, is separate out the stems and cut them into half a fingers length if they’re big, strip the leaves off and put to one side so you end up with two piles: the leaves and the stems. I can just imagine my nonna doing this whilst chatting to her women friends, putting the world to right

4 cloves of garlic, crushed or chopped. I HATE garlic crushers

A small bunch of flat leaf parsley, chopped up small

400g can of good, plum peeled tomatoes.

400g borlotti beans

some old sourdough/hearty bread (I leave this out sometimes but it’s a great way of using up old bread, do NOT be tempted to put in crap white supermarket sliced for goodness sake)

So you heat the butter up in the saucepan with the oil, until the butter has just melted. If you add the veg to really hot oil, it will brown and you don’t want that, you want to soften it. Add the onion, celery and carrots and the chard stalks and give it about 20 mins. Cover it, don’t cover it, it doesn’t really matter. Then add the garlic, and parsley and cook for another five mins. Now stir in the tomatoes, there shouldn’t be much juice if these are quality tomatoes but add whatever there is. Break them up a bit and cook for about 10 mins. Now add the beans and pour enough water to cover the whole thing. Simmer for half an hour, 40 mins. Then add the leaves of the chard or cavolo nero and cook for another ten or so minutes. Add a bit more water if it looks too thick but I never have had to.

Season, add the bread and serve drizzled with olive oil if you want, but I never do.

The spawning of the sourdough

Photo ©Ben McPherson


I have now shared my sourdough amongst at least four people. Possibly more but I forget. The latest recipients were my friend Ben McPherson and his wife Charlotte, who live in Norway and are keen to get started on sourdough making.

This is the furthest my sourdough starter has ever travelled and I told Ben that part of the deal, now that we were sharing wild yeast spores, was that he had to keep me in touch with how his starter was doing.

You can probably tell that Ben is a writer, producer and director by this photo of his starter, which he has put in an ENORMOUS jar and obviously crouched down to take this photograph from as dramatic an angle as possible. I said that it – the starter – looked like it needed its own TV show.

Anyway, I sent it heat sealed in a very strong plastic bag and that bag was in a plastic security sealed envelope. And yet the starter burst out of the heat sealed bag (which is made to withstand sous vide cooking) and only the plastic envelope stopped it escaping further. This just shows the power of the sourdough starter.

Ben has refreshed it and will hopefully start baking at the weekend. I hope to convince him to do a guest-post soon. Maybe with sub titles.

Every day sourdough baking

A gratuitous picture of a loaf of sourdough, baked this morning

I get asked, a lot, if sourdough bread is hard to make. I am tempted to say “really hard” to make myself look clever but the truth is, it isn’t.

Sourdough seems uniquely complicated amongst bread baking. I don’t know if it’s purposely shrouded in mystery. I know that it took me about two years to finally get down to it, to be brave enough to try, as it seemed magical and mystical. It is, but it isn’t difficult. The hardest thing about sourdough baking is being mentally ready.

Because once you have a good starter going, sourdough baking is almost bomb proof.

I bake sourdough about three times a week. Mostly I bake this bread, which is half wholemeal and half white.

Although I only bake half of the amount in that recipe, so 500g of flour, 200g levain (starter), 333g of water and I’ve got the salt down to just one teaspoon.

I divide the dough up to prove over two baton shaped bannetons so I have bread for two bakes. The bread in the picture above was proved in one of those bannetons.

It’s easy. The hard bit with sourdough, in terms of faff, has always been the starting off of it. Once I’ve weighed it out and refreshed the starter I know I need to be relatively close for the first three kneads (ten mins apart) and not too far for the one that requires a 30 minute rest. But after that I can do the school run or go out or do whatever. If I know I’m not going to be back in time – be really ages – then I put it in the fridge, and when I get back, simply bring it back to room temperature and take up where I left off.

You could never do that with bread with commercial yeast, because the yeast would get exhausted.

I’ve had a sourdough loaf going over three days.

Various people have said to me that they want to try sourdough baking. Instead of abstemious resolutions that make you feel miserable (isn’t January miserable enough?) try a resolution that will make you feel really good. With a good loaf you always have a meal. And when everyone else is out panic buying because it might snow, you can be smug knowing that with your starter, some flour, water and salt you can turn those tins of stock-piled baked beans into something really glorious.