Dan Lepard’s Almond Layer cake with crushed raspberries

All my own work.

This recipe was published in the Guardian last year. I made it on the day it came out, as you can probably see from the below the line comments (Dan linked to a picture of the cake that I tweeted, for I can no longer bake in isolation, but need to share with the world). Since then I’ve baked it many times. It’s perfect for when you want a proper teatime cake with goo. And it’s not difficult.

The recipe is here. There are a few comments I’d like to make:

I don’t have 18cm cake tins so I use 8″ ones (which is slightly bigger than 18cm, sorry to mix imperial and metric). It’s fine.

I find 30 mins just a bit too much….so check after 25 mins.

I double up the syrup Dan uses to soak the sponges, as I find doing his amount isn’t enough for my thirsty cakes.

You could easily, easily make two not-so-high-cakes out of these, by that I mean slice the cakes in half horizontally. That way you get more cream/raspberries to sponge ratio. Won’t be so towering and impressive, but if you need more cakes.

Put more cream in the sandwich layer than you think you’ll need. It squishes down.

Children also seem to love this. I find this is important when I just want to do one thing.

This is a really delicious cake. It’s so much more than a Victoria sponge. It’s so easy to make (make the cake bits ahead, assemble before you eat it) and is impressive. My friend Kate is so greedy for this cake, I can make her turn all sorts of tricks for it.IMG_0995


Eating and freezing notes: Unless this cake is for An Event, I now make two cakes out of it. That is to say instead of putting one of the cakes atop the other, which makes for a spectacular cake but one that’s fairly high, I slice each in half (see pic above). Or I freeze one of the (plain) cakes for another time. It freezes really well but freeze it before you soak it with the brandy/sugar syrup. Do that when you defrost it and then proceed with the cream/fruit part.

Schiacciata

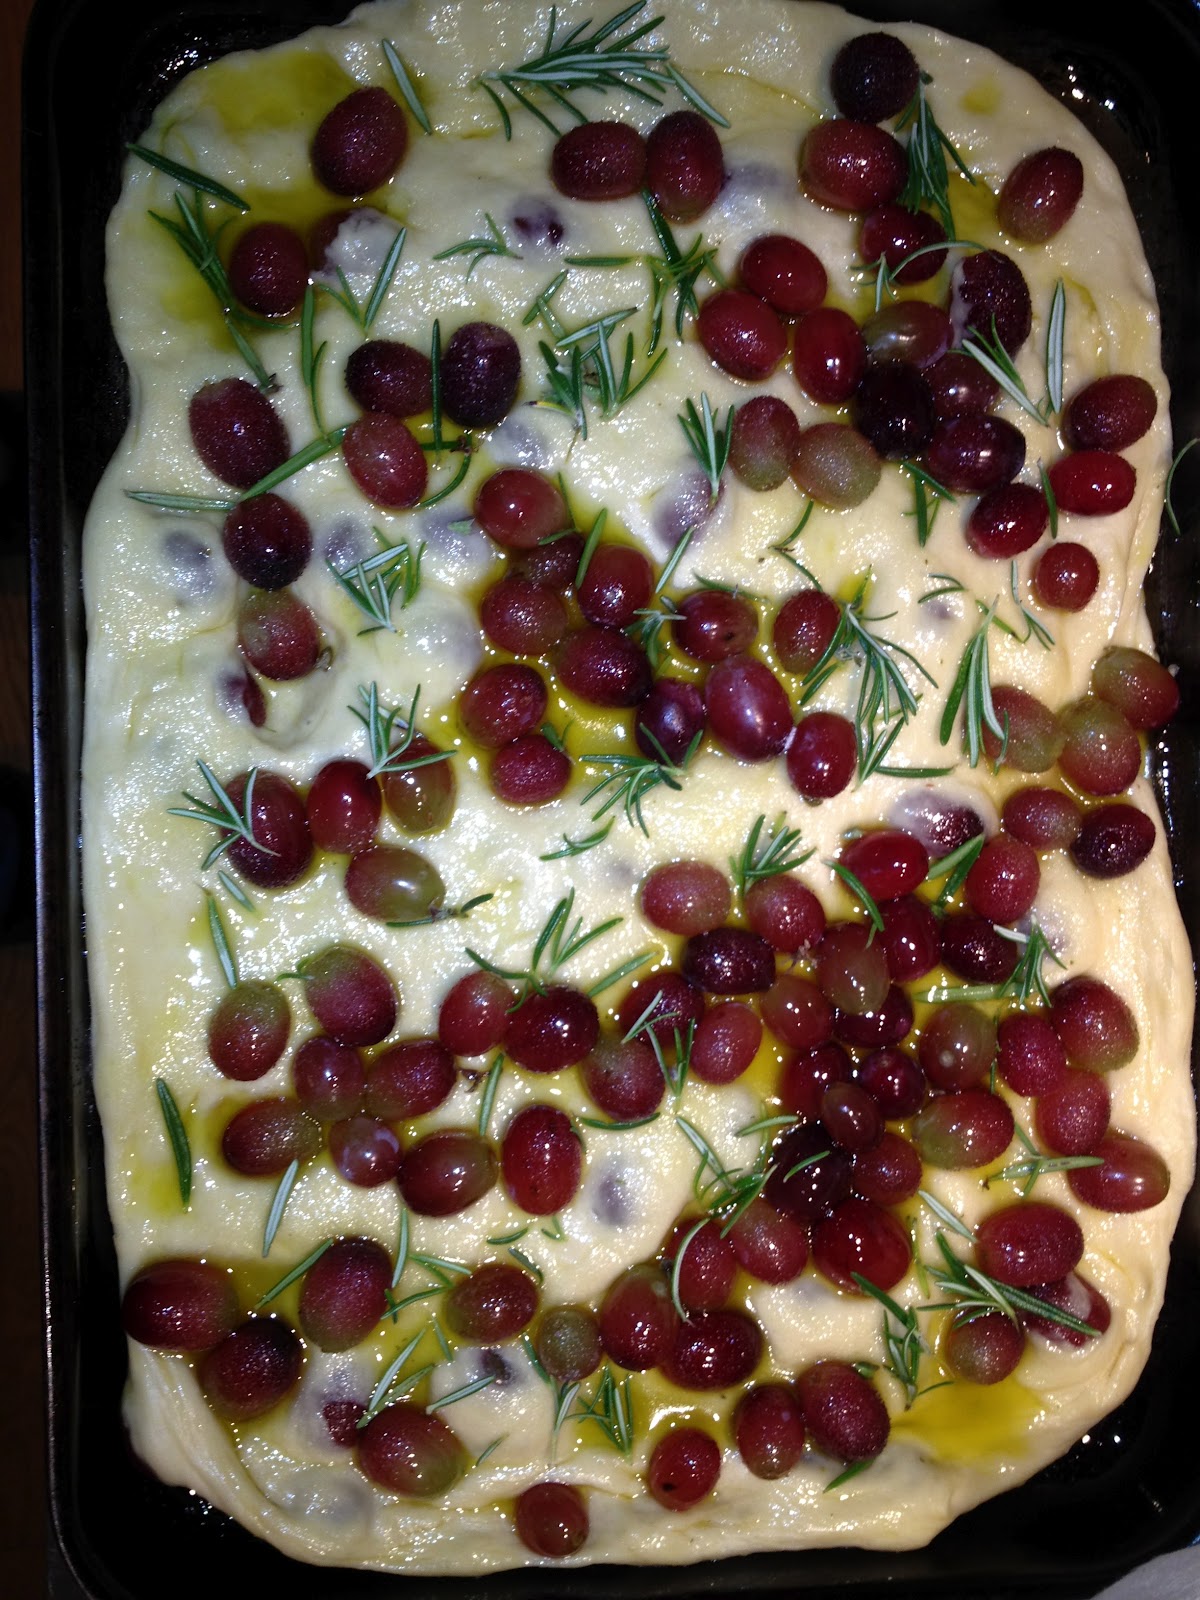
Aerial view before going into the oven

Schiacciata means squashed in Italian, and this is a recipe for a sort of foccaccia bread with grapes squashed into it. It’s not a sourdough recipe, you don’t need a bread maker. It’s really very simple. I have had this recipe for ages, cut out from an Italian magazine and converted into English stuff.

It’s an odd bread though. People often say to me things like “oh God I couldn’t make my own bread I’d just spend all day eating it”. Well, I don’t spend all day eating bread. I think this is largely because sourdough (what I usually make every day) is delicious, but satisfying. Even though it’s a sum of parts of water, flour and salt, the way it’s made makes it far more satisfying than bread made with commercial yeast plus those same parts. My partner makes a foccacia that is so addictive I am as bloated as a puffer fish by the end of a meal as I carry on eating it well after my stomach is stretched to fullness.

This is an odd bread, however, because what would you eat it with? Well cheese is an obvious one. A salty cheese especially I think (actually, almost any after-dinner type cheese, I just really wanted to write the words ‘salty cheese’). And I think it would be perfectly wonderful with Parma ham. Whatever you have it with, it makes for a very attractive centre piece, would make a lovely present, is easy and quick to make but really needs to be eaten within a day of making it. It’s lovely warm, but not too hot, from the oven. And it’s very hard to resist, so don’t make this if you’ve just gone on a diet (loathsome word). You won’t get a big, airy crumb. This is altogether a more cakey bread.

So, this is what you need:

1tsp of dried, fast acting yeast (I use Dove’s)
1tbsp of caster sugar
80ml extra virgin olive oil
Fresh rosemary sprigs, I dunno, like about five or six
200 strong white bread flour
200-300g red or black seedless grapes, washed and dried, all off the stems.
a generous half a teaspoon of salt

You can easily double up or treble the recipe. I double it usually and make it in a big rectangular tin. But really, that gives you enough for a dinner party and you don’t really want that unless you are actually having a dinner party. And as this bread doesn’t keep I’d keep the quantities modest until such time as you know you’ll be feeding the five thousand.

This is what you do:

Chop up the rosemary sprigs (take the leaves off the stems) until you have very finely chopped bits, about a tablespoon’s worth. Put in the olive oil in a pan and warm very gently through for a few minutes. Then take it off the heat and let it cool and infuse. You want it to be back down to kinda blood temperature, honestly as long as it’s not boiling hot you can’t go wrong.

Whilst that’s happening, mix the yeast in 90ml of warm water and a scant tsp of the caster sugar (more like half really, kinda like a pinch). Whisk gently and leave for 10 mins until frothy. Maybe longer, but it will have frothed and puffed up a bit.

Now add the flour and salt to a bowl, make a well in the middle and then the yeast mixture and half the rosemary oil. Mix together roughly with your hands until you’ve got it mostly together. Leave, covered, for about 8-10 mins.

Turn out onto an oiled board and knead for about ten seconds. Leave for 8-10 mins.

Turn it out onto an oiled board again and knead for about ten seconds. It should be all nice and smooth now. If not then do it one more time. If it looks good and smooth, cover with a bowl and leave to rise at room temperature for 1-2 hours. Sorry not to be more accurate, but it depends on your room temperature. Until it’s doubled in size. As a guide, my kitchen was at 22C and it took about 90 mins.

When you feel it’s ready, oil a suitable oven proof dish – you can use a round cake tin (23/24cm) or a rectangular one. You need something with sides really as you’re going to be brushing it with a lot of oil and you want to keep the oil in the dough, not escaping out onto a baking tray. I sort of squash the bread in, and over about 10 – 15 mins (so the dough is nice and relaxed) I push it out to the sides of the tin so it fills it. You want a thin layer of dough, not thin-crust pizza thin, but about 1-2cm thick.

Now squash the grapes in. I say squash but don’t break them, kinda push them in. Brush the bread with the remaining oil. yes it will see like a lot. Now scatter over some more rosemary, sprinkle over some caster sugar (not loads) and set aside for about half an hour, covered with cling film or a very wrung out damp teatowel.

In the meantime preheat the oven to 250 (or as high as it will go if not as high as that). Bake for about 10-12 mins, then turn down to 220 for a further ten mins or so. It’s done when it’s golden brown.

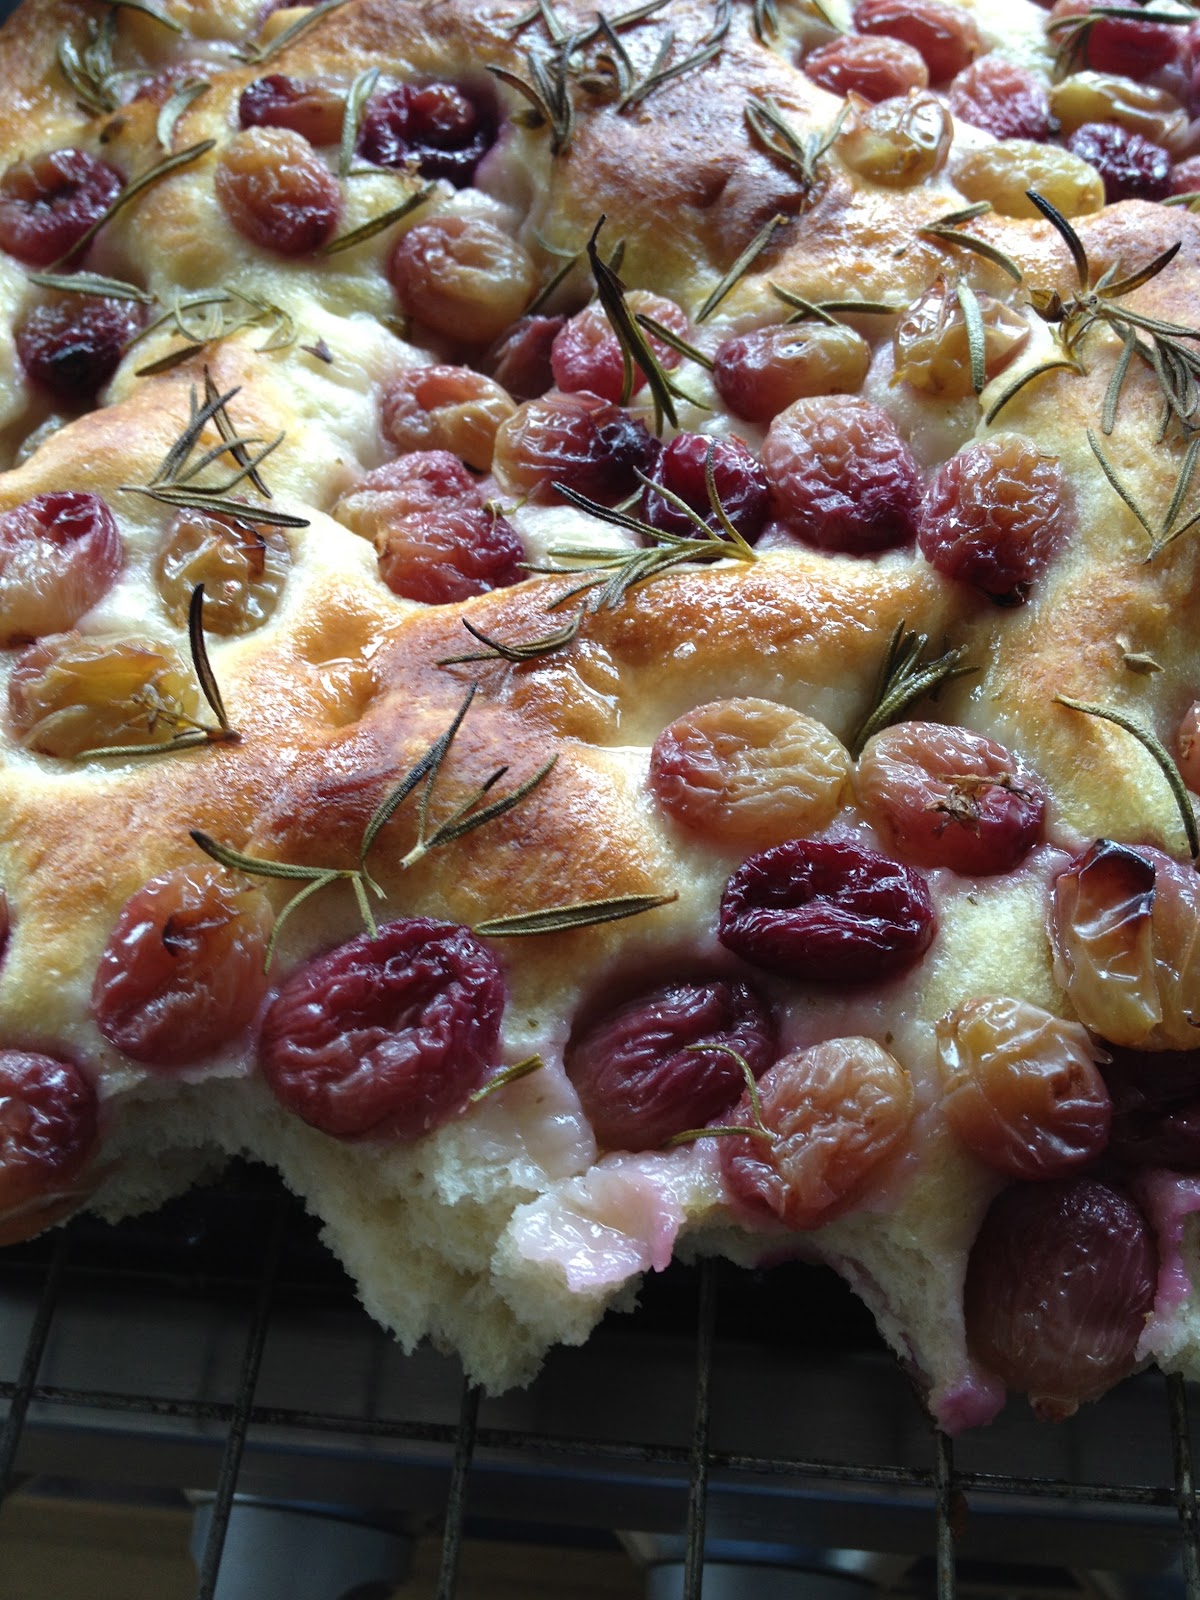
Cooked and heavily nibbled by someone.

Minestrone

Minestrone with broken up spaghetti and small bits of ‘pastina’

It’s mid June as I write this. In Italy, where my mother is from, it’s nearly 30C. Here, in Suffolk, it’s 12C.

And everybody’s complaining about it.

So today, I decided to make some minestrone. Minestrone is peasant food. You’d make it out of the bits ‘n’ bobs of vegetables you had left over. As such, there are many different versions. This is the beauty of it really, which is that you can add more or less whatever veg you have. Use bits of broken pasta that you can’t use for anything else, etc.

My mother makes an amazing minestrone, but she makes it using frozen veg. Which is quite inspired really when you consider that she lives in central London now, not on the edge of a vegetable patch. And the frozen veg is really fresh and delicious. I used to hate her minestrone (sorry Mamma, although the likelihood of you reading this is as high as the Vatican ever admitting it is wrong about anything) and the one and only time I was sent to bed without my dinner was when I, one evening, refused to eat it. I thought – and still think – this was quite harsh considering that I used to eat almost everything else. Including chickens’ feet and chickens’ stomach and tripe and brains. I mean, come on! Give me a break.

Anyway, I love it now and this is how I make it. I’d love to say this is a recipe passed down from my Nonna, but nope, I got it from Waitrose.

2tbsp olive oil
140g pancetta, cut up; or cut up bits of bacon (entirely optional, but makes it nice)
1 onion, diced
2 carrots, diced
2 sticks of celery, you guessed it, diced
1 clove of garlic, diced or chopped, go crazy
1 medium potato, peeled and guess what? diced
2 medium courgettes, diced
400g can of chopped tomatoes
1 large sprig of basil
Parmesan rind (save them for this)
salt and pepper (but not salt if you use the parmesan rind)
410g borlotti beans, drained and rinsed (optional)
50g your chosen pasta, nothing too thick, I love broken up spaghetti

You can prepare each veg as you go along.

Put the oil in a large saucepan and then add the pancetta/bacon. Once it’s beginning to colour, add the onion and cook gently until soft. Fry until soft.

Add the carrot, then the celery, then the garlic, then the potato, then the courgette. At each stage add the veg and let it cook for a minute or two.

Give the courgettes a couple of minutes, then add the chopped tomatoes. Fill the now empty tin with water, twice, and add to the minestrone. Now add the basil (if you don’t have it, don’t stress). Add parmesan rind and some pepper. If you don’t have the parmesan rind then add salt too.

Bring to boil, lower to simmer. With lid off, simmer very gently for two hours. You can eat it after one hour but it’s so much nicer after two hours. Twenty mins before the end, add the beans if you want to use them (I’m not a mad fan of the beans, and prefer it without).

If you’re planning on eating the whole lot in one go, also put the pasta in now, otherwise you get a better result cooking the pasta separately and adding it when you eat the minestrone.

That’s it. I find this really therapeutic to make and deliciously wholesome to eat.

What to do with your starter when you go away

This piece in the Guardian today is getting quite a lot of attention on Twitter. I think some people have taken it a tad too seriously…(it’s about checking your sourdough start into a hotel).

But it does bring me onto something pertinent, which is that people who I’ve got into sourdough (I’m a sourdough pusher) and have shared my starter with, have gone into a panic about going away.

It’s really no big deal. If you go away on holiday:

Make sure your starter is in a big enough jar to cope with any expansion.
If you’re worried about your start erupting (I never do, but I know some people do) then refresh it about 24hrs before you go away, not just as you leave. So you can keep an eye on it.
Keep the starter drier than usual so it’s less frisky.
Put your starter in the fridge.

I have to say, I don’t do anything different as I know my jar is big enough and I know how my starter behaves, but just to be extra cautious.

It’ll be fine. When you come back, refresh it as normal once or twice before you bake.

That’s all. Happy hols!

An easy summer dessert

My summer dessert special. If you come to my house during berry season, this is likely what you’ll get.

This is, actually, really, a dessert I invented myself. You can tell by just how imprecise everything is. It was probably borne out of that great motivator: greed.

This is what you need:

Some amaretti biscuits

Mascarpone, you need about 1-2 tablespoons per person depending on size of glass.

Some yoghurt

Lemon curd

Some berries

Some icing sugar

Some pretty glasses

Long spoons


Crush the amaretti biscuits. Whip up the mascarpone with the yoghurt and lemon curd – to taste. I tend to have a 60/30/10 split mascarpone/yoghurt/lemon curd. And when I say whip up, I mean just kinda loosen it with a fork until it’s all homogenised.

Take some of the berries and whizz them up in a liquidiser with the icing sugar. Just a tablespoon or so of the icing sugar! This is for the syrupy part.

Then you just layer everything, a layer of crushed biscuits, a layer of fruit, layer of the mascarpone mixture, a bit of the syrup repeat, etc. The syrup makes things really tasty, so don’t skimp on it. I like to end up with a  sprinkling of the amaretti or some chopped hazelnuts on top of a top layer of the mascarpone mixture.

You can make these in advance and bring them out at the end. With a flourish.


A white chocolate lolly ‘cake’

I don’t even like white chocolate, but let me tell you, these were so good I almost ate them all in ‘quality control’ before the actual day.

Yesterday was my eldest daughter’s first holy communion. I made her a cake made entirely of white chocolate lollies. Since first experimenting with chocolate lollies last year, I’ve really moved on with them and by investing in a few things: proper moulds, sticks and a stand, you can really make something quite simple and easy to make (but ssssh, don’t tell anyone) into something that looks spectacular.

I made these the day before, and just assembled them on the day (i.e. slotted them into the holes in the stand). Once I’ve had an alcoholic drink, my guests have to pretty much fend for themselves so anything that can be pre-made plays to my great organisational skills and my weakness for being a dreadful, drunk, host.

I usually make chocolate lollies in 70% cocoa chocolate. But a few months ago, my friend Lucy (who is the only person in the whole of East Anglia who possibly has more baking gadgets/biscuit cutters than I) mentioned that she had made some lollies in white chocolate using crystallized violets. I stored this bit of information away in my brain, thinking white lollies would be lovely for a holy communion, instead of a cake, say. We had some crystallized violets that my partner and the girls had made for mother’s day (every aspect of that sentence sounds smug, but I don’t mean it to), I used Green and  Black’s white chocolate (which is, I have to say, absolutely superb). And this is what I did.

Melted the white chocolate.
Poured it into the moulds.
Put in lolly sticks.
Scattered on some crystallized violets or freeze dried strawberries (from Waitrose, they come in a tube, in the baking aisle).
Put in fridge to set.
Removed from moulds after a couple of hours.
Tasted one for quality control purposes.
Decided they were so amazingly good I had to have more.
Cycle to Waitrose to buy more white chocolate.
Repeat process.
And then, when time comes, slot the lollies into the holes in the stand and da-dar.

A note about the stand. I bought mine from Amazon. It doesn’t appear to be sold anymore, but I’m looking out for other stockists as it’s really lovely and minimalist and classy.

Cast iron pans ‘n’ skillets

Everyone seems to have a tale of the cast iron frying pan that never got washed and was passed down from mother to child. I certainly have. Whenever I did the drying up with my Ma, and that drying up involved the frying pan (not a cast iron one), she would tell me about her Ma’s frying pan which never got washed, just wiped.

This queer little detail fascinated me for ages. How could you not wash a frying pan?

Fast forward many years later.  And all my well meaning friends, the one who breastfeed for years and have home births and make their own bread and are…generally just like me. Well they started going on and on about cast iron frying pans. How non stick made you die, how canaries in rooms with non stick frying pans just dropped down dead.

It was really boring, so I thought I’d buy a cast iron frying pan, if for no other reason than, when they came round, I could whack them round the head with it.

And now, here I am being just like them and going ON about cast iron. It’s true, owning a cast iron frying pan is like having another member of the family, someone you love and trust and who never lets you down.

Only kidding. It’s not. It’s a frying pan for goodness sake. But yes, there is something really nice about the weight, the solidity of a cast iron fucking frying pan. And I was actually getting fed up of non stick stuff lasting just a few years before it started to fall apart (and I’m not talking cheap pans, either, all of my non-stick pans were Berndes).

I now have three cast iron frying pans (aka skillets). They’re all from Lodge. They’re not expensive (I got mine from Amazon) and I stripped them all down (they come pre-seasoned, but I wanted to season them myself, so I stripped them down using oven cleaner) using this incredibly complicated, scientific formula from this rather fabulous website.

Even once you’ve done the seasoning in the oven, with the organic linseed oil, the prescribed six times (you need to feel the pain), it still takes a few uses for them to become really non stick, but then, you’re flying (frying…).

So, the first few times you cook with them, don’t use them for something where the non stick properties are really important.

Oh and according to Sheryl Canter (writer of the blog post on how to season your pan, above) you can wash your cast iron pans. We do. I gently wipe them with a non-scratch pad, hot water, occasionally a bit of washing up liquid. As she points out, the seasoning got there via a long process, a bit of hot water and soap ain’t gonna get it off. Then I dry them on the hob for a couple of minutes and apply a slick of olive oil to cover the whole pan. If any bits get stuck on, if you heat up the pan you can get them off with a wooden spoon or some other more gentle implement. Don’t use the pans to heat up water or anything with tomatoes in – the acid can damage the pan. You need your stainless steel pans for stuff like that. I recommend Le Pentole, superb. Mine are still going strong some 25 years after I bought them. (They’re not cheap.)

A few other advantages of cast iron:

It gets really hot and retains the heat, so great for fast cooking but also great for long, slow cooking where you can turn the heat right down.

You can cook something on the hob and then transfer it to the oven (like tarte tartin).

Works out your biceps and triceps every time you lift the damn things up (that’s actually a pain but I’m trying to make it into a positive).

I’m sure my cast iron pans will last for many years, and I’m sure my children will be delighted that instead of passing down my diamonds,  I’ll be passing down my non-canary killing skillets.

ps: Don’t confuse the cast iron I’m talking about here with enameled cast iron (viz Le Creuset).

pps: to answer Claire (below, who has asked me a question on Facebook), yes I do use my cast iron frying pan to make pancakes in. This is the pan I use.

Doughnuts, but not deep fried

Hello! Doughnuts that are delicious. But not deep fried.

A new year ritual in southern Italy, is to make zeppole, or doughnuts. They are unbelievably delicious and my aunt would make them (whatever time of year I went, because I would nag her) and lay them out on dishcloths (to soak up any excess oil) – one cloth on the bottom, one on the top. As such she built up a sort of doughnut grid system after a while. I was immensely skilful because I would take them out strategically – whilst she was frying the next batch – so that the cloth didn’t sink to reveal any tell tale dips.

By the time she discovered there were gaps, it was too late. I was gone, out into the street to play ‘fazzoletto’. Innocent, greedy, slim days, when all excess calories were worked off playing outside til long after the stars were out.

My aunt would coat hers in cinnamon sugar. I’m not sure how I feel about cinnamon. It makes me feel claustrophic sometimes, all cloying and needy.

Anyway. Years ago, I bought a mini doughnut tray from Lakeland. Don’t go looking for it now though as they discontinued it some time ago; probably because it realised that, although the tray was perfectly good, the recipe that came with it produced pretty crap little cakes. They didn’t taste like doughnuts at all, just very average tasting, round little sponge cakes that weren’t even very brown.

Nevertheless, I kept the tin, and the recipe. And today, whilst my children and I were swinging in the pod chair in the garden, I had the idea of making some more.

Except this time, I thought, I’ll cook ’em and then shallow fry them for a minute or two. And what do you know. They are brilliant. I think they’d make great little accompaniments to a home made ice cream or served with chocolate ganache you can dip them into. Although, for me, nothing beats a simple doughnut simply rolled in vanilla sugar.

If you want to try these, you can get a similar-looking tray from here. (Update note: I now have two of these Judge tins and they are better than the original one I bought from Lakeland!)

This is how you make them. They are ridiculously easy and quick, so warm the oven up the moment you decide to make them.

For 12 mini doughnuts you need:

75g  plain flour
half a teaspoon of baking powder
quarter of a teaspoon of salt
55g caster sugar
60ml of milk (I used semi skimmed)
1 beaten egg
1 teaspoon of olive oil
half a teaspoon of vanilla extract

Put the oven on at 160C.

Grease the mini doughnut tray. Little fingers love doing this. Let them get on with it as it’s annoying.

Mix all the ingredients together, thoroughly, then pour into the doughnut tray. The mixture will come about three quarters of the way up.

Put in the oven. Cook for fifteen minutes. Take out the incredibly unpromising, anaemic looking doughnuts. (Test they are cooked: if you press them they should spring back.)

Heat up a frying pan with some sunflower oil.  You need only enough to coat the bottom, like a puddle’s depth. I have a cast iron frying pan (which I seasoned from scratch, because I am HARDCORE) so this retains the heat beautifully. Then  you just fry the doughnuts, about 1-2mins per side. Put on kitchen paper and as soon as you can, throw them around some vanilla sugar.

If you eat these warm, and you should as there is nothing nicer, they will probably give you rampant indigestion.

Tagalong bikes or trailer bikes

The Roland Add-a-Bike


I ride a Nihola trike and have done for about four years now. It’s what I do the school run on and, aside from the harshest day in winter, I use it instead of the car for around town.

I will do a review on the Nihola soon, just haven’t yet. I don’t know why I just never seem to get down to it even though I love my Nihola more than is decent.

When my eldest got to eight years old, I thought it was about time she started to ride her own bike to school. Except. I wasn’t really ready for her to ride her own bike to school. I mean, she can ride, beautifully (we are Islabike fans) but we tend to let her ride mostly off road or just meander along. As a parent I realise you take all sorts of risks you’re comfortable with. I co-sleep with my children, which some consider a risk. I pick them up when they cry, which some consider a risk (that they will turn into monsters and be forever crying just to be picked up). I let them feed themselves, which some would worry about (the choking). I don’t Dettox everything and let them eat things that have fallen onto the floor (at home) and don’t always insist they wash their hands. I let them climb walls and trees. And I let my children use screens: iPads, computers etc. All of which some parents consider risky, irresponsible behaviour.

But I’m comfortable with all of that.

I’m not, however, comfortable with letting my eldest cycle to school, yet. So I thought a trailer bike was in order. You know the things? They hook up to the back of a normal bike, so the child gets a sense of being in traffic, she cycles, so gets valuable exercise (and believe me, this is a help when you’re cycling a Nihola with another child already in the box trailer up front) but is totally attached to the adult.

I’d written about tagalongs a while ago and done a lot of research. So I knew that the tagalong bike I wanted had to fit onto the pannier rack at the back of the adult bike, not onto the seat-post (the people I really listen to in cycling, none of them recommend that latter sort of fixing tagalong as it compromises the stability of the adult bike). The problem was that the only tagalong that did this was the Burley Piccolo which had gone out of production and second hand ones were fetching silly money on eBay.

The fabulous Islabikes used to do a trailer bike (I use the term tagalong and trailer bike interchangeably, they are the same thing), but I rang and spoke to Isla herself who told me that although she would probably do them again, there was a problem with sourcing one of the components and for the moment, she wasn’t making any new ones. A visit to eBay showed me that her trailer bikes were also exchanging hands for about the price of what they’d cost new.

So I was stuck. Then I rang Brixton Cycles and spoke to the fabulous Barnaby who has always been super  helpful and straight down the line honest with what he recommends, even if he doesn’t sell it. And he told me about Roland add-a-bikes which fix onto the back rack and are sold by Bikes and Trailers.

I think it was Sean I spoke to and the service was excellent.

So I got one and it is brilliant. I can’t comment too much on the stability because of course, my Nihola is a trike. But it comes with its own pannier back rack (so if you already have one, you’ll have to take it off) and the actual bike slots into the back quite easily. You can take it off if you do the school run and leave it there and then re-fix it when you pick up in the afternoon.

I umm-ed and ahh-ed about getting one with gears (it comes in 3 or 7 gear versions), or not. In the end I decided not to to keep the cost down. The one extra I did get (retrospectively, but wish I’d got it before) was the kick (two-legged) stand. It’s really useful if you regularly taken the trailer bike off and it has to stand on its own, because it can’t stand on its own otherwise…I hesitated because it’s not cheap at £34 but some things are just really useful and you have to bite the bullet.

If you were to transfer this bike from one adult bike to the other regularly, then you’d really need to also get the extra back rack. You can’t use the Add a Bike without it.

Just to add to this: I spoke to Isla last week to ascertain what was happening with her trailer bike, before I wrote this blog post. She told me she had no immediate plans to re-introduce it but it’s something she would think about doing in the future. She did however tell me that the Burley Piccolo is going back into production. I’ll keep you posted.

In the  meantime, we cycle to school now looking like a giant cycle crocodile. My youngest in the front in the Nihola box, me on the Nihola and my eldest on the back. The Nihola box allows me space for one more child and lots of shopping…who needs the gym.

One important point to add (thanks Claire), it’s not relevant for me with all the passenger space, but you can still use this tagalong and fit a child seat on the back of the adult bike. If you look at the Bikes and Trailers website you can see.

Willie’s Delectable Cacao Single Squares

Happy Easter. This is what I got today instead of an Easter egg. I really love plain chocolate, preferable 70% cocoa one, for a real punch.

You can get these Single Squares from Waitrose and they cost from £1.80. Not cheap (they weigh 50g) but the chocolate is excellent; I much prefer it to Green and Black’s dark chocolate which I find bitter. And I’d rather have a hit of really good chocolate than lots of cheap, sugar-filled stuff.

The ones I got – you can see them above – were hazelnut and raisin, ginger and lime and luscious orange. They are all delicious. There are others that are just chocolate: milk, plain or white.

I haven’t managed to ascertain what the fairtrade credentials, if any, are (I do try to buy fairtrade wherever possible). But you can read more about Willie’s chocolate  here.