Category Archives: Children

Chocolate ganache that makes a rather splendid base for hot chocolate or chocolate custard

Sorry about the overly long title.

I’ve written before that I have a thing about really good hot chocolate. I prefer a potent pokey hot chocolate rather than a long, watered down poor-man’s version of one. This base is absolutely brilliant, it takes not very long to make, you store it in the fridge, it lasts for a week (unless you use cream that’s right by its sell by date) and you can turn it, in minutes, into superb hot chocolate or add it to shop bought custard (buy good quality one) to make chocolate custard that’s just really IMPRESSIVE.

The proportions below are a rough guide. Stick loosely to them, because I’ve perfected this over years. But of course it doesn’t matter if you have only 90g of one chocolate or 60g of another, or a bit more or less cream. The effects of varying the proportions are, indeed, something you can play around with. This is what works for us.

100g 70% cocoa chocolate

75g 37% cocoa milk chocolate (I use Green and Black’s milk cooking chocolate)

225g of cream, I use double but you could use single

In a bain marie or a bowl over pan of boiling water, melt the two types of chocolate with the cream. Be careful not to let it get too hot or scorch. Then just put it in a suitable container and put it in the fridge until you need it.

IMG_5975.jpg

To make hot chocolate you just measure out some milk into the cup you are using – for a normal size cup of mug you use 3/4 of the cup of milk and a big dessert-spoon dollop of chocolate ganache, all into a pan, warm through until melted/warm. Drink and sigh.

To make chocolate custard get shop bought custard – I use this one from Waitrose which is 500g and I add the whole quantity of the custard ganache the recipe above makes. This makes a good old amount of chocolate custard, but of course you can vary it to make as much as you want, or you may prefer the custard less chocolately. Experiment. It goes super well with my chocolate sponge.

Later note: a dollop of this ganache, mixed up with cold milk, also makes a divine chocolate milk drink.

The Week Junior

The Week – a comic sized, comic-looking journal which digests all that week’s news for you (strap line: ‘All you need to know about everything that matters’) – launched 20 years ago. I was a subscriber from the beginning. I LOVED it. Despite working in newspapers since 1993, you do sometimes miss stuff, and also, sometimes, you want a handy-sized journal to stuff in your bag.

The great thing about The Week is that you end up reading about things you thought you had no interest in. It’s brilliant for catching up about world news and, each week, takes a closer look at an important matter you may have suddenly realised you know too little about, but were too embarrassed to ask. The Week has no original news of its own, it takes its material from news reports that have come out that week. It has a great column called Wit And Wisdom (which I’ve been in three times, go me) where it picks up great quotes that have been made that week in the press or TV or radio.

I love The Week. I love that it has hardly changed its format in twenty years (it may in fact have never changed it and that’s great because its format works).

I was a columnist for The Week’s website version (which does generate its own news stories). And then I got made its sketch writer for a while,  a job I’d always wanted. I got that gig the day my youngest started school, so that rite-of-passage was painless because it was all about me me me that day.

Yesterday, The Week Junior launched. It doesn’t quite have the great feel to it of The Week original. It doesn’t obviously take its news from newspapers, as in it doesn’t say “The Daily Telegraph reported this week”. And I think that’s a pity because a bit of that sort of thing might encourage young children to read newspapers and also tell them about reputable places to get their news from. I think more children should read proper news.

It’s well laid out, interesting – both my children started reading it the moment I put it down. I worry about what it will do to First News which is a good children’s newspaper, although neither of my children particularly took to it (and they may not take to TWJ, either).

(I worry because I think it’d be a shame if the launch of one news publication for children pushed out another. There aren’t enough.)

Just going by the first issue, I think TWJ is better, but that may be because I love the original so much that I’m completely biased.

TWJ is aimed at 8-14 according to its press release. I would say that’s pushing at the upper age limit. My eldest is 12 and she reads The Week (original) and whilst she enjoyed TWJ, I’m not sure she will still be interested in it when she’s 14. My youngest, who is six, could read it easily (I’m not saying this in a ‘my child is a genius kind of way, just saying she was interested in it). So I would say the age group is more like 6/7 – 13. But I could be wrong, and what does it matter anyway.

The Week Junior is currently available exclusively from Sainsburys (i’m sure it will roll out in other places soon). Cover price: £1.99. Do have a look at it to see if you think it’s right for your family. Currently The Week subscribers can add it to their subs for an extra £50 a year.

[Disclaimer: I got sent the first issue for free, but if I subscribe I will do so using my own money.]

February 2016: We’ve been taking this for a couple of months now and we think it’s really excellent.

Halloween spider’s web cake

We do Halloween in our own way in this house, which is not very much. We don’t do trick or treating because that kinda contradicts everything we say the rest of the year (“knock on strangers’ doors! Eat lots of sweets! Ghosts and ghouls do exist!”).

But we aren’t total killjoys, either. We do stuff and have our own traditions and one of them is that I make this cake.

It’s basically a red velvet chocolate cake – or that’s how it started – but I don’t add red colouring so mine isn’t red, it’s just a light chocolate cake with cream cheese/sugar/butter filling and covered with a chocolate ganache, then iced with white chocolate. It’s actually fairly easy and really tasty and if you have one, a plastic spider on top looks good.

This recipe is adapted from a recipe in Waitrose magazine. The changes I’ve made are: no salted butter, no red food colouring, more cocoa, I used kefir instead of buttermilk (don’t worry if this means nothing to you!) and I cut the sugar down. But you can’t tell. It’s still very much a proper cake.

The cake

200g butter at room temperature

350g plain flour

1 tsp of baking powder

1 tsp bicarbonate of soda

4 tablespoons of good cocoa powder

quarter of a teaspoon of sea salt

300g caster sugar

3 eggs

1.5 tsp vanilla extract

284ml buttermilk/kefir

Cream cheese filling

120g butter

120g cream cheese

100g icing sugar

Chocolate icing

300ml double cream

250g 70% cocoa chocolate, chopped

1.5 tablespoons of liquid glucose (you can buy it in tubes in the baking aisle)

50g white chocolate (I use Green and Black’s – absolutely the best white chocolate there is that doesn’t cost loads)

You’ll also need an icing bag and fine nozzle

What to do

Oven to 170C.  Line a 23cm spring-form cake tin with parchment or treat yourself and buy some cake tin liners. Put all the dry ingredients in a bowl, but not the sugar. Put the sugar and butter in a separate bowl and either beat by hand or put in a food mixer with whisk attachment and beat until smooth. Now add the eggs (continue with the food processor if you have started with it, but by hand is also, of course, fine) one at a time, beating well with each addition.

Now add the dry ingredients, alternating with the buttermilk/kefir until all combined. That’s it, your cake is done. Scrape into a tin then bake for about an hour.

It needs to cool completely. When it is cool, slice it into three. You’ll probably have two flat layers – the bits of the cake that were the middle and the bottom – and a slightly domed layer – the natural top of the cake. You can, if you want, straighten the slightly domed layer out by cutting it, or you can just use it as the middle layer of your cake. Either way, you want a very flat layer for the top, please.

Place what will be the bottom layer on a cooling rack on top of a baking tray (this is important for later) and spread half the filling on, place other layer on top and finish with a flat layer. Put it in the fridge for about 30 mins (longer if you want).

When you are ready to do the topping: place the double cream, dark chocolate and liquid glucose in a bowl atop some simmering water until all smooth and melted. At roughly the same time, melt the white chocolate in the same way and prepare to put into an icing bag with a thin nozzle icing head-piping-thing.

Now, spread the chocolate layer over the top with a spatula knife – this is where the baking tray comes in useful. It takes some practise but you will get some chocolate on the sides as you really need to cover the whole thing. Flatten the top. Now you pipe a spiral of white chocolate around the cake – start a bit off centre. When you’ve covered the whole cake, take a cocktail stick or skewer and make lines from the centre out, to make that ripple effect. Put back in fridge to chill and take out and serve at room temperature.

It’s good. Happy Halloween!

The Sir Alfred Munnings Art Museum and Garden Cafe, Dedham

Dedham is a village near where I live. We stumbled upon it a few years ago, when we did a marvellous country walk along its river bank (the Stour). It is an area of outstanding natural beauty that is heavily protected and, historically, always seems to have had residents who care about what happens there. It is Constable country: the artist lived down the road at East Bergholt and all around is the landscape he painted. He went to school in Dedham – you can see where in the square, the Old Grammar School – apparently walking there every morning along the same sort of route we took when we first discovered the village.

Dedham doesn’t have many shops, but it does have probably the best toy shop in the world (more on this another time).

The last time we went, I thought I’d see where we could have some good tea and cake. And this search took me to the Garden Cafe in the Munnings Art Museum (you see how I access culture? Via cake). The art museum wasn’t anything I’d ever seen or come across in Dedham before, and indeed, it is tucked away, nearly a mile’s walk from the village centre and badly signposted once you’re through the park (good playground). At one stage you are in deep Dedham suburbia (I guess this is where the houses that cost less than a million are) and you wonder if you’re in the right place at all. But you are and you keep going and then, there before you is Castle House, where Sir Alfred used to live and where a great part of his paintings are now kept.

(You can drive there, but we walked from Dedham.)

The museum is lovely. I love that children only pay £1 (adults: £6.50). I confess I’d never heard of him. Munnings painted lots of horses, he lost an eye to a bramble bush and went on to become a war artist for the Canadian army. He was controversial, as president of the RA, he made a speech slagging off modernists like Picasso and Matisse, live on BBC radio air. His first wife, Florence, attempted suicide on their wedding night. She killed herself two years later. The film Summer in February, starring him from Downton Abbey and Dominic Cooper, is about this part of his life (I’ve yet to see it, but want to). Florence was expunged from all record of Alfred’s life.

I didn’t come away feeling exactly warm towards him. But nevertheless it was a captivating museum. Although most of the pictures are of horses, my favourite was the bon viveur one above which is called Taggs Island and is displayed above the stairs.

Alfred’s second wife, Violet, had a black pekingese called Black Knight, which she carried everywhere with her. When he died, she had him stuffed and continued to carry him everywhere with her. One of the stewards in the museum remembers her, in the village, asking other customers to hold the stuffed dog, whilst she got money out to complete her transactions. There was even a ‘autobiography’ written by him, Diary of a Freeman (the dog was made a Freeman of the City of London, of course)..Black Knight is still there, stuffed and forever asleep on a cushion, in a glass case in the museum, with a red telephone next to him, presumably so he can order room service, when no-one is looking. My youngest was transfixed by this. Just goes to show that Karl Lagerfeld’s cat, Choupette, isn’t the first pet to chronicle their comings and goings.

The cafe in the garden, next to Alfred’s studio, is lovely. I mean, really first class. The staff were just delightful, the cakes (and you know how I am about cakes) DELICIOUS, all light and airy and even though I didn’t think I wanted them, I managed to eat everything on my plate. We had a coffee and walnut cake and a Victoria sponge, which had just been put out and was giant and multi-layered, the size of one of those pans we have in Italy, to cook pasta for fourteen in.  I didn’t try the food but it looked really good – all sorts of healthy salads and nice looking paninis. I promised the children we’d go back in the autumn to sample lunch, but it was a promise I mostly largely for myself

Do check opening times – of both the museum and the cafe. At the time of writing they were:

“The Café’s opening hours are 10:00am to 5:00pm and the Museum is open 2:00pm to 5:00pm Wednesday – Sunday and Bank Holiday Mondays (April to October). Please check in advance if we are open at other times.”

The Nutribullet

Ours is not a house short on gadgets. This is due to many things. We cook and bake a lot. My partner and I were fully formed adults when we joined households and we both cook and bake a lot, as I just said, and we had our own homes. So when we threw our lot in together, we discovered we now had four sieves, 12 pans that all did the same thing, 25 wooden spoons etc.

We have a juicer, a blender, a grinder (two actually), two ice cream machines, a food processor, a food mixer, a dehydrator, a stick blender with enough attachments to build a robot man…you get the idea. And we/I use all of them. Regularly.

So did I need a Nutribullet?

Strictly speaking no. There’s lots of talk about how it busts open the cells in your food. Sounds fabulous! But that’s what your teeth do and also, that’s what any good blender will do.

And make no mistake, the Nutribullet is a blender. That’s it.

But this is why it’s good and this is why I’ve used mine every day since I got it at Christmas.

The foot print is tiny (14cm) compared to that of any other blender that I know of. So it sits on the work surface and you’ll use it.

It’s unbelievably simple to clean. You just rinse the blade part under hot water and put it on the draining board and stick the cup part in the dishwasher if you have one, if not that is so easy to clean, too. If you do this immediately after you’ve made your smoothie you don’t need to do anything else. I have a toothbrush I use to clean any bits that get stuck under the blades, occasionally, but that’s it. No seals to take off like on my other blender (a 1000W machine).

And those really are the two reasons why it’s great. It’s easy to use and easy to clean. What more do you want? It comes with another blade – a grinder – which I use to make things like oat flour (just chuck in porridge oats or oatmeal). The Nutribullet comes in two versions, a 600W one, which is what I have, and a 900W one which costs 50% more.

You get two blades and various container ‘cups’  (the large one is the one I use most) in the smaller version, three blades and various other gizmos in the larger version. I’m sure you can decide which one, if either, is right for you. It costs about £100 for the 600W version, £150 for the other one.

I got mine (with my press discount of 20% which I’ve had for 20 years) from Lakeland which offers a life time guarantee on everything (or at least it used to but this now seems to have disappeared from its website so I’ve asked them to clarify) *.

I use it every day to make smoothies of varying degrees of “Gwyneth-ness” and my children have one every morning (God we are so GOOD). If you need some smoothie inspiration see my drop down menu on the right for ‘smoothies’.

*And Lakeland did:

“Thank you for getting in touch to ask about our guarantee.

We’ve recently changed the wording on our guarantee but it’s still the same Lakeland ethos.

Our guarantee states ‘We’re only happy when you’re happy’. So if you’re not delighted with your purchase or our service, please tell us so that we can put it right.

So, if at any time, you feel the product hasn’t given you value for money or develops a fault we’ll be happy to help.”


Sticky cinnamon buns

Buns is a word you simply can’t say enough. If it’s not already, it should be a control word, used by psychologist in experiments, to put people in a good mood. It is a fabulously English word and, even though I try, there isn’t really any alternative in Italian. We have the rather more catch-all phrase meaning, simply, ‘pastries’.

Although we don’t really celebrate Mother’s Day (I really don’t need a day to tell me to appreciate my mum), if you were so minded, these would probably go down a treat if you made them today (as I write, tomorrow is Mothering Sunday), put them in the fridge to prove overnight, then cooked them in the morning.

They take almost no kneading. I got the initial inspiration from Edd Kimber who won the Great British Bake Off five years ago, but I’ve cut the sugar down (with no ill effect) and changed the kneading process so there isn’t really any, Dan Lepard style. I also don’t use currants or any dried fruit because my children don’t like them. I’d never thought of using cream cheese in an icing before but it’s wonderful and entirely Kimber’s idea, not mine. I am not a fan of sugar/water icing and the addition of a protein-rich food really takes the teeth-janglyness out of the icing. It doesn’t make them any less delicious, only more so.

These are life-affirmingly good about half an hour out of the oven, I’ve just eaten one and am in a seriously good mood. I’ve done a lot of gluten/dairy free baking recently and was just about to put up a recipe for a green smoothie, so thank goodness for these. My inner Nigellas and Gwyneths are still fighting but, for today, Nigella wins.

This made 20 for me.

For the buns, you will need:

250ml whole milk (I don’t suppose the world would fall in if you used semi skimmed)

50g unsalted butter

500g strong white bread flour

30g caster sugar

1 teaspoon of salt

7g fast action yeast

1 large egg, beaten – the egg should be at room temperature

vegetable oil for greasing

For the filling, you will need

100g light brown sugar, smash any lumps out

3 tablespoons of cinnamon – yes tablespoons. It seems a lot, but these are cinnamon buns

60g butter, melted

For the topping, you will need

50g soft cream cheese

50g icing sugar

This is what you do

Warm the milk and the butter up in a small pan until the butter has melted then let it cool until it is just luke warm. (If you haven’t taken your egg out of the fridge yet, do it now and set it aside to warm to room temperature.)

The milk/butter is ready when you put a clean finger into it and you can’t really feel hotness or coldness. If it’s too hot or cold it won’t activate the yeast efficiently. If you want to speed up the cooling process, take it out of the pan and put it into a wider-lipped vessel like a bowl.

In the meantime, in a large bowl, mix together the: flour, sugar, salt and yeast.

When the milk and butter mixture is lukewarm, make a well in the middle of the dry ingredients (the flour etc) and pour the milky buttery liquid in, followed by the beaten egg. Mix this all up as best you can using a fork. You’ll have a lumpy dough that will look most unpromising.

Leave it for ten minutes.

Turn out onto an oiled surface and knead gently for a few seconds, cover with a bowl and leave for another ten minutes. Knead again for a few seconds. You should now have a smooth, soft-ish dough (it won’t be super soft and may seem a tad dry). If not, if there’s still obvious ‘bits’ to it, give it another 5-10 minutes rest and another quick ten second knead.

Now, put  it into an oiled bowl and cover with cling film and leave it until it’s doubled. This may take much longer than you think. In my kitchen (which is kept at a Spartan 18C and a humidity level of under 50) this took nearly three hours. In a hotter kitchen it can take as little as an hour. I know this bit is scary – knowing when the dough is ready always used to scare me – but what I do is I put it in a large bowl, so that the dough fills up about half the bowl. This is because, as the dough rises, you can never remember what height it was, can you? So it’s difficult to judge when it’s doubled. But if you choose a bowl where the dough comes up about half way to begin with, and then cover with cling film, you know it’s done when the dough starts to push up the cling film.

At this point tip onto a lightly oiled surface and roll out the mixture until it’s about 40cm x 50cm. It should roll out really quite easily. You may need to oil the rolling pin – I did. You will get rounded edges, no right angles. That’s okay.

Now the mixture: mix together the sugar and cinnamon and set aside for a momentino. Now, with a pastry brush, brush the melted butter all over the slab of dough, right to the edges. This is quite meditative. Think of all the people who have done you wrong whilst you do this and think that they won’t be getting any of your cinnamon buns, the bastards.

Now, on top of the dough, sprinkle the sugar and cinnamon, making sure to go to the edges as best you can. You will spill some onto your work surface, try to pick these up and put them back on or, at the end, gather the up with a clean hand-sweep and sprinkle them on top of the made up rolls.

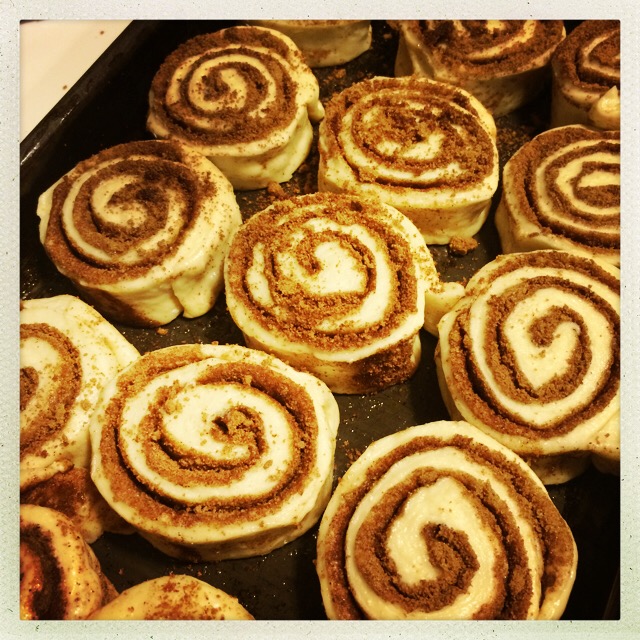
Now, with the filling all spread, roll up the dough, with the longer end towards you so you get one long cinnamon bun roll. With a sharp knife, trim the edges off, then cut slices of about and inch and a half or so. Place the buns flat down on a lightly oiled tray measuring about 23cm x 33cm (you can even got a bit bigger, but no smaller). There will be a little gap between them, see picture.

IMG_1712

(If you have any sugar/cinnamon stuff left on the work surface, don’t waste it but gather it up and sprinkle it on top at this point.)

You now have a choice. If you fancy eating them soonish, cover them with cling film and leave until they have doubled in size. Anything from 45 mins to a couple of hours. But. I put them in the fridge at this stage and leave them all night. (Also, see update, below.)

Whenever you cook them, you need to a) preheat the oven to 180C b) brush the cinnamon buns with melted butter before they go in the oven (this is important). If you prove them in the fridge you can cook them straight from the fridge, or leave them at room temperature just until the oven warms up. No longer.

Cook for 20-30 minutes (mine took 25).

Whilst they are cooling make the icing, just mix together the icing sugar and the cream cheese until it’s pourable but not too liquidy. It will really seem like it’s not going to work for a bit but then it all comes together. Drizzle on top of the buns (it’s okay to do this when they are about 20 mins out of the oven). Then, prize them apart with a spatula thing and eat with a good coffee whilst making whimpering noises.

(Have napkins handy, these are sticky.)

UPDATE 20 April 2015

Having now made these a few times, I offer these observations:

These buns are fabulous when freshly made, but they go stale disappointingly quickly. Unless you plan to eat them all in one go (!) then what I suggest you do – what I do – is I now cook these in two batches. You can easily keep them in the fridge for that final stage of proving (i.e. the bit just before they go into the oven) for two days. I divide mine up onto two smaller trays and cook them over two days, thus giving me fresh buns for breakfast two days in a row. Just mix up 25g cream cheese and 25g icing sugar for each batch. Which brings me to my next observation:

I think that 50g of cream cheese and 50g of icing sugar is AMPLE icing for these in total so I’ve amended the original recipe above.

Towelling turbans

Swimming is a fairly big thing in our house. I don’t swim in winter, because I am a wuss. But my children do. In the summer, however, I swim every day. Sure you can wrap a towel round your head turban-style. But these (see links below) make the job so much easier, because you can fasten it up so it doesn’t fall off. Also of course, these are super useful every time you wash your hair. Especially now that I have LONG HAIR (almost). Indeed, I am actually writing this post with a turban on my head whilst my hair has a conditioning treatment on it.

Talk about method writing.

I must interrupt this post to tell you about the time I had to go to a party and face my nemesis, an ex girlfriend of my boyfriend who had caused a lot of trouble (this was the first and last time I ever let this happen to me). I took ages getting ready. And I thought I looked great. Except for one problem: I still had my hair all piled up on my head in a towel, turban-style. Without the turban it looked all wrong. Anyway, I went to the party – without a towel on my head – and I faced her and she was actually perfectly nice and we sort-of became friends. There is no moral to this story other than, sometimes, you can demonise people you’ve never met and there are very few people who don’t suit a turban.

Don’t be tempted to buy cheap ones. I have an Aquis Lisse one, which is made of microfibre; I was sent it ages ago when I wrote about beauty. For an adult head I think they can’t be bettered. But they cost £15 odd. For children the Cuddledry ones, £9 odd, are perfect and well worth buying. Once properly secured they pretty much stay put.

Chocolate and nut oat bars

I live in hope of finding some sort of cereal bar, that I can make, that my children will like. I think a good cereal bar is an excellent thing to be eaten when you don’t have much time, but need something that will keep you going. But so many bought cereal bars are full of crap.

Many years ago, I co-ran a parenting website called I Want My Mum (because that’s all I said when I was pregnant and not long after having my baby, “I want my mum, I want my mum!” I would lament. Luckily she wasn’t far). I posted a recipe on there for some sort of healthy cereal, chewy bar. Loads of people went crazy for it, saying that their children loved it.

Not mine. My children have never liked any sort of bar that I’ve made, but they look at the Kellogg’s Special K Raspberry and Chocolate bars with longing every time they go past them in the supermarket aisle.

So I saw these in my Dale Pinnock Healthy Every Day book. He’s the one I got the chocolate/coffee smoothie idea from. I adapted his recipe, changing the proportions and also, he said you should sandwich the chocolate/peanut butter layer in between the layers of oats. But this didn’t look great to me, and also, in a bid to entice my children, I thought it’d be better to coat the whole lot in chocolate. I even wrapped them up in little bags to make them look shop bought. Did they love them?

No.

The ungrateful bastards. But I really like them (just as well as I have about 18 of them now) and if you need a healthy but delicious, quite treaty snack, you can try these. Or, if you’re lucky, your children might like them.

65g unsalted butter

50g coconut oil

45g raw honey

1 teaspoon of vanilla extract

300g porridge oat flakes

125g 70% cocoa chocolate

80g nut butter of choice – not one that’s full of sugar but if your nut butter doesn’t have salt in it you may want to add a pinch

Melt the  butter, coconut oil and honey in a pan. Add a pinch of sea salt if your nut butter doesn’t have it. When melted, add the vanilla extract and the oats, and coat everything.

In a bowl atop another pan of simmering water, melt the chocolate and nut butter. When melted, add to the oat mixture and stir really well.  Tip into a tin (I use one that’s about 20cm square but you can see how much mixture you have so use a tin accordingly. I line mine with baking parchment to make thing easier). Then just chill for an hour or two, cut into slices and offer to your children and when they refuse, sit down and eat the lot yourself whilst writing them out of your will.

IMG_1243

Making a tasty biscuit as good as it can be

Since I’ve had children, I do try my best to change cake/biscuit recipes so I take down the amount of sugar and I try to ramp up the amount of wholemeal flour etc. I’ve made my own choccy lollies with high cocoa content chocolate and pumpkin/sunflower seeds. I’ve cut down the sugar, and sneaked wholemeal flour into a famous Nigella Lawson chocolate loaf. But I know how far to push it. My children start to refuse biscuits and cakes if they go the Gwynnie side of worthy.

Hugh F-W’s Ten Minute Cookies have been our standard biscuit recipe for years now. But over these years, I’ve experimented with taking down the sugar and today, I made them with a third of the flour made up of ground up oats (I whizzed them in a very powerful blender with a mill attachment, I’m sure something similar would work, too). Nobody noticed any difference. They were still delicious. A tiny bit chewy. More substantial. I really liked them. If you’ve never made these biscuits before you may want to start with the original, and work your own way down the sugar scale. Or you may want to jump right in. The original recipe plus amendments, is here.

I think these biscuits are as good as they can be, whilst still being a bit bad. And I think that’s a good thing.

Dense chocolate loaf cake

This is a lovely chocolate cake that I’ve been making for years. It’s so simple, yet so good. I’ve put it up here for my friend Kate who has never, to my knowledge, asked me for a recipe. But she did after tasting this on Saturday. It’s a cake that keeps, a bit like gingercake, for a good few days wrapped in parchment and foil. Ideal for taking for weekends away, picnics, lunchboxes

I don’t know a child who doesn’t like this – and it’s rare I can say that; and, slightly warm, and with custard or maybe some cream, makes a nice, simple pudding.

It’s originally from Nigella Lawson’s How to Be a Domestic Goddess, but, like a lot of Nigella’s recipes, God love her, I’ve cut down the sugar dramatically (yes, really and it’s still at 250g!) and changed the flour around a bit.

225g very soft, unsalted butter

250g dark muscovado sugar

2 large eggs

1 teaspoon of vanilla extract

100g dark chocolate (70%), melted

150g plain flour

50g wholemeal plain flour

1 teaspoon of bicarbonate of soda

150ml boiling water

A 2lb loaf tin, about 23x13x7. Mine one is bigger. If you want to use two smaller loaf tins you can, cook for less time: 20min for first part, then 10minutes.

Preheat oven to 190C.

Line the loaf tin – this is really important as this is a very moist cake and it will fall apart if you have to wrestle it out of the tin. If possible leave some baking parchment overlapping so it lifts out easily.

Put the chocolate on to melt – in a bowl above a pan of simmering water, making sure the bowl doesn’t touch the water. When melted, set aside to cool slightly.

Cream the butter and sugar together with a wooden spoon, then add the eggs and vanilla. Now fold in the cooled chocolate. Mix the flours and the bicarb together.

Now you’re going to add the flour mixture and the water, a spoon at a time, stirring well between each. This is important. If you add the flour and water too fast, the boiling water will cook the flour into little balls and you’ll end up with little white flour balls in the cake. I know because I’ve made this many, many times and tried to cheat the system and it doesn’t work.

You’ll end up with a very runny batter. Put – pour- in the cake tin, and if your tin is very up to the brim already, it may be prudent to put a baking tray underneath to catch any spills. (This is why I use an even bigger loaf tin than recommended. I can’t bear to lose any to the oven.)

Cook for 30 mins, then turn down to 170C and cook for a further 15 mins. I do this exactly and end up with a very squidgy, moist cake. If you use two smaller loaf tins, cook for 20mins and then 10 at lower temperature. The top should be set and there shouldn’t be any discernible ‘wobble’ (or not much) but a skewer inserted may still have some crumbs attached due to the moistness of the cake. Don’t overcook.

Let it cool completely before taking out of the tin. It will sink a bit in the middle, don’t worry, it’s meant to. If you don’t eat it all immediately, wrap in parchment and foil and enjoy a slice every day.