Tag Archives: bagels

Sourdough bagels

I’ve long made bagels and they are a thing of beauty and deliciousness. I have made sourdough ones but not with any regularity. But recently I started making them again. They take a bit more time, in that they need to be left to rise in their own sweet time, far more than yeasted bagels. I rushed them last week and they were dense – still delicious but not so airy and light.

I tend to shape these into little round rolls first and then puncture a hole with a wood spoon handle. I tend to make these with a smaller hole than my yeasted bagels. Who knows why.

Unlike yeasted bagels these can also be left to prove for 48 hours in the fridge (maybe even longer but I’ve never left them that long), so if there aren’t that many of us, I tend to cook a batch up in two lots so we have fresh bagels for two days running. I can’t do that with yeasted bagels as they really have to be cooked the day after making (after an overnight prove in the fridge, ie they don’t ‘last’ that long in the proving stage).

If you want to make them totally vegan then don’t egg wash them.

You can of course use 500g of just white flour, or mix in a bit of wholemeal. I’m always looking for a more gut-friendly diversity so I add Vanessa Kimbell’s Diversity XXX flour. TBH these days I add 10-15% of it into almost all my bakes but here I use 20% (100g of 500g is 20% isn’t it? I failed maths..)

I think this recipe is, at least in part, from Edd Kimber but I adapted it a while ago. (I love Edd.)

What you need:

185g active sourdough starter
250g warm water
1 tbsp of sugar or barley malt syrup
1 tsp of fine sea salt
400g strong white bread flour
100g Diversity XXX flour

I mix everything together in my Kenwood Chef food mixer with the dough hook. I leave it on low for ten minutes. Then I turn the dough out onto an oiled surface, cover it with a bowl and leave it for an hour. After an hour I give it a gentle knead for ten seconds, leave it for an hour and then knead it again for ten seconds. If your house is very cold you might want to do this one more time. I kinda go on dough-feel (and no I’m not very good at it either).

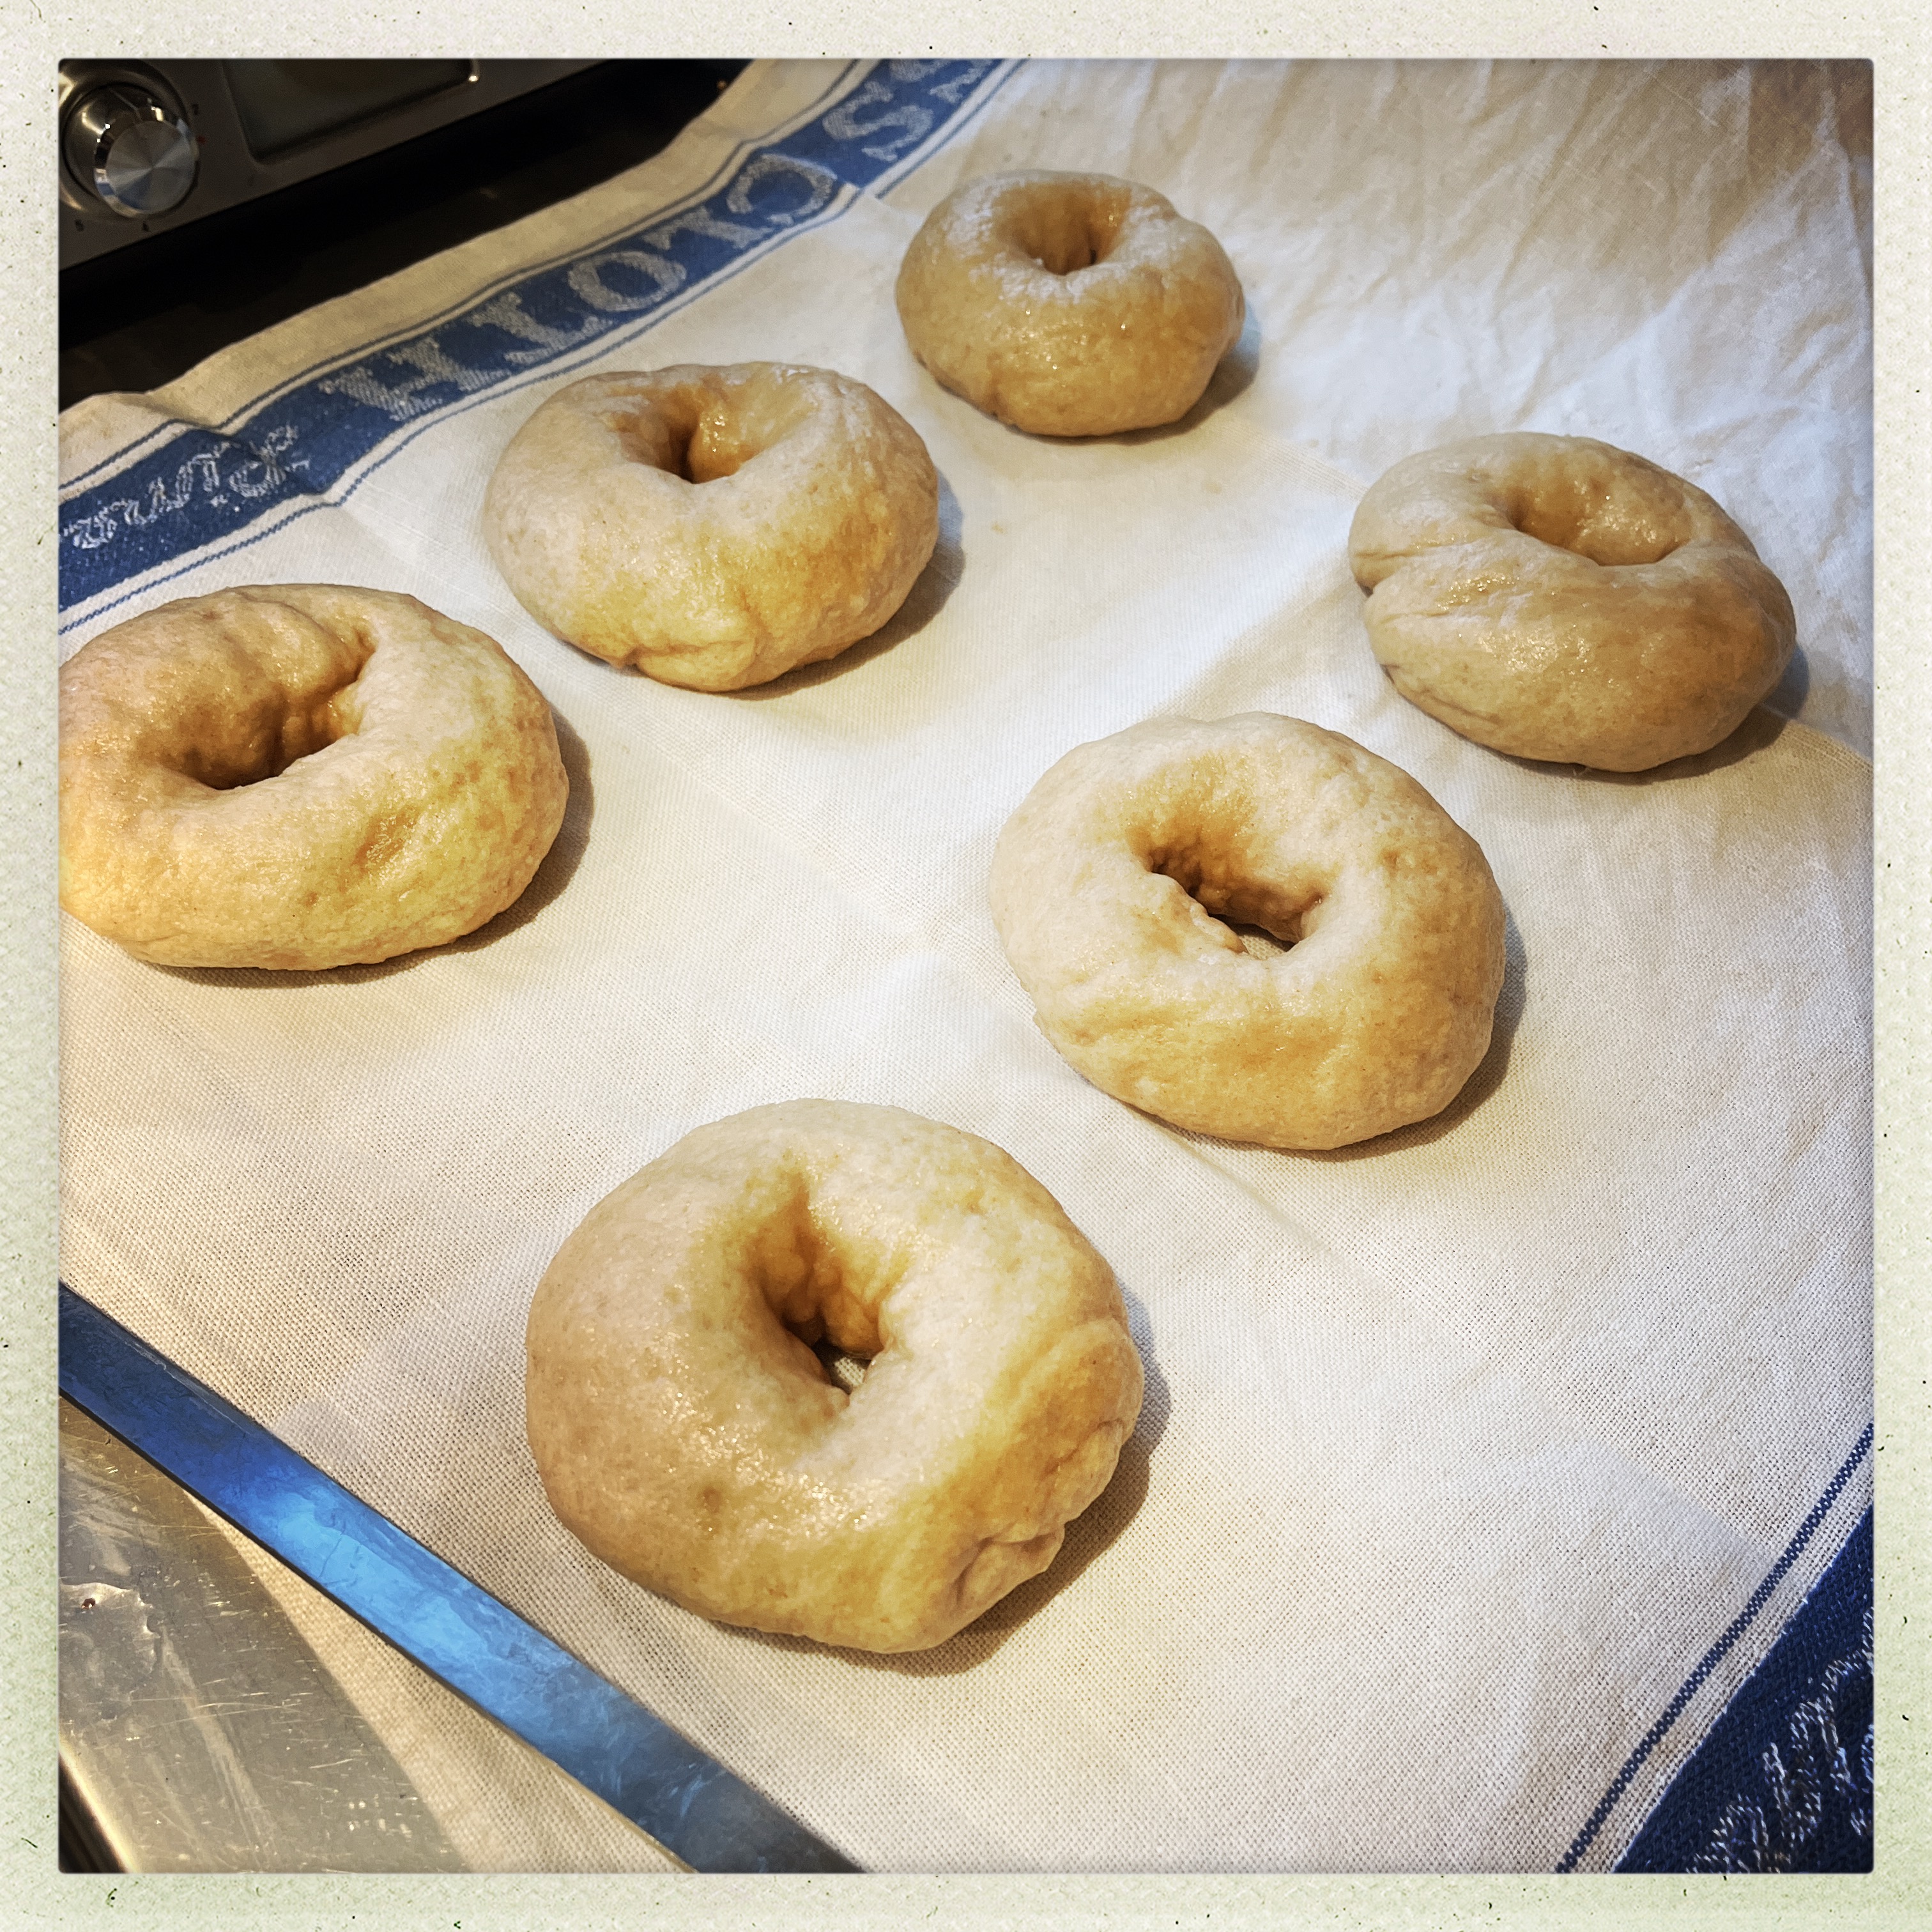
When you’re ready to shape the bagels, when the dough feels lighter and a little more yielding, then cut it into 6/8/10 depending on how many you want to make (this makes eight regular sized bagels for me). I roll into little balls using my hands, then make a hole with the handle of a wooden spoon, stretching the hole out a little.

Place on a parchment lined tray.

I now leave this out, covered with a tea towel, for about another hour before putting them in the fridge overnight. I also think they benefit from coming up to room temperature after taking them out of the fridge but I never have time to do this so I put them straight away into the boil process.

Boiling and baking

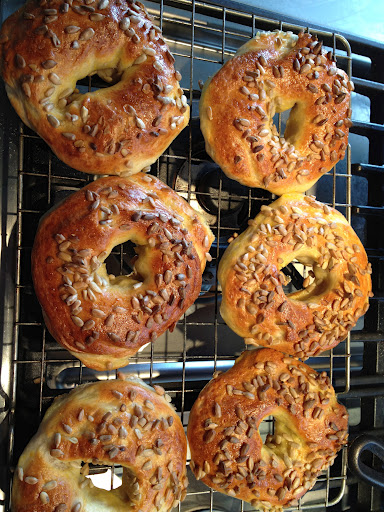
Bring a pan of water to the boil. Some people put things in the water to make them more of a bagel (I don’t know what but stuff that makes it apparently taste more bagel-y) I can never be bothered. When the water is boiling I plop two in there – if you can get more in without them hurtling into each other than do. I give them a minute or two until they float and puff up a little, and turn them with a slotted spoon, another minute or two, then take them out and rest them on a tea towel. When all are done put them back on the parchment lined tray, brush with beaten egg if you want and scatter with seeds if you want and cook at 220C for 14/15 minutes. Check after 12.

These are really very good.

Bagels 2.0

I first started making bagels over 13 years ago. I still make them very regularly. Home made bagels are not difficult, completely different to shop bought versions and whilst I won’t say they are ‘healthy’ they are very much better if you make them yourself.

The original recipe still stands but I’ve tweaked it ever so slightly and this is what I do now, making it in a stand mixer.

Ingredients:

450g strong white bread flour

1.5 tablespoons of caster sugar

1.5 teaspoons of salt

230-240 ml of water, at body temperature preferably (but just not ice cold).

1.5 teaspoons of dried yeast

egg wash for later and seeds if you want them.

Method


If you want to eat these the next day, start making them about 5pm. They overprove easily, even at 4C in the fridge, so you don’t want them hanging round too long. If you want to eat them that day, start making these about 3 hours before you want to eat them.

Put everything in a stand mixer with a dough hook. Mix steadily for ten minutes. Take out the dough hook (on very lazy days I don’t even do that, I drape a tea towel over the mixer) and cover.

Leave for one hour at a room temperature. After an hour the mixture should have risen. Obviously if you live somewhere very hot or very cold adjust accordingly. The dough should be puffed up and a bit yielding to the touch.

Now cut the dough up, using a bread knife, into eight pieces (more if you want to make smaller bagels). You can now either roll each piece into a long sausage and then join the ends (overlap slightly, as per pic below, although in that they are already baked) or gently knead into a ball (put dough in palm of your hand, cup your other hand over and gently make circles, it’ll ball-up), then make a hole with your finger, or a wooden spoon and make the hole a bit bigger. Place on a baking parchment lined tray. Cover with a clean tea towel.

You can also roll them into a sausage shape and overlap the edges if you prefer.


Now either put in the fridge at 4C if you want to bake these the next day – in which case you can go straight to the boiling of them once you’ve taken them out of the fridge. Or rest for about an hour til they’ve puffed up.

Whenever you are ready to cook:

Preheat oven to 220C.


Bring a wide-mouthed pan of water to the boil. I boil two at a time. Slide in two bagels, upside down to begin with (it doesn’t really matter but this is the way I do them), boil for 45s, tip over with a slotted spoon, boil for another 45s. Take out with the slotted spoon and place them to drain for a few minutes on the tea towel, whilst you do the others.

Once ready to bake put them back on the parchment lined tray you had them on, brush with beaten egg (can be a whole egg or just a yolk if that’s what you have), sprinkle with seeds if you want.


Bake for about 12 minutes (depending on your oven of course).


Voila. They also freeze (once baked) beautifully – better than letting them go stale and then toasted them – and you can defrost them gently in a microwave and they seem like freshly baked.

Bagels – not sourdough

These bagels are not just not sourdough, they’re made in a breadmaker. Nevertheless, here they are, all blousey and almost industrial compared to my artisan sourdough.

But look: they’re delicious. Nothing at all like bought bagels which may look surgically enhanced but are as interesting as dust to eat (although if you remember that fantastic sketch from Little Britain, dust is a valuable diet food…). The only memorable bagel I ever had out was at the Geffrye museum cafe, I had it with smoked salmon and a very fine cappuccino. A memorable little lunch that shows food doesn’t have to be fancy to be remembered.

So, my bagels. I’ve been making them for years and the recipe is from some bread machine book I had but adapted slightly (in what way I can’t remember now but anyway it works which is what matters). They don’t look pretty – ignore that and just enjoy the taste.

These are excellent for children – they just love them. In which case I make them smaller and end up with 12-16.

For eight large bagels you need:

2 teaspoons of dried yeast
450g strong white bread flour
1 1/2 teaspoons of salt – I grind up Maldon sea salt
1 1/2 tablespoons of sugar – I use caster
230ml water, whatever temperature it comes out of the cold tap.

egg or malt wash – see later

baking tray
clean tea towels
saucepan and slotted spoon

I put it into my bread machine, which is a Panasonic bread machine and the only sort I recommend. Your bread machine may ask for the ingredients to go in in a different order but mine asks for the yeast first. You then select the dough cycle. Mine is 2hrs 20mins long. Be careful not to put it on a short dough cycle (mine also has one for pizza which is 45 mins long) as it won’t work.

In the meantime, get a baking tray

When the dough is ready, you divide it up into how many bagels you want. This mixture makes eight regular sized bagels, but I have made more mini ones. I roll each piece of dough between my palms to make a ball. I rest them for a few minutes (in reality you can start on the first one by the time you’ve done the last one if you follow), then roll them into sausage shapes and loop the ends around. This isn’t a regular bagel shape – none of that perfect roundness – but honestly once baked you won’t care. It’s the best way, I’ve found, of keeping the hole intact.

As you shape them, place each one on a lightly oiled baking tray or one with baking parchment on it – make sure they’re not touching or you’ll have a hard job separating them and they might collapse as you manhandle them. When they’re all shaped, leave them to rise, covered with a dry, clean [why do they always say this, does anyone use a dirty one?] tea-towel ** for about 10-30 mins (30mins if your kitchen is cold, 10mins if it’s warm or you put them in a warm place). There’s a lot of yeast in them so don’t overprove.

**Note here: you can – and I regularly do – also put them, at this stage, into a refrigerator overnight for their rise, and then go straight to boiling them. I think this gives them a nicer flavour and chewier texture and it also means you can have freshly baked bagels for breakfast.

Whilst they’re resting and puffing up, put a big saucepan of water onto boil and preheat the oven to 220C/Gas 7. I use a casserole dish pan which is shallow, but wide. You don’t need the water to be deep deep, as the bagels will float, but if you have a wide aperture then you can get more in at once.

When they’re done and the water is on a rolling boil, put the bagels in to the pan. Unless your pan is a huge paella pan, you will have to do them in batches – that’s fine. You boil them for about 30 secs each side (so turn them over with the slotty spoon). Watch them puff up more. Take them out one at a time with the slotted spoon and place on a clean tea towel to drain them and do the next batch til they’re all done.

Either get a clean baking tray and oil it lightly, or wipe off the last one you used and re-oil it. OR if you’re like me and have one of those reusable baking sheets that you used to prove the bagels on, you just now put them back on them. But either way, place the boiled bagels onto the tray. It’s fine if they touch, because once cooked they’re more stable than at the proof stage, so you can tear them apart. But if you can do them so they don’t touch all the better. Mine are always crammed together as that’s the only way you can get them cooked all in one go and at this stage – i.e. proved and boiled – you don’t really want them hanging round waiting to be baked for longer than necessary.

Once the bagels are on the tray, you’re on the home run. Either make an egg wash of beaten egg, or use this fabulous dried malt extract which I mix up with some water and brush on. You can then either cook the bagels plain or scatter on some sesame seeds, pumpkin seeds, sunflower, linseeds etc.

Cook for 12-15 mins (this is in my oven, yours may differ). They’ll be a lovely dark golden brown when they’re done.
These keep for a day or two but are best eaten on the day of being made and toasted thereafter. They freeze really well – just freeze when cooked to have lovely fresh bagels another day!

The shaping is getting better..