Category Archives: Christmas

A last minute Christmas present idea: Kumquat chocolate slab


This is a really easy, delicious thing to make. Yes you do need a) chocolate and b) kumquats in the house to make this exact one, but the idea is that with a bit of imagination, you have a really easy, original gift to make for someone at the last minute. Perhaps you’ve been invited round to someone’s house and want to take a little gift.

I used kumquats, because that’s what I saw in Martha Stewart Living. This decision also resulted in perhaps my most middle class quest of the year: going in search of them (Sainsbury’s had them). It was worth it because kumquats lend themselves really beautifully to this idea and weren’t madly expensive. A packet that would have made this twice over cost £1.50. Plus they look festive, colourful and this was absolutely delicious: like a grown up, not too sickly, Terry’s Chocolate Orange.

But if you don’t have kumquats, or don’t like them you can put anything on top of the chocolate: slices of stem ginger, roasted hazelnuts, sliced pistachios, what ever takes your fancy, you get the idea.

For this I used a mixture of Green and Black’s milk chocolate and Waitrose Continental 70% cocoa chocolate, because I wanted it to be quite creamy. You want the slab to ‘snap’ when you serve it so don’t go too milky chocolatey, even if you want to serve it to children. To make it really grown up and ‘snappy’, make it out of all 70% cocoa chocolate. I used about 250g of chocolate in total to make this slab, which fed sixteen at after lunch coffee.

Melt in a bowl, over boiling water, then pour onto baking parchment on a baking tray. Scatter over your topping of choice. Put in fridge to set. If giving as a present – and not serving at your own dinner party – then break it up and put it in cellophane bag or if you have food-grade cellophane wrap (naturally, ahem, I do) then you can wrap the whole thing in one piece.

That’s it. So easy and looks so impressive.

Stollen

IMG_4263

Stollen was, like panettone and panforte, one of those things that appeared at Christmas that really wasn’t very nice. Of course, that was back in the days before I realised you could make, almost, anything yourself (I’ve still not been brave enough to try panettone, because to make it properly takes three days and involves hanging it upside down).

My friend Lisa Durbin, posted some pictures of the stollen she was making and they looked so delicious, I asked and she passed on her recipe. And yesterday, really quite late in the day, I decided to give it a go.

I have a few notes to add, which is that the marzipan stipulated seemed a bit mean to me to begin with, so for one of the loaves I doubled the amount from 50g for each loaf to 100g. As I was doing this, my partner walked into the kitchen and he reminded me that, actually, with marzipan in cooking more is not necessarily a good thing. So, suitably chastened, I went back to Lisa’s recommendation of 50g for each loaf for the others. I haven’t tasted the turbo marzipan one yet but the one with ‘just’ 50g held out his theory and Lisa’s recipe.

After making this stollen, ahem, a couple of times, I’ve settled on 75g per stollen as perfect for me.

I found 45mins too long in my oven. I cooked mine for 25 mins.

This stollen really doesn’t keep. If you don’t freeze it EAT IT on day of purchase. It won’t be so good again after that.

Image 3

I also didn’t roll mine out on a floured surface, instead rolling out between two sheets of Magic Carpet type stuff (reusable baking parchment). It’s up to you if you make your  loaves more stout and thick or long and thin. Experiment.  As per picture above, you’ll see mine are quite flat.

I ate half of one, about 20mins out of the oven, whilst watching Masters of Sex. So the two things are now, indelibly, etched in my mind. At that temperature, just warm, the stollen are frangible and seriously delicious. If you can eat it at this temperature, at least once, do so.

Image 2

Otherwise they are really not difficult to make (although if I give you one as a present then, yes, of course they are really difficult) and you get four loaves so it’s a good result vs effort. You could easily freeze some Lisa tells me (before you add the icing sugar) for another day. Or just eat them all in a stollen frenzy. You can also leave them for the final prove (the one that takes 45 mins in Lisa’s recipe) overnight in the oven, waking up to freshly cooked stollen (well, for YOU to wake up to freshly baked stollen, someone else had to get up first to bake it, but the idea is there, yes?)

ImageChristmas 2014. I made these mini this year, just cutting bits of the dough off, and rolling it with my fingers around some marzipan. Worked really well and I got about 20 mini loaves out of it. I cooked the mini ones for 15 minutes.

IMG_0388(You’ll note one is missing, it’s very important to test the merchandise before selling.)


Best panettone and chocolate mulled wine

I wasn’t much of a fan of panettone, growing up, despite my father coming from a region where the panettone is famous. All those raisins and candied fruit. I much preferred pandoro (‘bread of gold’) which was, to me, like panettone but without any of the bits in and you’d dust it with glorious vanilla sugar as soon as it was out of the box.

It didn’t help that the panettone you can usually buy in this country – at least until it seemed fairly recently – was pretty grim. Heavy and dry. Mine used to stay on the top of the fridge, in their cardboard box, going stale until such time as I had an idea to resuscitate them in a panettone bread and butter pudding.

This seems sacrilegious now. A few years ago, my parents got given a proper panettone. They gave it to me and I almost put it on the top of the fridge, in time honoured fashion. But something made me open it. I’m going to use words like ‘billowy’ now, so prepare yourselves because this panettone was indeed billowy. Soft, fresh….billowy. It tasted delicious and, as I remember, we ate it in one sitting. I subsequently discovered it was a very expensive panettone and it showed.

At Christmas, I usually make my Colomba in the shape of panettone. It’s not the same thing (proper panettone needs to be hung up side down when made and takes three days from start to finish) but it’s good enough. Last Christmas however, I heard, through one of my editors, Kate, at the Guardian about a panettone taste test she was doing. On her recommendation I bought the Nudo one. It was superb. Not cheap though at £15 a kilo (I’ve realised you need to spend about that much for a panettone to be any good). This year, in a fit of organisation, I went to order one on 1st November. Sold out. This annoyed me beyond explanation.

So I went to the number two one last year, Valentina and bought two. I decided to open it last weekend. Partly because I didn’t want to be disappointed if it wasn’t very good, partly because I am greedy and partly because I have decided to spread out the joys of Christmas fayre this year starting in, cough cough, late November. Anyway. It’s fantastic: everything you want a panettone to be. Really fresh, really light, tasty, glorious. You could easily eat one in a single sitting. The service was amazing and I thoroughly recommend you buy one. My children loved it too, and the sell by date is April 2014. Not that it will get that far.

It’s £12.95 for 750g and you can buy it mail order (the p&p is a bit steep at £5.95 so double up with some friends if you can) or if you can, visit one of the stores, there are five, but not sure all sell the panettone so check before going.

[Just to avoid any doubt, I paid full price for the panettone, no freebies.]

The pic above is my first slice, served with a glass of my chocolate mulled wine. Which, if you haven’t tried yet, I thoroughly recommend you, also, do.

Alternative Christmas ‘pudding’ ideas

Jamie’s Winter Pudding Bombe
My actual bombe

I don’t mean as a direct alternative to that dried fruit pudding English people have after Christmas dinner (which I now love, I actually made my own two years ago for the first time and make them a year in advance now). But I mean, something to eat for pudding on or around Christmas Day.

Chocolate Chestnut Rum Roulade

Every Christmas I make this amazing Chocolate Chestnut Rum Roulade. It’s an Icelandic recipe that I got from the Waitrose magazine twelve years ago. It is so good. I make it every Christmas and my eldest asked for it for her birthday this year. It’s really not that difficult, can be made ahead and put in the fridge.

Another thing I make is Jamie’s Winter Pudding Bombe. This is superb made in advance and stuck in the freezer. I do make some changes to this as the clementine he asks for just freezes solid (obviously) and I don’t find it very nice to eat. So I do his recipe but instead of the bits he asks for  I add some dark glace cherries, some candied fruits, some sour cherries soaked in marsala (I use marsala instead of vin santo throughout) and then some toasted pistachios and hazelnuts. I think you could easily customize this bit.

I also use home made vanilla ice cream because it’s tastier and cheaper.  The quantity in that recipe I’ve linked to make the perfect, perfect amount for this recipe.

Need I point out that you don’t use expensive panettone for this.

You can make it in advance, as I said, and then just turn it out when you want to serve it, and pour the chocolate over the top.

Annie Bell’s Blackout cake, as near to chocolate cake perfection as possible.

Lastly, for something that doesn’t look as festive but is really, really delicious. Annie Bell’s Brooklyn Blackout cake which is as close to chocolate cake perfection as I can take you. I guess you could make it more festive with gold leaf or something. I don’t know, up to you. It’s sensational however and once people start eating it they won’t care if it looks festive or not.

Do feel free to share your Christmas pudding alternatives.

update: mid January 2013. We just at the last of the bombe, which had been nestling in the freezer since I made it on 21st December. I thought you might like to see inside. It was still really really good.

Pretty fairy lights, battery operated

John Lewis LED finewire snowflake lights, £6

Some years ago, as a present, Tesco sent me some really pretty blue flowery fairy lights that were battery operated. Doesn’t sound like much now, but at the time, they were pretty innovative (the battery part). They cost £5 in the shops and I wish I’d bought more as they’ve proved strangely useful. My children use the in tents, we drape them over any corner that needs a little pretty illumination. I’ve been tempted to go out wearing them (you could, with the battery pack in a pocket. I mean, come on). I don’t know, they just make me feel good. Even though they are, you know, from Tesco’s.

Anyway. These are not like them. They are very very fine and delicate. The wire between them is really fine wire. But they still look nice on my mantelpiece and every evening, as dusk fades and “the clouds turn pink” as my daughter says, I switch them on and they make me go aaah.

I’m easily pleased.

They also come in little green trees, red hearts or blue stars. And the size above is about actual size.

Buy them here.

Torrone

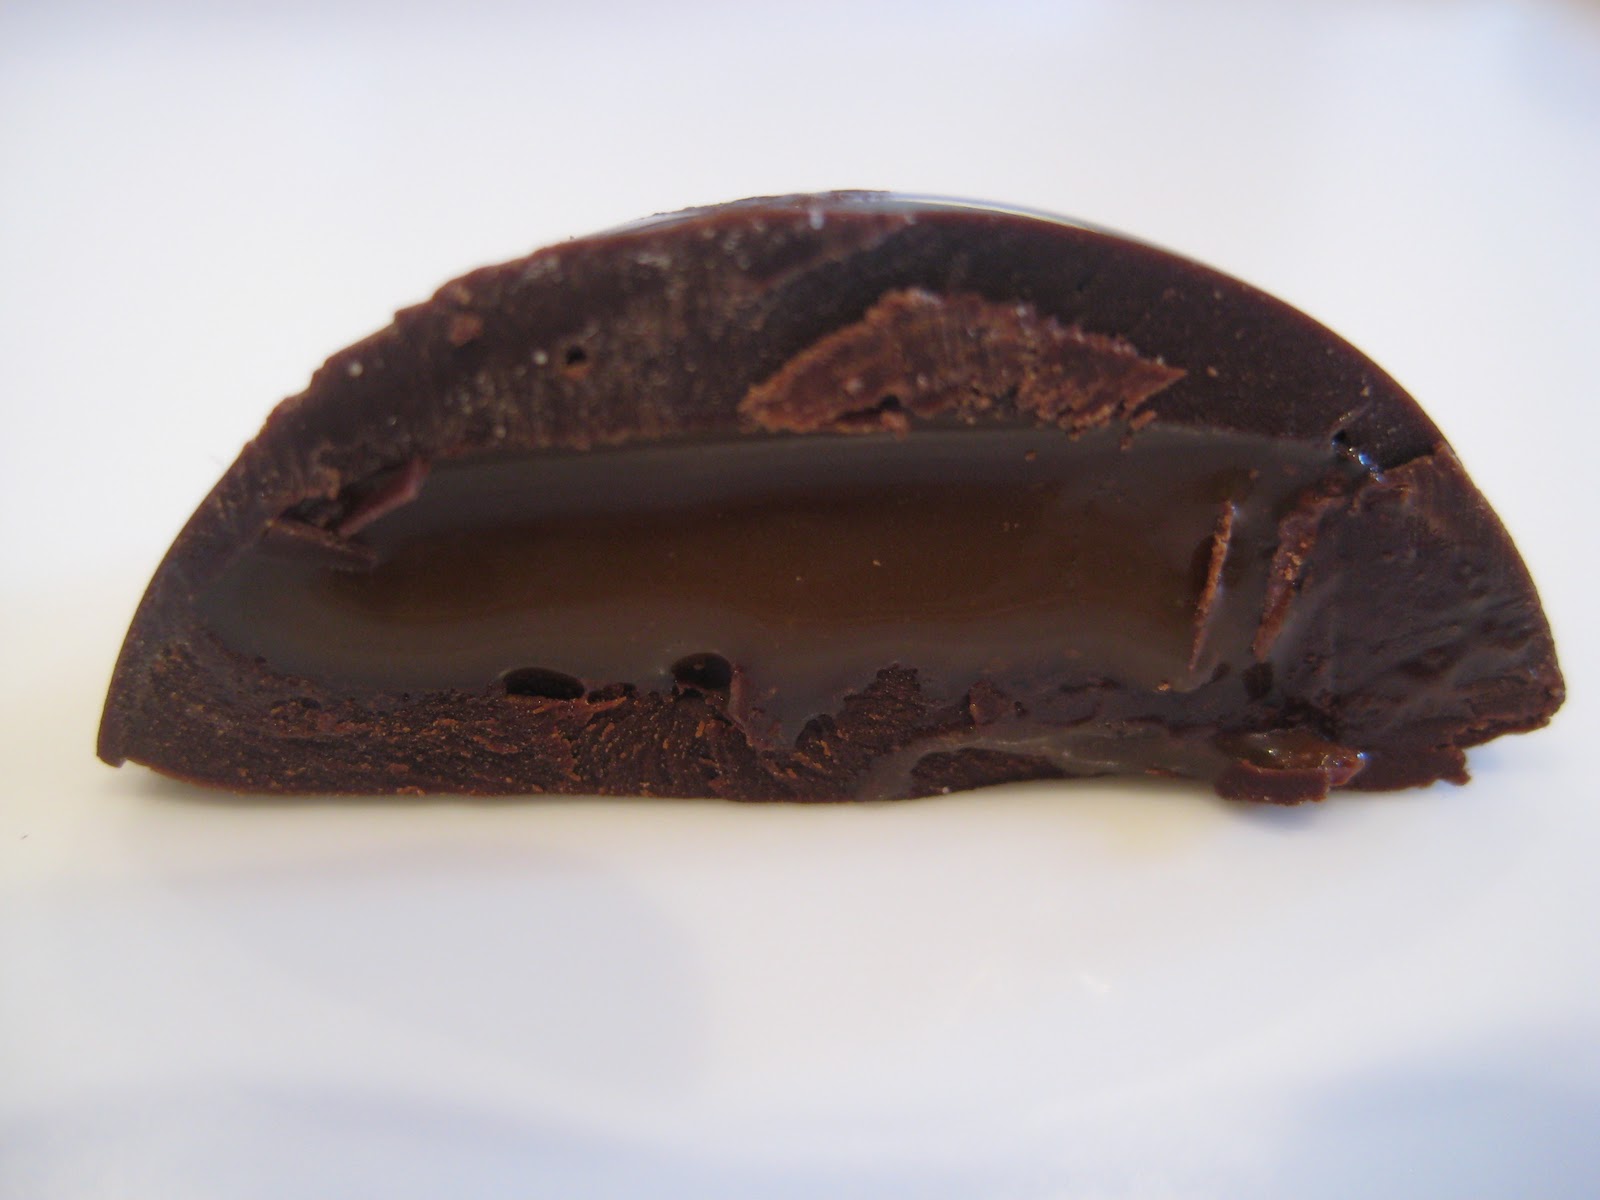
Torrone with dried cherries, almonds and pistachios. Sweets for grown ups

 
Torrone is Italian nougat. It’s usually sold at festas, and at Christmas we always get some. Usually it’s of the rock hard variety (I get the impression this is easier to make as the softer one – which I thought of as the ultimate luxury as a child – is much harder to find and more expensive). Sometimes it’s covered in chocolate and sometimes it’s pantorrone which is torrone with a booze-soaked sponge that runs through it, covered in chocolate.

The only person I know who ever made their own torrone was my uncle Bruno, but he died some years ago, so I couldn’t ask him.  I knew it was fiendishly difficult.

I was not proved wrong.

Actually I don’t want to scare you. It’s not that it’s difficult, difficult. But it’s a lot about technique and temperature and there’s no correcting it if you get it wrong. My heart was beating really fast when I made it and I think I probably shortened my life by six months.

Please do not try to make it if you’re in a rush or you have young children running round the house.

Don’t make it if you haven’t got the right ingredients or utensils. You really need a sugar thermometer for example. 

You heat the mixture up to 130C and you have minutes to make it once it’s at temperature. You really need to have all your equipment near to you (I actually moved my Kenwood Chef out of its specially built cubby hole next to my cooker and I strongly suggest you have your mixer next to your hob, too).

I wouldn’t try to make this without a freestanding mixer.

And as I said, no small children that only you are in charge of; getting 130C sugar solution on skin is not a joke. I know, I’ve done it (when I made toffee apples one year) and the burn was ferocious.

So now that I’ve scared you stupid, here’s the good bit. If you get it right – and you will – it’s glorious. It looks lovely and it’s pretty much all over in half an hour.

I got this recipe from the Donna Hay (I LOVE HER) magazine Dec/Jan2012 magazine, however I can’t find it on line so I can’t link to it. Which is a shame cos the pictures are GORGEOUS. If you have an iPad, do get the app (which is currently free). I’ve adapted it slightly in that I added the nuts and dried fruits I wanted to add. Basically once you’ve got the nougat done (and I wouldn’t mess with that part of it) you can add any nuts/dried fruits you want up to a point. You don’t want to overload the mixture. I’d say 400g total of nuts/dried fruits is probably the limit. I used about 200g and could easily have had more.

You need 2 x sheets of confectionery rice paper (I got mine from Amazon; Lakeland also sells it as does the Jane Asher on line shop. You may be able to get it locally, I couldn’t).

550g caster sugar
350g liquid glucose
115g honey
1 teaspoon of vanilla extract
2 eggwhites, at room temperature
100g butter, softened – mine was melted but cooled
then whatever nuts/dried fruits you want. I used about 160g almonds and pistachios and 60g dried cherries. Hazelnuts would also be lovely I think. Toast the nuts gently first.

A word about liquid glucose. You can buy it in small tubes/tubs from the supermarket. Your chemist may be able to sell you culinary grade liquid glucose in bigger quantities. I buy mine from Jayson’s Pharmacy. JM Loveridge also sells it (and in fact the one I got from Jayson’s was marked Loveridge) but I couldn’t work out how to buy it on site and was in a rush.

You need to line the base of a 20cm square tin with the rice paper. My rice paper wasn’t big enough so I overlaid another sheet to fill the gap. Keep the other sheet for the top.

Now, place the sugar, glucose, honey and vanilla in a saucepan with a handle. Very important this, as you’ll need to use just one hand to eventually pour the ingredients into the mixer bowl.

Over a low heat, let it all dissolve. Stir until this happens. Once the mixture starts to boil, put in a sugar thermometer and watch the temperature rise as it heats. You need to watch it. Don’t wander off. Donna Hay says that once it gets to about 110C put the egg whites in the free standing mixer and start whisking until stiff peaks form. I found that by doing this (my mixer was right next to me by the hob, have I mentioned) I had plenty of time.

You’ll find the temperature goes up in leaps, then seems to stagnate (you may need to gently increase the heat but keep watching it), then jumps up again. Once it’s at 130 you are green for go.

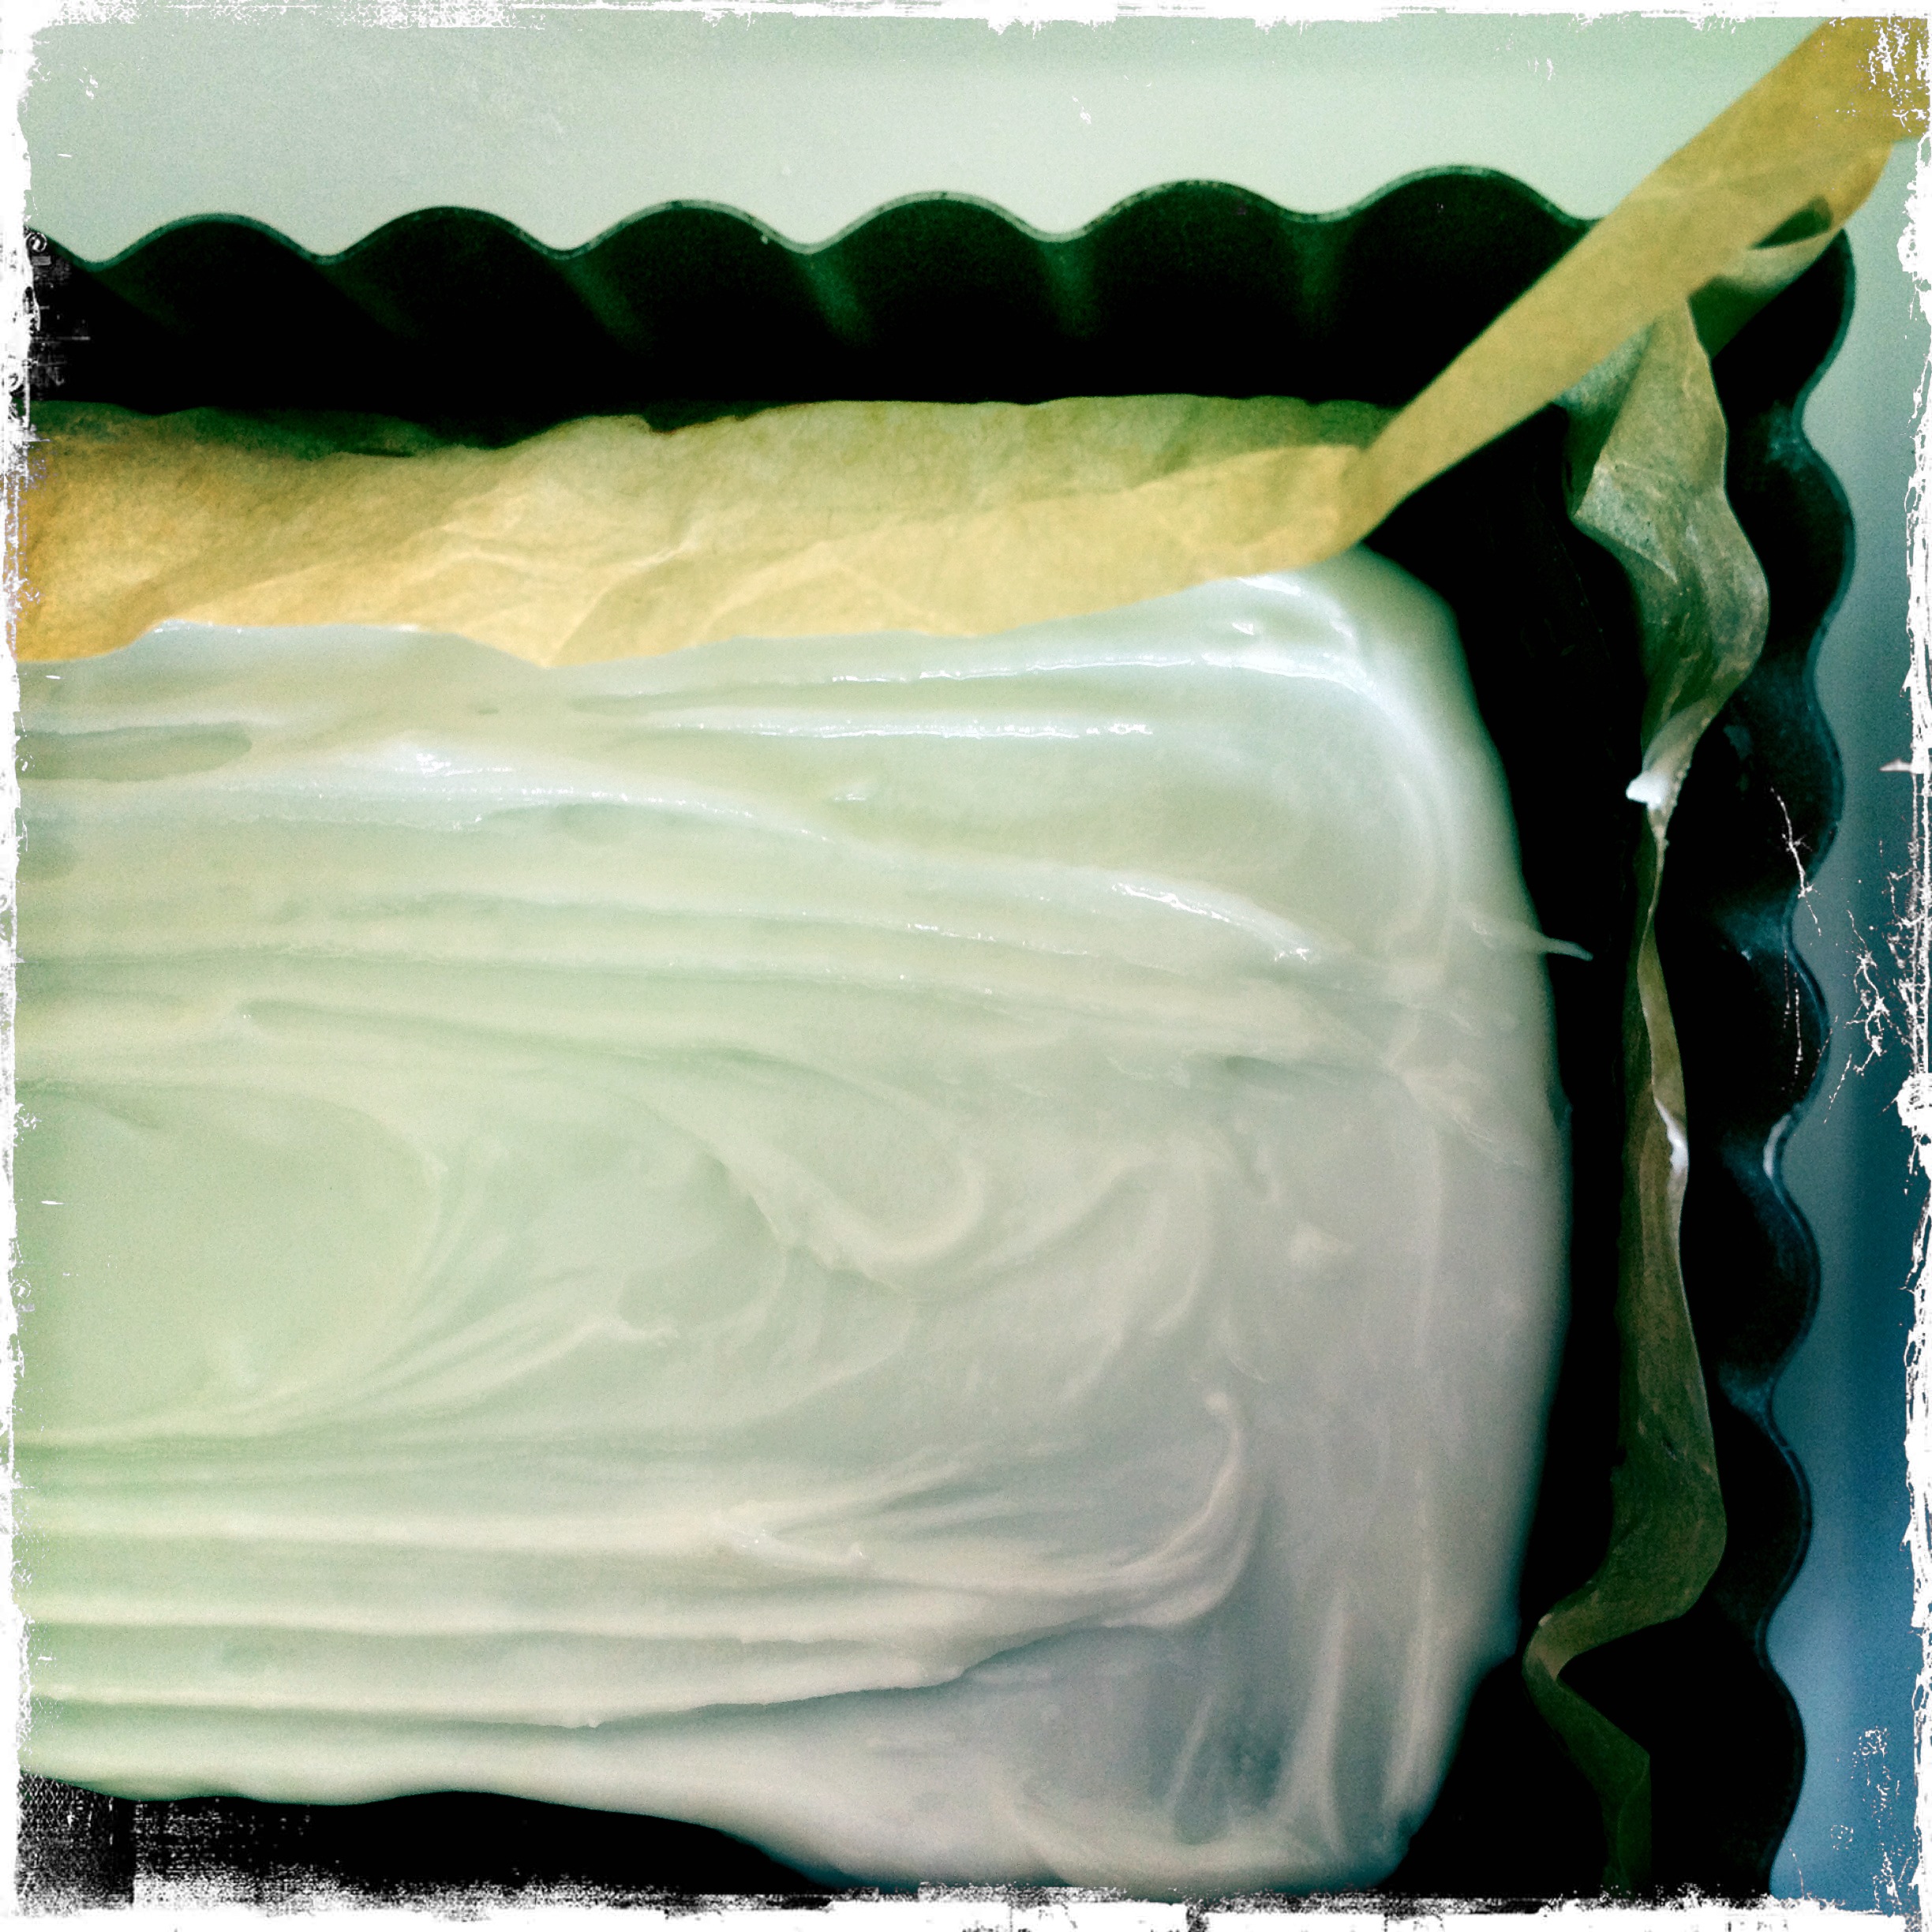
With the mixer beating (I had mine on medium speed), pour the molten sugar mixture very slowly into the egg whites. The idea is that it you cook the egg whites with the sugar mixture. A slow, steady, thin stream is what you’re looking for. Beating continuously all the time. Don’t stop! Once all the sugar mixture is in, continue beating for about a minute, until thick and glossy. But don’t hang around or it will start to set and you won’t get anything else into it. Now add the softened butter, whisking til well incorporated before adding more. It may start to look greasy and slightly separate. Do not panic. Once all the butter is added, keep whisking for another minute until it all looks well combined.

Now, working fast, lift up the mixer and take the bowl out. Stir in the nuts and fruits manually – you need to make sure they’re evenly distributed but as you stir it you’ll feel it setting so be quick – and pour/spoon the mixture into the prepared tin.

Cover with the other rice paper (again, using more than one sheet if yours isn’t big enough) and flatten with another tin or just your  hands. Now leave to set. Donna doesn’t say where, I think a cool kitchen is fine. Leave to set for eight hours (mine was done way before this). Then turn out – it can take some wrestling and cut into strips/cubes.

When I first made it and tasted it, it was really chewy. So chewy that I thought “hmm, my dentist isn’t going to like this” but after a few days it changed to a really lovely, soft consistency that wasn’t remotely filling pulling. Donna Hay says to keep it cold as the humidity will make it melt. In Italy they say to keep it in the fridge, too. But it’s zero degrees here in Suffolk and my nougat has been at room temperature (room temp being about 20C) and it’s absolutely fine. But if you do want to keep it cold, just remember to get it up to room temperature before eating it.

It’s very delicious. Would make – has made – great presents. I wouldn’t make this for every day but once/twice a year, a wonderful treat. And I feel it’s elevated me onto a whole other level of ‘cooking’. I mean, I made torrone and lived!

Salted caramel chocolates

Here it is, cut in half.

I’m very fond of salted caramel chocolates. I know salted caramel is a bit everywhere now, but I am partial.

L’Artisan du Chocolat’s are my favourite. But expensive. I went into the store within Selfridges not so long ago and a box costs £12 million pounds. Or nearly that.

Anyway, whenever I’m on a deadline, which is often, I think about how I can waste time in the kitchen. Because when I am failing at writing I need to achieve at something. Be it ironing or stuffing envelopes. I need a task that has a beginning, middle and end. Unlike writing which seems like all beginning and then huge relief followed by anxiety.

So this is what I did. I got my button chocolate mould, what I bought at Lakeland. This doesn’t make buttons like Cadbury’s buttons, it’s bigger. Each button is about 2cm across at the widest part. (Or something, I haven’t measured it I can if anyone wants me to). I melted some 70% cocoa chocolate, which isn’t really chocolate, it’s health food. I half filled the mould. Then put it in the fridge until set (not long). Then I put in some caramel sauce.

Here they are, chocolate at the bottom already. I actually put a bit more caramel in than is shown because I am very greedy.

Don’t be mean with the caramel sauce. But don’t fill so much that you can’t seal the chocolate up. They key is not to get the chocolate too thick, but to strike the right balance between enough chocolate to hold the caramel in, without making it too thin/thick. Even if you get it wrong the result is totally delicious, so fret not.

I use this caramel toffee sauce, aka dulce de leche. I don’t know how authentic it is but it’s what I use.

You thought I made my own caramel to go in these? You were wrong.

On top of each puddle of caramel, I then put a sprinkle of sea or rock salt. My two year old sometimes helps with this bit and some get enough salt to put you in a coma and I have to go round cleaning up.

You then let it rest for a bit more in the fridge, then top up with more chocolate. I keep my chocolate runny by keeping it over a pan of boiling water (but not on the stove).

Voila. Easy. Let’s just have another look at the finished product:

Pretty nice eh?


Addendum, November 2012.

I have now started making my own caramel to make these and it elevates them into something else. It doesn’t take long to make, the caramel, but as it’s my secret ingredient I am, for once, not going to share it. I’ll just post this here to be really annoying.

But you can find a recipe for caramel anywhere…

Chocolate Mulled Wine

I found this recipe, in amongst various things I’d torn out of a magazine one Christmas past. It answered my question: “should I serve hot chocolate or booze (to the grown ups)?” for a Trick or Treating treasure hunt extravaganza that we were staging in our garden (for the children). It came from Delicious magazine and was written by Laura Santini. I really can’t impress on you how very good it is. Even my partner – a wine expert and hater of mulled wine – got all knee-buckly about it.

This apparently serves six but there was four of us and we managed quite nicely…

750ml red wine
1 cinnamon stick
1 large dried red chilli (I didn’t have one so I used some chilli flakes)
1tsp ground spice
5 whole cloves
100g caster sugar
50g Venezuelan Black chocolate, 100% cocoa – grated*

*if you’ve never grated 100% cocoa chocolate, be warned: it’s very brittle/dry and it goes EVERYWHERE. I wouldn’t personally recommend grating it, but instead, scraping it off with a sharp knife.

This is what you do:

Put the wine and spices in a saucepan and warm slowly, over a very low heat. Then, add the sugar and stir until dissolved.

Add the chocolate and warm through. I used one of those Aerolatte whizzer things to homogenize it as it had a tendency to go a bit ‘speckedly’ with the chocolate. You can either then strain and serve, or strain and chill until you need it (it says it’ll keep for two days), then warm it up again and serve.

I really don’t plan to make mulled wine any other way now. And look: 100% cocoa is terrifically good for you, so this is practically a health drink.


One giant after dinner mint

I got this recipe from last month’s Delicious magazine.

After dinner mint chocolate: make it, smash it, eat it

I used a long tin of about 8cm by 30cm, cos I wanted that sort of shape. I lined it in baking parchment (tip: scrunch up the paper first, then flatten it out so it lays flat more easily, this also gives the After Eight an authentic looking side to it, all crinkly).

I melted some dark chocolate. I used about 100g for the bottom and 100g for the top (I’ll put the whole recipe, as I used it, below) I used 70% but actually you could easily go higher – and definitely no lower. It’s important to get the chocolate spread thinly. Thick sounds good but in reality this means you end up with chocolate that’s hard to crack and you want it thin. Don’t sweat it though because unless you’re an idiot you still end up with a great end product.

Pour/spread the chocolate for the bottom (so, 100g) on the bottom of the tin – refrigerate. Chocolate takes almost no time at all to set. Mine took what seemed like 10 mins. It should be hard and crisp.

Make the fondant bit. I used one egg white and 220g icing sugar plus of course the all important peppermint essence. Just in case your fondant is really stiff add a tiny bit of water. Go easy as you don’t want to add too much.

This is a suitable juncture to point out that this product contains raw egg whites so you know, don’t eat if you’re old/young/pregnant/prone to hysteria.

Mix the egg white and icing sugar together (sieve the icing sugar in) until you have a consistency that you like. Add a teaspoon of peppermint extract. Note that refrigerating it doesn’t really thicken it up much so aim for what you want the finished filling to be like, not what you hope it will turn into. To this end you may wish to add the egg white bit by bit. (I never have to as my eggs are laid by my chickens, so not giant).

I end up with really thick fondant that’s a great consistency for what it needs to do.

IMG_1130

When ready, spread over the base layer of chocolate and refrigerate for an hour or two.

Now melt more chocolate and spread it gently over the top – don’t drag it or you’ll end up with a mess.

Refrigerate and when ready to eat bring it out and smash it up with a hammer (but so you get big pieces, not lots of little ones) and let people help themselves. The circles on mine (if you look closely) are from the meat tenderizer I used. I’m sure finer folk have a toffee hammer or some such. DON’T bash it with a large thing like a rolling pin, you want to shatter it into shards, not smash it into a mess of tiny pieces.

You can cut this into squares, but they won’t be really neat. Or at least, mine weren’t. And I do think it’s fun to break it up yourself and eat shards of it.

Scoff after your meal with a strong espresso.

IMG_1136

In summary you need:

about 200g very dark chocolate
220g icing sugar
1 egg white
one teaspoon of peppermint extract (I used the Star Kay White one from Waitrose)

A greedy disposition.

Save

Cranberry sauce

Cranberries, orange zest and juice and sugar, all you need to make a delicious cranberry sauce

Cranberry sauce isn’t something that is served in Italian households. In fact any sauces, save for those you put on pasta, are rather alien to us. Growing up, we were made to be highly suspicious of sauces, especially opaque ones. “Whatta area dey trying to cover upaa?” my mother would say with, probably, hands on hips. Subsequently, I didn’t try Indian food til I was very grown up and my best friend’s husband, Mark (half Indian) introduced me to it. Accompaniment sauces, such as ketchup, mayonnaise, chutney etc are never on the table, either, in the Italian households I visit. Although in recent years, younger relatives have started using them.

I’ve had this recipe for cranberry sauce for ages. Torn out of a long ago published magazine. I have no idea what attracted me to it, given that cranberry sauce, have I mentioned, didn’t feature on my radar. It may well have been on the same page as a recipe for chocolate biscuits or something. Who knows. What I do know is that when I got me an English husband (almost) and I started moving away from always having Christmases at my parents’ house (sob!), I also started making cranberry sauce.

And this one is fantastic. And so easy.

The beauty is that you use the same amount of sugar as you have cranberries. I’d say from about 250-500g of cranberries, one orange zest/juice is fine. If you start to go above those quantities then you might want to use more orange zest/juice. The packets of cranberries that Waitrose sell come in about 325g, so I use those, and of course 325g of sugar. This makes more than enough for about six people. I’d say 500g cranberries/sugar would make enough for about ten. Obviously it depends on how much you put on your plate. Anyway it’s nice to make extra and have some left over to use for cold cuts over the next few days and weeks – it keeps for months.

So. You take:

The same amount of cranberries as you have sugar, so say 250g cranberries, 250g caster sugar
Grated zest and juice of one orange.

Preheat oven to 170C/gas 3. It’s hard to say how big your dish should be, but about 1 litre for 500g of cranberries?

Put the cranberries in the baking dish, scatter over the sugar, zest and juice. Stir around gently so that the berries are coated. That’s it. Now cover with foil (although I have cooked without foil and it’s been fine!) and cook for 35-40 mins until the berries are tender and bubbling. (What I do is set the timer for 20 mins and then give the berries a gentle stir and check how they’re doing.)

Cool and store in a jar in the fridge. Keeps for weeks if not months.

Here it is finished in the jam jar, ready to go into the fridge.