We discovered Orford Ness quite by chance last year. It’s about an hour from where we live and we went there on my birthday last year, with steak pasties in our ruck sack and no expectations.

We were blown away. Not literally of course, although that’s always a possibility on Orford Ness. It’s an old military bomb testing site – once one of the most secret places in Europe until just a few years ago – and there are still unexploded bombs there so you have to stick to the paths (the Coast Ranger told me that the light house keeper blew himself up by stepping on an UXB many years ago, but I don’t know if he was making that up..). It’s a desolate, fascinating, fragile place.

Visitor numbers are strictly limited and you can’t book in advance, so you can only turn up and be booked on the next boat of that day – they run from 10am until 2pm to get you out there (the journey takes about a minute). The last boat back is at 5pm and they have a system in place to make sure you don’t get left behind.
So what is it? Well it’s a peninsula, a spit of land, off the very pretty village of Orford (well worth a visit). Although it is, strictly speaking, accessible by land from Aldeburgh, it isn’t for the general public and so it feels like an island which you can only get on to by boat.

And it’s weird. If you like abandoned places you’ll love this place. There’s left behind ordnance, old buildings – some now too fragile to go into unfortunately. The National Trust – which owns it – treads a fine line between letting nature reclaim it and looking after it. There are three paths and they are only open seasonally, and not all are open at the same time and, as the numbers are limited, there is a real ‘cut off’ feeling when you get there.

There is only one toilet and no picnic places. When we’ve been we tend to perch on old rocks ‘n’ things. There are no trees so there is no cover, so sensible shoes/clothes/sunhat/sunglasses are a must depending on the weather (which is always that bit more extreme than on the mainland). No dogs or bikes allowed.
But it’s magical. Unfortunately you can’t walk down to the lighthouse anymore and then along the amazing shingle beach which houses a significant portion of all the shingle in Europe. The lighthouse was sold last year (you can still go visit) and the beach suffered terribly in last year’s storms. Ten metres were lost in five months, four metres in just one night.

This is such a shame because it was one of the best beach walks I’ve ever done, there’s something so raw and…epic…about this bit of coastline.
August 2015 note: this has now changed, and although the Police Tower (which is still shown on the maps) was washed away, you can walk down to and along the beach on approved paths and it is still magical. But it’s always good to check first as things do change on Orford ness!
I am completely obsessed with the Cobra Mist building, which stands, hulking and secret in the distance (you can’t get to it and you certainly can’t go in it).
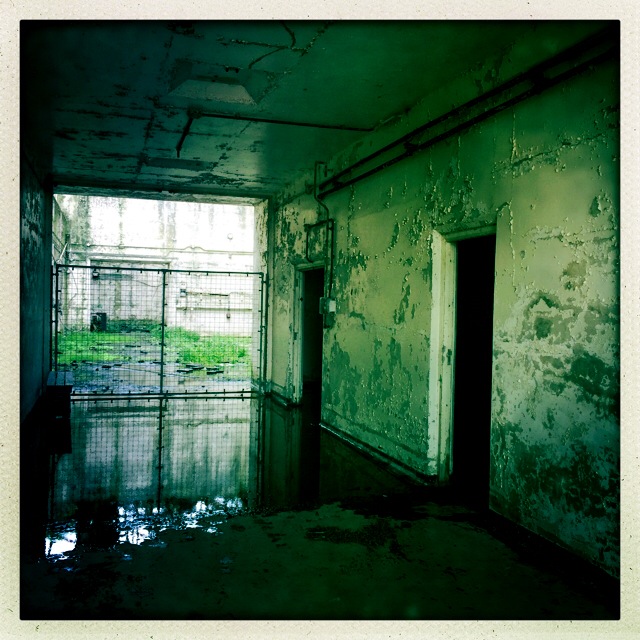
I had to make do with standing ankle deep in suspect water in one of the AWRE (Atomic Weapons Research Establishment), where work ceased 43 years ago and nature has taken over. It was one of the eeriest, creepiest places I’ve ever been in. I was actually too scared to go in some of the rooms, which were dark and dripping with water.

The rest of Orford Ness is fragile, beautiful and unlike anywhere I’ve been in the UK. So close to ‘civilisation’ and yet the moment you step onto the peninsula it feels like nowhere you’ve ever been. It feels slightly dangerous, like you’re just on the edge of something happening…

To reconnect with the world, when we got back onto Orford, we went to the Castle Green to the lovely Lisa’s Ice cream cart and had a truly excellent ice cream..