Category Archives: Yoghurt

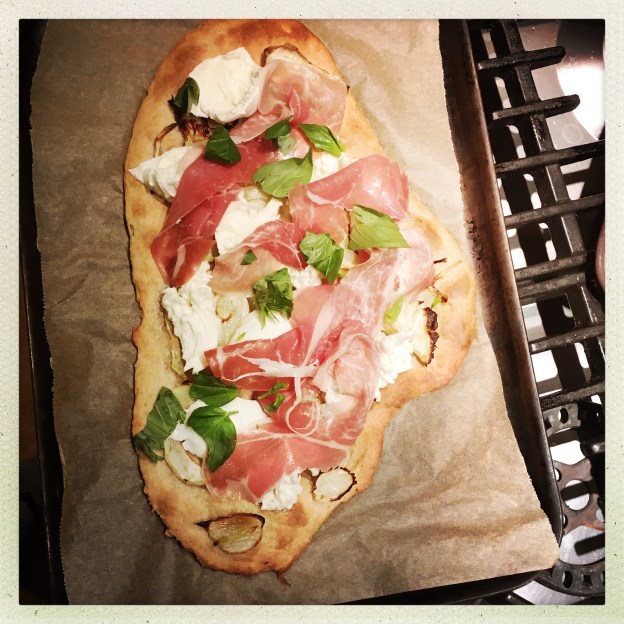
Quick spelt pizza

This is a Donna Hay recipe which makes a really quick, light, and slightly flakey pizza. It’s not pizza as you may know it and I find it best if you fold over the finished product and eat it like that. But it is delicious. And fast. I’ve reproduced the recipe more or less as she originally gave it but you can customise it with any topping you like. This makes two pizzas which we divided up to have half each and I found that was plenty for dinner with a green salad.

The base

1-2 fennel bulbs thinly sliced

Four tablespoons of olive oil

260g white spelt flour plus a little extra

Half a teaspoon of sea salt

250g Greek yoghurt

The Topping

300g soft mozzarella (ie not the block kind, Hay calls for burata but i didn’t use it)

6-8 slices of Parma ham or equivalent

Some fresh basil to scatter atop

Method

Oven to 200C, I put mine a smidge lower and on fan so that I can do both at the same time. Put two large baking trays in the oven to heat up.

Toss the fennel slices in two tablespoons of the olive oil and set aside. To make the pizza dough put the flour and salt in a bowl, stir, make a well in the middle and into that put the yoghurt and the remaining two tablespoons of olive oil and use a fork to mix it all together. Tip onto a lightly oiled board or work surface and gently knead until a smooth dough forms – this doesn’t take long. Now divide into two.

Roll out each piece between two pieces of baking parchment. This always seems wasteful to me but it’s needed and you’ll use two of them for final baking. (I use three piece in total, as I move the top sheet from one piece of dough to the other.) Roll out until, Hay says, they are about 35 x 25 x 0.5 cm. I just did mine until they seemed right (and they were!).

Keeping the dough on the bottom sheet of the baking parchment (you’ll transfer the whole thing onto the baking tray), remove the top piece and arrange the fennel slices on the top. If you’re using something else that needs to be baked – pepper slices, tomato sauce, you’d add that here too. Don’t over do it though, think of this pizza as something you do partly in the oven, partly you top outside of it. But the beauty is that you can also experiment.

When you’ve done that, take the baking trays out of the oven, slide the topped pizza on top, repeat with the other one and then bake for 15-18 minutes until the base is crisp and golden.

Remove from the oven and top with the slices of mozzarella and Parma ham or other toppings you’ve chosen that don’t need cooking. And scatter over Basil leaves if you have them.

Super fluffy pancakes with cherry berry compote

There are a few reasons this blog exists. Doing the day job I do, it’s nice to have somewhere to write fluffier (all puns intended) pieces. It’s a nice repository for recipes I’ve tried and liked (hence all the notes to myself, at times) and it’s also somewhere for my children to look up family recipes.

I didn’t have that. All the things my grandmothers (nonne) or zie (aunts) made have gone with them. My mum is still alive, thank goodness, but she now doesn’t really remember what she put in what. None of my female relatives ever wrote anything down. (The men in my family didn’t tend to cook. Although my dad made the best fried eggs and he did show me his tricks!) Perhaps they didn’t have time, perhaps they wore the whole “I don’t follow a recipe” thing as a badge of pride. Perhaps it helped them regain control in a world where they they had little control, with no economic independence (not talking about my mum here but those before her) and having to push out baby after baby all in the name of religion. Perhaps having ‘no recipe’ to follow meant that, were they mightily pissed off, as they must have been at times, meant they could at times sabotage things. Adding more or less of an ingredient that someone did/didn’t like.

You take it where you can.

But I am lucky. Thanks to my feminist mum I am financially independent but I do need to follow a recipe and as my eldest starts to grow up, and thoughts of her leaving home settle on the horizon, it’s nice to think that she can, should she so wish, look up recipes for things she enjoyed at home.

These super floofy pancakes as we call them are beloved of my youngest who isn’t a fan of super thin crepes or my oatmeal pancakes so occasionally I make these just for her and every time I have to hunt the recipe (originally from BBC Good Food) down.

Ingredients (This recipe makes enough for about ten regular sized pancakes, enough for three of us, if you want an abundance or there are more of you, then make double. The mixture keeps happily in the fridge for a day or two).

for the pancakes

175g white self raising flour, don’t even think about adding wholemeal here

1 teaspoon of baking powder

A sprinkle of cinnamon

1 teaspoon of caster sugar

1 large egg

75g of buttermilk or yoghurt

165ml of milk

for the compote if you wish

A tin of 150g cherries and berries in natural/light/syrup – don’t sweat it you can work with any of it. You can of course also use fresh or frozen berries if you have them, just cook the latter for longer. If using fresh add a tablespoon of water into the pan.

Method

the compote

Empty the tin of cherries and berries into a saucepan and warm through until gently bubbling. Depending on the juice the berries came in you may need to put half a teaspoon of cornflower to thicken it up. What you want to ideally end up with is a thickish syrup. Tinned fruit takes the least amount of time, fresh a bit longer, frozen the longest. None of it should take too long though, you want the fruit to still have shape but be soft and the syrup to be thickish.  Set aside to eat in a moment. I make the pancakes whilst this is bubbling in the background.

for the pancakes

You literally just tip all the ingredients into a bowl one by one as they are listed and give it a good whisk until there are no lumps or bumps.

Heat up a skillet or frying pan, I dribble a tiny bit of oil on and then brush the pan with my silicon pastry brush. Note a natural pastry brush will melt so don’t do that. You can just try to get the oil to cover the pan. You really don’t need much oil at all. Perhaps on a non stick pan you need none at all, but I don’t use non stick pans.

When the pan is hot, you dollop about two tablespoons (I have a small ladle from Muji which is perfect for this) onto the frying pan, on mine I can do three pancakes at a time. They don’t need much time at all to cook, maybe two mins per side. I like how the second side tends to puff up as you turn onto it.

HipstamaticPhoto-605271267.053553 2

I have mine with Greek yoghurt and the compote, my daughter has it with chocolate hazelnut spread, my husband has his with compote, banana and chopped nuts. My eldest doesn’t like them.


Spiced carrot and lentil soup

This is one of those soups that is so much more than a sum of its parts.  (A bit like this chorizo and red lentil soup one is, too.) It’s also perfect for this time of year when you’ve been in elasticated waistbands for the last two weeks and dread structured clothing. And yet you can’t stop eating, as if hiding evidence.

It’s so easy to make. I chuck it all into the slow cooker at about 2pm, not that it needs slow cooking, but it just makes it even easier. Put it on low and then we eat it at about six  o’clock after a quick whizz up with the stick blender. No need to grate the carrot, I just chop mine into pieces.

The recipe is here on the BBC Good Food site.

Bee Wilson’s almond waffles

Last year, just after my father died, I made two “grief purchases”. In that sort of ‘fuck it, you only live once’ way one can be after a loved one dies, I didn’t go through my usual checks and balances of ‘do I need this? Is it worth it? Will it earn its keep in the cupboard/on the work surface’. But I didn’t buy an Aston Martin. I bought a waffle maker.

My eldest has always loved waffles. When we used to walk through Whiteley’s department store, on the way to see my mum and dad, on the ground floor there was (still is) a kinda shop/stall which sells, amongst other things, waffles. These waffles are served crowned with squirty cream, chocolate sauce and….Smarties. [We have a Nestle embargo in our house so the Smarties are a very rare treat.]

So imagine my disappointment – which I tried to contain – when I bought a waffle maker, made waffles and my daughter said she wasn’t that keen on them. Not on my waffles anyway (this has happened many times before and I really should be used to it).

But my waffle maker was a top of the range model and I started to panic slightly, I hid it in the cupboard and there I thought it would stay until this January when the fabulous food writer Bee Wilson wrote a recipe for almond waffles in the Guardian.

I made it, they were delicious and this is how we have made waffles ever since. I need to tell you that once I forgot the eggs and although the waffles that were produced were smaller, they tasted like some sort of amazing waffle/doughnut hybrid which I still think about of a morning when I am making these wondering whether I should accidentally forget the eggs again.

Anyway, I love that they have almonds in them, thus lowering the hit on your blood sugar levels. We have these every week now. You can make the mixture the night before (I throw everything into my food mixer), keep it in the fridge and then they are only marginally more work than toast.

I have altered Bee’s original recipe to include a bit of wholemeal flour (20g to 80g of white, plain), as she says on the original recipe, she has also made them using gluten free flour, entirely successfully. I’ve also made them using Sharpham’s Baker’s Blend flour which is a mix of wholegrain and white, entirely successfully.

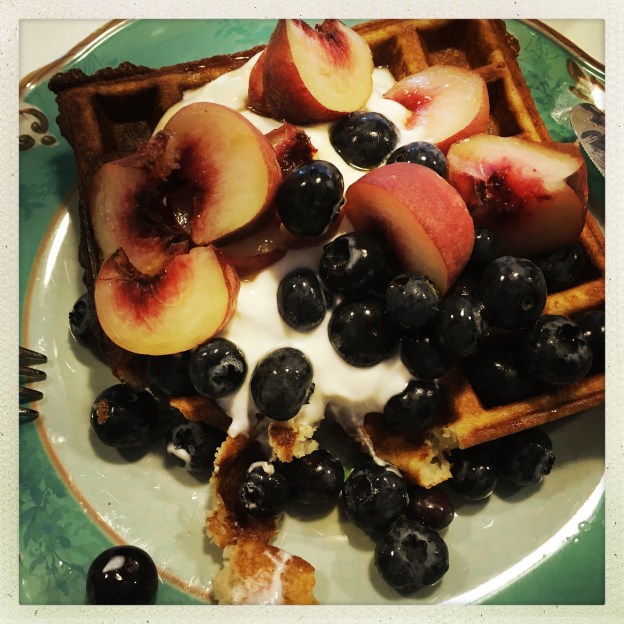
We serve ours with yoghurt and chopped up fruit and the merest lacing of maple syrup.

80g unsalted butter, melted
20g caster sugar
2 large eggs
100g flour of choice (I’ve made it with gluten-free flour for coeliac friends and it works fine)
80g ground almonds
1 tsp baking powder
170ml whole milk (or almond or coconut milk if you’d rather)
1 tsp vanilla essence

Chocolate yoghurt

This is a really nice thing to have with some fruit. I’m all for eating yoghurt on its own but if you want to butch it up a little, or make it into an extra treaty thing then you can easily make chocolate yoghurt. This serves two.

Melt 50g of chocolate of your choice in the microwave or in a bowl over a pan of simmering water. White chocolate gives a lovely vanilla-y flavour but experiment with milk or plain. Obviously milk or plain will colour the yoghurt.

Now, for the yoghurt, use anything from 150g – 250g. We always have live Greek-style yoghurt (is any yoghurt dead yoghurt?) but use any plain yoghurt that takes your fancy. 150g gives you a very tasty dessert indeed. Chocolate-y tasting with a nice, clean tang of yoghurt. The more yoghurt you add, the more you’ll have to eat but the less sweet it tastes. Experiment..

Once the chocolate is melted you add the yoghurt, add a tablespoon in first so you get a smooth mixture then add the rest; stir it so it’s all amalgamated and serve with some nice fruit. Awesome, fairly healthy, dessert. If you want to up your good fats, sprinkle some chopped nuts on top.


Blueberry and yoghurt loaf cake

Ever since I started making my own yoghurt, I’ve looked out for recipes involving yoghurt. Prior to last year, I’d never used yoghurt in cakes. I’d used it, with much success, in pancakes, but cakes? No.

Last year I found an amazing recipe for a very plain, but none the less delicious, lemon yoghurt cake. I’m not reproducing that one here because although the actual cake was delicious, the topping it recommended, was not. Using yoghurt in a cake makes the cake really moist and light, making it a bit more ‘shop bought’ in texture, which sounds mad, but sometimes I do like the texture (if not the taste) of supermarket cakes.

This cake is a Donna Hay recipe. It’s light, easy, delicious, wonderful. And sometimes you need something easy, yet spirit lifting. Especially on a Monday. I hate Mondays. I find it so difficult to wrench myself from the bosom of my family and send my children out to school and me out to work. Cake makes it all better, and if it’s made of yoghurt and blueberries, that can’t be bad, can it?

You need:

150g unsalted butter, melted or very very soft.

220g caster sugar

2 eggs

140g thick plain yoghurt

Zest from a small lemon

1 teaspoon of vanilla extract

225g self raising flour

125g blueberries

icing sugar to dust.

This is what you do:

Oven to 160C. Put the butter, sugar, eggs, yoghurt, lemon zest and vanilla in a bowl and whisk to combine (I use a food mixer with a whisk attachment but it’s fine to use a wooden spoon/hand whisk and some muscle). Now add the flour and whisk until well combined Gently fold through the blueberries and spoon into a lined loaf tin of about 22cm x 8cm x 7cm. Smooth the top and bake for about an hour, bit more if it’s still very moist. A cake tester should come out clean. Cool and dust with icing sugar.

Another favourite cake recipe that uses yoghurt in the icing is here and it’s delicious.

Making your own yoghurt

IMG_2883

The reason I started making sourdough was because nowhere near where I live does proper sourdough. And even if it did, it would cost a fortune. As it is, making my own bread costs me about 50 pence per half a kilo of flour loaf. That would cost about £7 in a shop.

There is no such imperative to making your own yoghurt. Sure, once upon a time, you could only get really not very nice yoghurt (thin and sour) but, now, supermarkets are full of them. Thick, creamy Greek yoghurt, drinking yoghurt, yoghurt with naughty corners, yoghurt stuffed full of fruit or delicately flavoured with vanilla or coconut. So there’s not a huge heap of point making your own – I may as well come clean.

But here are some reasons to make your own:

If you eat a lot of it, making your own does save money. I made some today which would have cost about £2 in the shop and cost me about a quarter of that.

You know absolutely what goes into it.

You can use it to make frozen yoghurts and cakes (more on these another time).

I also use rather a lot of yoghurt in Ali’s Oatmeal Pancakes which we are totally obsessed with and top them with yet more yoghurt.

You can also make just what you need.

You make it using almost any type of milk.

If you find you’ve run out of yoghurt, which I realise is hardly a crisis, as long as you have some starter and milk, you can make some overnight and have some for breakfast.

If you get any whey off the top (sometimes you do and sometimes you don’t), you can use it to make sourdough (just use it to replace some or all of the water).

You can use it to make your own drinking yoghurts and save a fortune (I’ll write about how to do this next week).

So if you’ve decided to give it a go you should know that you can make yoghurt using no special equipment at all. Just a flask, or even a bowl wrapped in towels and placed in a warm place like an airing cupboard.

But where would be the fun in that.

Regular readers will know I love a gadget. The yogurt maker I have is an electric one by Lakeland. (£19.99 so it will take a while to recoup savings made on making your own, but isn’t that always the way when you buy a gadget. Note: I get 20% discount on Lakeland products.) I liked the idea of an electric one as the temperature is controlled.

Yoghurt, like sourdough, needs a starter to get going. However, unlike sourdough, I find you can’t use a bit of your ‘old’ yoghurt to make a new batch. I find the cultures in the yoghurt weaken over time. I know some people have written about having a starter going since year dot. But this hasn’t been my experience. So what I do is buy some organic Greek style yoghurt (because that’s what I like) and freeze it in an ice cube tray and then take it out and defrost one cube per half a litre of milk (approx).  I find that one small pot of bought yoghurt provides starter for about eight batches of my own. Probably more. I was never great at maths.

You can make yoghurt using UHT milk, in which case it’s even simpler as you just use the UHT milk (at room temperature) and go straight to the bit where you put it into the yoghurt maker with the starter. Don’t dismiss this totally. I have a litre of organic UHT in the cupboard for yoghurt making emergences.

I’m totally aware of how that sounds.

So this is what you do. Get some milk, about 400ml. Don’t sweat it if you have a bit more or less. I use organic milk; either semi skimmed or whole milk. I have truthfully found no difference at all in the end product and so I use what we have. Whole milk is much better for you (less sugar) but we only get it twice a week so I usually have semi-skimmed and that’s what I use; the yoghurt in the picture was made with semi skimmed and it is so thick and creamy.

If you want to guarantee really creamy yoghurt use two tablespoons of skimmed milk powder. You stir it into the  milk before you boil it (or into the UHT milk before you add it to the starter, make sure it’s dissolved). I always use it.

I do, of course, have a digital probe thermometer which I put in and it’s great as it also has an alert so tells you when it reaches a certain temperature (more on which this is useful in a moment). As soon as it reaches 100C (at which point it will froth up so you have to be on it), take it off the heat and leave it. Note: it takes longer to cool down milk for yoghurt than it takes to heat it up so be prepared.

(Note: all equipment that you use to make yoghurt, such as a probe thermometer etc must be really clean.)

Now, yoghurt is made from milk due to two types of of bacteria: Lactobacillus bulgaricus and Streptococcus thermophilus. These multiply when the milk is at a particular temperature. If the milk is too hot it will kill the bacteria, if it’s too cold the bacteria can’t be bothered to work. This is why it is now crucial that you cool the milk to the right temperature. Some people are able to do this by dipping a clean finger into the milk, if it’s right you should be able to count up to ten with your finger in the milk. I have really cold hands so this is hard for me to get right so I use the digital thermometer to tell me when the milk has reached 44C. This is where the alert comes in.

Why 44C? Well the temperature window you’re aiming for is no warmer than 49C (kills the bacteria above this) and no cooler than 33 (bacteria can’t get going). 44C works really well for me.

When it reaches 44C you mix a bit of the milk with the starter and make sure it’s all well combined, then add the rest of the milk, mix gently but well and put in the yoghurt maker following the instructions for your own particular one.

That’s it. It’s usually done after 6-8 hours. For a milder yoghurt leave for less time but sometimes it’s not set after six hours anyway so you have to go longer. When it’s done, put it straight in the fridge and then later decant into another container (if you want to) and use as you wish. I find it keeps easily for five days, we’ve never had to test it for longer.

A few trouble shoots:

If your yoghurt doesn’t set, it’s usually due to one of three things:

Your starter didn’t have enough bacteria in it. This is why it’s really a good idea to freeze fresh yoghurt and then defrost it just before you need it. There’s no reason you couldn’t freeze your own yoghurt I suppose, but I always freeze shop bought as I think that way you’re starting with a really fresh culture.

Your milk was too warm or too cold. Temperature is key.

You may get some whey on the top, either stir through or drain off and use it to water certain plants (blueberries love them, but dilute it, about 1/10 parts water and note I’m not a gardener, this is just what I’ve read). Or as I said above use it to replace water in bread baking.

So to summarise, this is what I use:

400ml of of full cream or semi skimmed milk to make the same amount of yoghurt (i.e a shade over 400ml)

An ice cube size of starter – about 30ml, more if you want the yoghurt to set more quickly and if you want a milder taste (the less time it takes to set, the milder/cleaner the taste, more starter yoghurt means it sets more quickly, in less time).

Two tablespoons of dried milk powder.

Update: February 2014. Since I realised that a teaspoon of maple syrup was only about 15 calories, and the difference such a small amount could make to certain foods, I have been less reticent about using it. Some freshly made, but chilled, yoghurt, with a teaspoon of maple syrup and some soft, squidgy, cut up Medjool dates is really delicious and I’m not one to really say that of yoghurt based desserts.