Category Archives: Breakfast

Oat Milk Iced Coffee


I’m always a little embarrassed to post a ‘recipe’ that’s basically just an idea. But tbh I’ve had some of my best tips from people posting mere ideas…

Since I stopped eating sugar and dairy (and soya, nightshades, meat and probably something else I’ve forgotten) to help with my health I’ve felt so much better. But it’d be a lie to say it hasn’t had its challenges. We are a family who loves our coffee and especially in the hot months, our iced coffees.

I don’t know why I didn’t think about it before but actually half a glass of oat milk (or plant milk of your choice), half a glass of ice, and an espresso or two makes an excellent cold drink that’s my new favourite way to drink coffee atm.

However, it seems to challenge baristas when I go out.

“Do you have oat milk?” I ask. “Yes they say”.
“Do you have ice?” I ask. “Yes,” they say.”

“Then could I have half a glass of oatmilk, some ice and an espresso?”

You’d be amazed how often the answer to this is ‘no’. (And listen, my parents ran a cafe for years and I worked there so I know what it’s like to work as a barista.)

Pret can’t seem to handle it and insist on giving me an Americano instead (which alters all the proportions). The coffee bar at my otherwise amazing military club can’t get their heads around it, although just a few feet away the staff at the lounge bar can mak a beautiful drink for me. The waiter at Ottolenghi got it and made it for me himself.

But most of the time I just make it for myself at home, thus saving myself £££.

If you like sweet drinks this isn’t for you. But if you like all the component ingredients you’ll love this. And if you’ve been doing this yourself for years then: good for you. Why didn’t you tell me?

Sourdough (English) muffins


I’ll get straight to the point. These take time to make but most of that time is resting the dough in some shape or form. You have to cook them slow and low. But they are delicious and they freeze really well. I got the recipe from Facebook, from one of the many sites I follow about sourdough. The original says to use active starter, mine was a few days (in the fridge) old and it did it no harm. But I’ve adapted it slightly. You’ll need to start these the day before you want them. The bulk ferment (the bit where it stays out at room temperature for 10-12 hrs or as long as as possible) takes a long time so best to start these in the morning of the day before you want to eat them. Note you cook these on the hob, not the oven.

Ingredients


250g whole milk
115g water
55g butter (unsalted)
20g honey (or sugar, if using sugar add it with the flour)

75g starter
500g bread flour (I used 50g of Hodmedod’s Sourdough School’s Diversity XXX blend and the rest white but you can also use half wholemeal and half white depends how wholesome you want them to be)
A gently heaped teaspoon of fine grain sea salt

Method

Put the milk, water, butter and honey together in a sauce pan and gently heat til all melted then let it cool for ten minutes. If you’re using sugar then add it to the flour mixture next.

In a large bowl – for this is what you’ll eventually mix everything in, add the starter (sugar if you are using) and then add the milk/honey/water/buttery mixture and mix everything together, now add in the flour and salt. You’ll get a rough dough. Cover it and leave it to rest for 30 mins.

Now over two hours, every thirty minutes, you give it a gentle knead/fold and stretch. When this is done put in a clean bowl (oil with some olive oil) and cover it with a tea towel or a plate if you have one big enough. You leave it out for a looong time for the bulk ferment, or as long as you can. The original recipe says 10-12 hours. But if your kitchen is raging hot then probably half this. I think I left mine out for about 7 hours. Then transfer to the fridge for a day or two. I left mine in for two days.

When you’re ready to make them turn out the dough on a clean surface/board that’s been oiled or lightly floured and roll out to about 1.5cm thick. You don’t want it too thick. Get a biscuit cutter that’s the size you want the muffins to be – mine was about 6-7cm – and cut out as many as you can, transferring them to a baking tray which has either been lined with baking parchment or dusted with polenta. Re shape the dough and roll out again until you’ve used it all up. You’ll have one left that you’ll probably shape by hand. This will be the sacrificial muffin.


Leave out like this, covered with a tea towel, for about an hour. Heat up a cast iron frying pan – big as you got – but make sure you have a lid for it. You can also use a Le Creuset but make sure the heat is low. You can’t rush these babies.

When the pan has warmed up put in the sacrificial one to try out the heat of the pan and how long they take. It’s really worth doing this. Of course I thought I knew best so I ruined four finding out the hard way that my heat was too high.

Eventually I worked out mine took about eight minutes each side, on the lowest gas setting. You want them to be gently brown, when done turn over and do the other side for eight minutes. Keep an eye on them, it’s easy for them to burn but be raw in th middle (this is also why you don’t want them to be too thick to start with). Note they do puff up a bit when cooking.

Cook in batches, put on a cooling rack and then eat. With bacon and egg, sausage, cheese and chilli jam, hummus and carrot, whatever you like. They are SO tasty and freeze beautifully. Of course you can also toast them but I had mine fresh.

Pretzel Rolls

The food writer Nicola Miller introduced me to what I think is the best bacon roll, from 5 Angel Hill in Bury St Edmunds. Their soft pretzel rolls, filled with salty bacon slices can see me going pretty much all day. Few breakfasts do this.

So when I saw this recipe for soft pretzel rolls in BBC Good Food magazine a while ago, by Edd Kimber (who I think is a genius and the only person I pay for on Substack) I had to make them.

I gave up hope of making them so they looked like pretzels, mine just look like in the picture. They make great rolls for sandwiches, sweet – but not too sweet – and soft. And of course with bacon for breakfast, and maybe an egg. I also really like them on their own.

The baked bicarb bit is a pain but you only need to do it once to yield a jar of baked bicarb which lasts for a good few batches, and it is worth it (I’ve done it without and they are fine but the baked bicarb does add something). I’ve reproduced the recipe here, eversoslightly tweaked, largely to help me as the way it’s laid on in BBC Good Food I always found confusing.

For the pretzel rolls (makes eight)

500g strong white bread flour

7g dried yeast (I use Dove’s Farm)

25g dark brown muscovado sugar

300ml of luke warm water

50g unsalted butter
(I sometimes put 50g of fridge-cold butter into a jug of 300ml of just boiled water and wait til the butter melts, thus cooling the water, and then wait until the water is at the sort of temperature that when you dip your finger in it feels neither hot or cold)

1 teaspoon of salt

For when ready to bake

2tbsp baked bicarb (see later)

An egg for egg wash

Sea salt for sprinkling if you want.

I put all the ingredients for the pretzel rolls (not the ‘for when ready to bake’ bits) into a food mixer with dough attachment and mix for ten minutes. Then I take out the dough hook and leave at room temperature for an hour (less if it’s really hot).

When ready, take the dough out and divide into eight. You roll each piece out into a long sausage and then shape into a U then cross the ends up and over. If you get stuck just YouTube How to shape a pretzel but don’t get fixated on making large holes or gaps. You can also just shape these into little normal buns. Place on parchment covered tray.

Then you can either set these aside for – as the original says – 20 mins (covered with a cloth) or do as I do which is put them in a fridge which is at 4C (on a parchment covered tray, covered with a tea towel). I bake them the next day. Note these won’t keep for ever in the fridge so if you want them the next day, make them late afternoon/evening.

When you are ready to cook, preheat the oven to 200C and bring a large pan of water to the boil put in the two tablespoons of baked bicarb (I will tell you how to do this at the end). Take your tray of pretzel rolls out of the fridge. Depending on how big your saucepan is you put in, say, two pretzel rolls and a time and boil for 20 seconds each side (flip over using the slotted spoon). Take out the pretzel rolls with a slotted spoon and place back on the parchment covered baking tray.

When all are done like this you brush the rolls with beaten egg, sprinkle with sea salt if you so desire and bake them at the 200C for 20 mins. They will be a rich golden brown. As soon as you are able to place them on a cooling rack, off the parchment (otherwise they can go soggy). Wait as long as you can to start enjoying them.

Once cooled these also freeze beautifully, I defrost them in the microwave on the defrost function for about 2 minutes.

Baked bicarbonate

Preheat oven to 120C. Foil line a baking tray and pour a whole tub of bicarbonate of soda (the sort of size you get in the supermarket) . Spread out so it’s all even and bake for one hour. When cool put in a specially marked container so you have it for next time.

Super fluffy pancakes with cherry berry compote

There are a few reasons this blog exists. Doing the day job I do, it’s nice to have somewhere to write fluffier (all puns intended) pieces. It’s a nice repository for recipes I’ve tried and liked (hence all the notes to myself, at times) and it’s also somewhere for my children to look up family recipes.

I didn’t have that. All the things my grandmothers (nonne) or zie (aunts) made have gone with them. My mum is still alive, thank goodness, but she now doesn’t really remember what she put in what. None of my female relatives ever wrote anything down. (The men in my family didn’t tend to cook. Although my dad made the best fried eggs and he did show me his tricks!) Perhaps they didn’t have time, perhaps they wore the whole “I don’t follow a recipe” thing as a badge of pride. Perhaps it helped them regain control in a world where they they had little control, with no economic independence (not talking about my mum here but those before her) and having to push out baby after baby all in the name of religion. Perhaps having ‘no recipe’ to follow meant that, were they mightily pissed off, as they must have been at times, meant they could at times sabotage things. Adding more or less of an ingredient that someone did/didn’t like.

You take it where you can.

But I am lucky. Thanks to my feminist mum I am financially independent but I do need to follow a recipe and as my eldest starts to grow up, and thoughts of her leaving home settle on the horizon, it’s nice to think that she can, should she so wish, look up recipes for things she enjoyed at home.

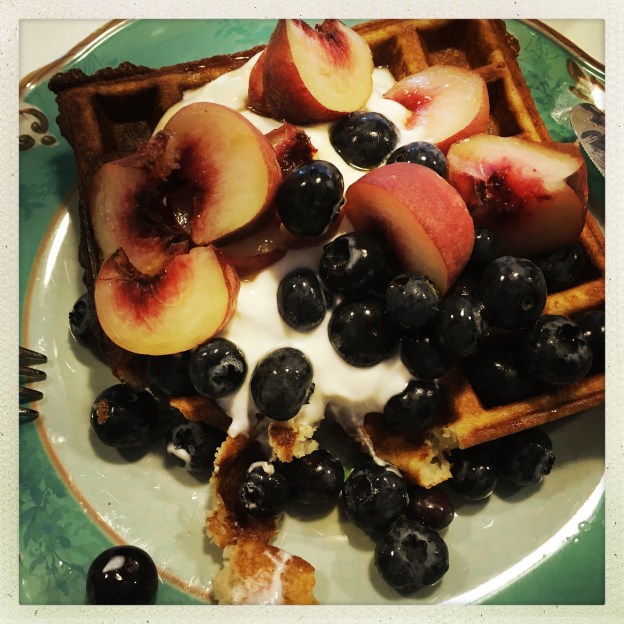
These super floofy pancakes as we call them are beloved of my youngest who isn’t a fan of super thin crepes or my oatmeal pancakes so occasionally I make these just for her and every time I have to hunt the recipe (originally from BBC Good Food) down.

Ingredients (This recipe makes enough for about ten regular sized pancakes, enough for three of us, if you want an abundance or there are more of you, then make double. The mixture keeps happily in the fridge for a day or two).

for the pancakes

175g white self raising flour, don’t even think about adding wholemeal here

1 teaspoon of baking powder

A sprinkle of cinnamon

1 teaspoon of caster sugar

1 large egg

75g of buttermilk or yoghurt

165ml of milk

for the compote if you wish

A tin of 150g cherries and berries in natural/light/syrup – don’t sweat it you can work with any of it. You can of course also use fresh or frozen berries if you have them, just cook the latter for longer. If using fresh add a tablespoon of water into the pan.

Method

the compote

Empty the tin of cherries and berries into a saucepan and warm through until gently bubbling. Depending on the juice the berries came in you may need to put half a teaspoon of cornflower to thicken it up. What you want to ideally end up with is a thickish syrup. Tinned fruit takes the least amount of time, fresh a bit longer, frozen the longest. None of it should take too long though, you want the fruit to still have shape but be soft and the syrup to be thickish.  Set aside to eat in a moment. I make the pancakes whilst this is bubbling in the background.

for the pancakes

You literally just tip all the ingredients into a bowl one by one as they are listed and give it a good whisk until there are no lumps or bumps.

Heat up a skillet or frying pan, I dribble a tiny bit of oil on and then brush the pan with my silicon pastry brush. Note a natural pastry brush will melt so don’t do that. You can just try to get the oil to cover the pan. You really don’t need much oil at all. Perhaps on a non stick pan you need none at all, but I don’t use non stick pans.

When the pan is hot, you dollop about two tablespoons (I have a small ladle from Muji which is perfect for this) onto the frying pan, on mine I can do three pancakes at a time. They don’t need much time at all to cook, maybe two mins per side. I like how the second side tends to puff up as you turn onto it.

HipstamaticPhoto-605271267.053553 2

I have mine with Greek yoghurt and the compote, my daughter has it with chocolate hazelnut spread, my husband has his with compote, banana and chopped nuts. My eldest doesn’t like them.


All about the crust

I make bread almost every day. I put it in for final fridge-proving overnight and get up early (with the oven on a timer so it is up to temperature by the time I get up and a baking tray in the oven so that the raw dough goes onto a hot tray) to bake it.

I know. How lucky is everyone in my house.

There are many great things about baking your own bread but you can also custom-bake the crust so it suits you/what you’re going to use the bread for.

I usually bake sourdough bread at 220C for thirty minutes. This is how I’ve been doing it for years and it affords time for the bread to bake, and cool, in time for making sandwiches for packed lunches. And the first packed lunch leaves the house at 7.30am so you can perhaps work backwards and work out how early I get up.

(No-one makes me. I like to get up early and as the bread bakes I tidy up and get ready for the day.)

The crust on a 30 min loaf is quite thin, golden brown, it wouldn’t stop the room at a party but it’s good for anyone who can’t, or doesn’t like, very crusty bread.

But lately I’ve been craving really thick, dark, chewy crusts. To do this you need to bake for about 45 mins minimum but the longer you go the thicker the crust.

Of course if your oven is too hot it will also be too burned so you need to play with the temperature. However, what works for me is this:

250C ten minutes

220C twenty minutes

down to 200C for another ten if it’s looking too burnt, if not keep it at 220 for another ten minutes.

Yes I know this is 40 mins but timings are really tight in the morning which is why I blast it with a 250C heat to begin with.

My shelf is on middle and my oven is on normal oven (not fan) setting

The crust is amazing. I love it with butter and apricot jam.

I also stick an ice cube on a tray under the bread to allow for maximum oven spring (rising). Nothing beats the bread when it’s first baked – but cooled as I hate hot bread – and I will fight anyone for the crust-end, or ‘il culo’ (the bottom) as we say in Italian.

Oat milk for smoothies

I wrote about making almond milk some years ago, and whilst I love almond milk, it’s expensive. We drink a lot of smoothies in our house, and I usually add some sort of non-dairy milk to them. Not because I don’t have dairy – I do, and how! – but I just prefer nut/oak milks in my smoothies; so, in an attempt to make something cheaper,  and to avoid shop-bought ‘mylks’ I tried making my own oat milk. Plenty of people do and it’s so simple I urge you to give it a try.

The basics is one part oat flakes to four parts water, and then, depending on taste and how much you make you can add some vanilla extract, a pinch of salt, or a date for a bit of sweetness. If you use one cup as the measurement, I use a teaspoon of vanilla extract, one date, half a teaspoon of salt. So you can increase or decrease those measurements to suit the quantity you make. But, increasingly I make it using just oats and water. I make it about 1L at a time (I make mine quite thick and then dilute with water at point of making) so it’s pretty fresh. It keeps for a few days in the fridge. It might need a shake/stir before using.

Take your one part of oats (say one cup, in fact I use my 1/3rd cup measurement as that is what works for my bottle), add four parts water, blend for 30-60seconds depending on your blender. You can strain it in through a fine cloth (I do) or in fact just use as is. I don’t find there’s much left behind in the cloth but I do have a ‘super blender’, which basically turns oats to dust.

I felt so disproportionately pleased with myself for saving money making this, I went out and bought a fancy bottle to put it in, thereby completely wiping out this week’s savings.  But I think the presentation is important…


Enriched bread dough with nuts and dried fruit (bread machine)

After I made enriched dough chocolate chip rolls, I thought I’d try making something similar, but stuffed with nuts and dried fruit instead. My mum especially, likes bread like this. She gets something from M&S that is stuffed with nuts and fruit.

I doubled the recipe used before and added 160g of mixed dried fruits and nuts of your choice. The bread was lovely, really soft, tasty and would be lovely with cheese or just eaten with a thick spread of butter. I made two loaves this morning and one is almost already all gone (the other, on its way to my Mamma).

Without adding any bits, these make a fantastic burger/hot dog bun and are now what I use for burger buns. You can also make, bake and then freeze for future use.

This is what I did:

One teaspoon of dried yeast (I use Dove’s Farm)

500g strong white bread flour (you could make this a teeny bit more healthy by using 400g strong white/100g of strong wholemeal, but I never do)

Two teaspoons of caster sugar

50g butter, chopped and added in

Two tablespoons of milk

One teaspoon of salt

Two eggs

175ml water

for later: 160g of ‘stuff’ if you are adding bits: dried fruit, nuts, chocolate chips or a mixture. My every day is chocolate chips and flaked almonds. I’ve now found a great source of very good quality chocolate chips which I can buy in bulk, as it was costing me a fortune. I like the 55% cocoa ones, as they are a good half way house, but you can go higher or lower.

Put everything, bar the fruit and nuts, into the bread machine and set to a dough cycle (mine lasts 2hrs 20mins). You can also easily make this by hand by mixing everything together, leaving for 15 mins, kneading lightly, leaving for 15 mins etc: repeat about four times until dough is really smooth and soft.

When done, take out and put in a bowl and mix in the fruit and nuts. Leave for ten minutes.

On an oiled surface, tip out and knead lightly to make sure everything is incorporated. Leave for ten minutes. Then cut in half and shape: either into a baton shape, a round or buns. I get eight good sized buns out of this but you can of course make them slightly smaller and get more. Place both on a baking parchment lined tray and prove overnight in the fridge (cover with a clean dishcloth).

In the morning bake for approx 12 mins at 220C.

Delicious!

(Apologies if I’ve made any mistakes, I’m typing this whilst also answering 101 questions about Our Generation dolls, posed by my youngest…)

HipstamaticPhoto-533895246.730634


Bee Wilson’s almond waffles

Last year, just after my father died, I made two “grief purchases”. In that sort of ‘fuck it, you only live once’ way one can be after a loved one dies, I didn’t go through my usual checks and balances of ‘do I need this? Is it worth it? Will it earn its keep in the cupboard/on the work surface’. But I didn’t buy an Aston Martin. I bought a waffle maker.

My eldest has always loved waffles. When we used to walk through Whiteley’s department store, on the way to see my mum and dad, on the ground floor there was (still is) a kinda shop/stall which sells, amongst other things, waffles. These waffles are served crowned with squirty cream, chocolate sauce and….Smarties. [We have a Nestle embargo in our house so the Smarties are a very rare treat.]

So imagine my disappointment – which I tried to contain – when I bought a waffle maker, made waffles and my daughter said she wasn’t that keen on them. Not on my waffles anyway (this has happened many times before and I really should be used to it).

But my waffle maker was a top of the range model and I started to panic slightly, I hid it in the cupboard and there I thought it would stay until this January when the fabulous food writer Bee Wilson wrote a recipe for almond waffles in the Guardian.

I made it, they were delicious and this is how we have made waffles ever since. I need to tell you that once I forgot the eggs and although the waffles that were produced were smaller, they tasted like some sort of amazing waffle/doughnut hybrid which I still think about of a morning when I am making these wondering whether I should accidentally forget the eggs again.

Anyway, I love that they have almonds in them, thus lowering the hit on your blood sugar levels. We have these every week now. You can make the mixture the night before (I throw everything into my food mixer), keep it in the fridge and then they are only marginally more work than toast.

I have altered Bee’s original recipe to include a bit of wholemeal flour (20g to 80g of white, plain), as she says on the original recipe, she has also made them using gluten free flour, entirely successfully. I’ve also made them using Sharpham’s Baker’s Blend flour which is a mix of wholegrain and white, entirely successfully.

We serve ours with yoghurt and chopped up fruit and the merest lacing of maple syrup.

80g unsalted butter, melted
20g caster sugar
2 large eggs
100g flour of choice (I’ve made it with gluten-free flour for coeliac friends and it works fine)
80g ground almonds
1 tsp baking powder
170ml whole milk (or almond or coconut milk if you’d rather)
1 tsp vanilla essence

Pea, avocado and ricotta hot cakes (with or without poached eggs)

These are my new favourite thing. You might be able to tell this as there is no photo of the product all plated up, because I was too busy eating.

The original recipe is from Waitrose magazine (I’ve slightly adapted it) and it serves four. But you can easily make these for fewer and keep leftovers in the fridge (20seconds zap in microwave) for a really quick, tasty and nutritious lunch. They are much more filling than they seem as there’s a lot of protein and good fats in there (okay so the ricotta may not be the best fat you can get but come on).

You need:

110g frozen garden peas

250g ricotta

Half an avocado for the hot cake mixture, more for serving it with – as you like

100g self-raising flour, you can go part or whole wholemeal if you like

3 eggs, separated, but not for long

about 3 tablespoons of olive oil for the frying

Peashoots/avocado to serve.

The recipe shows this with poached eggs, which is how we had it, but I had the hot cakes warmed up two days later with just avocado for a super fast lunch (from conception to partial digestion in under four minutes as I had an interview to do). You can of course serve these with whatever you want and I can’t help thinking they’d make a good breakfast.

This is what you do:

Put a pan of water onto boil, when boiling add the peas and simmer for two minutes. Drain and cool under cold water. Tip into a food processor with the ricotta, half an avocado, flour and three of the egg yolks. Whizz up, season.

Separately, whisk up the 3 egg whites until stiff, then fold into the pea/ricotta mixture.

Put a large frying pan on with some oil (you will need to do these in batches unless your pan is huge). You use one or two large dollops per cake – see how you go. Cook for about two mins. Unlike almost evert-other-thing I make like this, when you turn them the underside has actually set and doesn’t stick (or mine didn’t) and I didn’t have to chase it round the pan and end up crying.

Flip (it may swidge a bit) and cook until the other side is done – I mean this is obvious right?. Keep warm whilst you make the rest.

That’s it. Serve, as above, with poached eggs, avocado and peashoots.

Apricot and cinnamon breakfast muffins.

Of course, you can eat these beyond breakfast time. I made them because I was told I am borderline anaemic the other day, and apricots are a good source of iron. Not as good as a rare-cooked steak served with green leafy veg and washed down with a Guinness and an orange juice, but possibly easier to carry in your bag. These are very filling, not particularly sweet and keep me going if I can’t be bothered to eat lunch. Well, until about 4pm. I love how chewy the top apricot goes.

This recipe is from the free little newspaper Waitrose provides each week.

It makes 12 and you need to allow a little time for soaking the apricots.

You need:

250g dried apricots, I prefer the organic variety here as they have less stuff on them, it does mean they are quite dark though and not all zesty bright.

1 large orange, juice and zest

275g self raising flour (I used some wholemeal too)

2tsp baking powder

2tsp cinnamon

75g porridge oats, plus a bit extra for sprinkling

150g caster sugar

285ml buttermilk or kefir milk if you make it

2 medium eggs

50g butter, melted

3 tablespoons of apricot preserve

You also need a muffin tin lined with muffin cases.

Method

Reserve 12 of the apricots. Roughly chop the rest and put them to soak in the orange juice and zest. I do this the night before, but 30 mins is fine.

Preheat the oven to 200C. Mix together the flour, baking powder, cinnamon, oats and sugar. In a separate large bowl mix together the buttermilk, eggs and butter and add the soaked apricots sand orange zest/juice. Now add the dry ingredients and mix until must blended.

Divide amongst the paper cases – you’ll find the mixture is quite up to the top but don’t worry as it doesn’t rise much (despite the self raising flour AND baking powder). If you like use those fancy tulip-shaped muffin cases that look like someone artfully folded some baking paper, the ones that cost about £20 for ten (exaggeration).

Place a whole apricot atop each muffin and sprinkle with some porridge oats (this makes the muffins look good!). Cook in the oven for 18-20 mins. When still warm, mix the apricot jam with a tiny bit of boiling water and brush over the top for a lovely glaze. I wish I could tell you my children loved these. They didn’t. But my partner did!