Category Archives: Gluten-free

No/low alcoholic chocolate mulled wine (a thing of beauty)

Some years ago I posted about a recipe I’d found for chocolate mulled wine, and indeed I made this for some years. But I stopped drinking about five years ago and life changed and I’d not made it since.

But last week, in preparation for some friends coming round to make wreaths, I decided I’d try to make it again but this time as a no-alcohol version, this was the original plan. This was in part inspired by another girlie-get together a couple of months previously, around the fire pit, where my friend Tracy had brought round some Captain Morgan no-alcohol rum which proved a big hit. I still had some left so I decided to use that as the basis for this no/low alcohol version.

I’m very much not a throw things in a pot kinda girl. I like a recipe and instructions. Sure I sometimes – often – then vary a recipe but I always like a framework to work to. So I was super pleased with how this worked out. I realised, as I started to make it, that I didn’t have the 750ml of liquid the original recipe called for. So I started to panic a bit, looked in the fridge, found some ginger beer, realised that still wasn’t enough to get it to 750ml, panicked some more and added some red wine (hence the low-alcohol title of this post). However you could easily just make this with all no-alcohol rum, or half that and half ginger beer, or what I did. What I did is reproduced below but bear in mind you can, as I did, vary what you use. Add a bit of booze if you like or not.

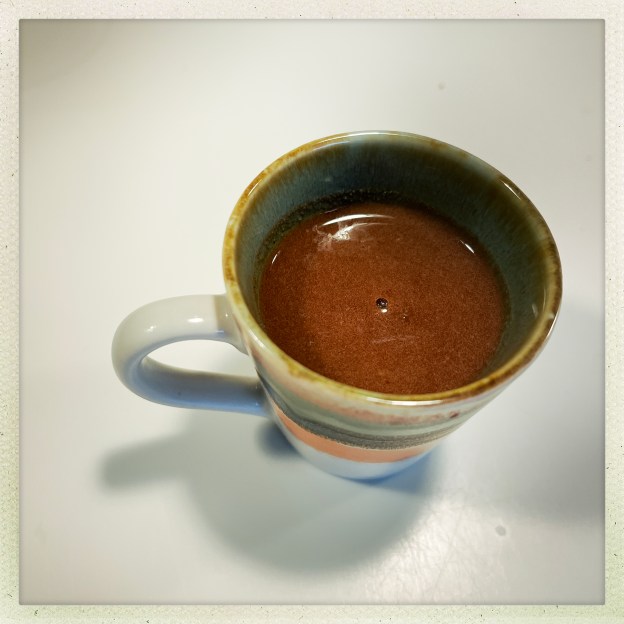
Chocolate in mulled wine? Don’t knock it til you try it. Don’t be tempted to use anything other than 100% cocoa here. I used Firetree which is the best 100% but you could also use any 100%, most of it is awful on its own but here it could shine. The Fiori di Sicilia essences were, if I say so myself, inspired in this as it adds a wonderfully citrusy note to everything.

Bottled up wouldn’t this make a fabulous present for someone? Shake it up and heat it up before serving. My husband said it was one of the most delicious things he’d ever tasted.

Feeling REALLY pleased with myself over this.

Ingredients:

750ml some sort of liquid, see above. I used 500ml of no-alcohol rum, 150ml of red wine and 100ml of ginger beer. I used this Captain Morgan rum and this gingerbeer.
1 cinnamon stick
1 teaspoon of chilli flakes
1tsp ground mixed spice
5 whole cloves
100g dark muscovado sugar
(you can also use just normal caster/granulated)
80g 100% cocoa chocolate of your choice (I used Firetree), broken into pieces.
A good few drops of Fiori di Sicilia. Of course you can make this without this ingredient but I use it a lot in my cooking and I really think it’s worth buying, you can use it in so many things and it lasts for ages.

Put everything together in a sauce pan and heat through gently until the chocolate has melted. Then either serve immediately or cool, put in the fridge and heat up as required. This will happily see you through Christmas!

Chocolate, ginger and nut pavé

This is another old timer, heavy lifter of a recipe that I’ve had for ages and never committed to ether. Why? I’m not sure. But it’s such a useful thing to have/make/give at this time of year. I’ve never given it to anyone that hasn’t been anything less than delighted, asked for the recipe and asked me to make it again for them. As long as, of course, that they like all the ingredients.

There’s a possibility that you have all the ingredients at this (Christmas) time of year so you could rustle it up if you need an extra nice thing.

What you need

200g dark chocolate, broken into pieces. I recommend 70%
50g unsalted butter
60g double cream
50g of either crystallised ginger or stem ginger drained of its syrup
100g of nuts of choice: pistachio work well here cos of the colour, as do pine nuts* (pine nuts is what the original recipe called for) or almonds/hazelnuts. If you use the latter I would toast them gently first and let them cool before adding.
*if you use pine nuts use 50g, and 50g of other nuts because what are you, loaded?
25g icing sugar
Cocoa for dusting


What you need to do


You’ll need a tin of approximately 26cm x 8cm. I use the base of a 2lb loaf tin as I like my pave to be a rectangle but you use whatever shape you like just bear in mind the above dimensions. Line it with v. lightly greased baking parchment.

Atop a simmering pan of water put the chocolate, butter and cream making sure that the bowl doesn’t touch the water (or it might seize). Take off heat let cool for a minute or so and then stir in all the other ingredients.

Easy isn’t it?

Then put it in the fridge to set. When ready to eat/serve/give you just turn it out, trim the edges to make it really neat if you want (you can also nibble here to test!) and dust with cocoa powder.

I give mine wrapped in string and parchment.

Wish I had a picture but don’t currently you’ll have to trust me this is lovely.


Chocolate Chestnut Rum Roulade

I’ve made this every Christmas for over twenty years. Last year, I went to look up the recipe on line (it was a Waitrose recipe from Iceland) and it had gone. It was a ‘404’. I panicked. Despite an extensive internet search nothing came up for it.

More panic. This is my pièce de resistance every Christmas, and my children love it so much they have, on occasion, requested it for birthdays.

But luckily – amazingly – I had made a note of it in my Travelling Cookbook which I started up years and years ago to commit my favourite recipes to paper. But if that goes…so finally I’m going to commit it to technology for me, and all, to enjoy.

I won’t say this is difficult. It’s not. But it’s not always perfect and it is a roulade and involves rolling, like a Swiss roll. It’s not super easy but just go with it and don’t worry. It’s delicious and look, no flour.

Ingredients

For the roulade

170g 70% chocolate, broken into pieces
170g caster sugar
Five eggs separated
1 teaspoon of vanilla extract
Three tablespoons of hot water (see note later)
Icing sugar for dusting

For the filling

Three tablespoons of icing sugar
115g unsweetened chestnut purée
Four tablespoons of sour cream
100g cooked, peeled chestnuts chopped
Two tablespoons of rum (or liqueur of choice but then it’s not rum roulade!)
285ml of double cream

Method

Now, those are the ingredients above. I admit what I now do is buy some vacuum packed chestnuts, whizz some up and use the rest chopped. Because otherwise I tended to get left with lots of left over chestnut purée. But you do what works.

Preheat oven to 180C. Lightly oil a shallow baking tray of approx 34cm by 24cm and then line with baking paper and very lightly, again, oil. TBH you’re probably fine with just the baking parchment/paper but this recipe is from like 25 years ago so just reproducing what they said at the time..

Now melt the chocolate in a bowl, on top of some simmering water and as ever, do not let the bowl touch the surface of the water.

In a separate, large bowl, beat the caster sugar with the egg yolks until thick and pale and creamy. Add the vanilla extract to that.

Once the chocolate has melted and cooled a little, stir in the hot water until smooth then gradually add into the egg/caster sugar mix. Now again, I’m not sure what the hot water does. I’m quite skilled and fearless with adding hot water to chocolate but chocolate can and will seize if the water you’re adding is too hot or cold, so you might want to leave it out. Gently stir the chocolate until smooth and then gradually stir this into the egg and sugar mix.

Now again separately, whisk the egg whites until they hold soft peaks. Quickly and gently fold them into the chocolate mixture and pour the whole lot onto the lined tray, spread evening and put in the oven for fifteen minutes.

Remove and immediately cover with a sheet of baking parchment and a clean tea towel and leave until cold. Don’t leave it too long though or it will crack when rolling it.

Whilst that’s happening, mix the icing sugar into the chestnut purée, followed by the sour cream and chopped chestnuts. Pour the rum/liqueur and double cream and whisk until peaks, then partially fold the rum/cream into the chestnut cream so you have a marbled mixture. You could technically do this in advance and keep it in the fridge but it’s a perfectly good thing to do whilst the roulade is cooling.

Now the originally recipe asks for you to spread out a large sheet of baking parchment on a clean work surface, liberally dust with icing sugar and then gently turn out the roulade onto it, peeling off the baking parchment.

I don’t do this. To me this is adding too much faff and precariousness. So what I do is I take the sponge off the baking sheet – already on baking parchment – and I use that as the base. If you want, trim the roulade of any rough edges but I don’t – it’s all good. Spread the marbled cream on the roulade and then carefully roll up the roulade from the long end. It may crack – do not panic. What I do is I then sort of mould it/hold it together with cling film (just on top using your hands to do this you don’t take the roulade off the plate to do it it just helps keep it together if that’s what it needs) and put it in the fridge until it’s time to serve it. Then I peel off the cling film and then I sprinkle with icing sugar and decorate it. I’ve made this so many times and sometimes it cracks, sometimes it doesn’t and there seems to be little rhyme or reason. It’s always delicious and it reminds us that, even cracked, things are still beautiful.


Nigella’s chocolate olive oil cake

This is simple and beautiful. It can be flourless but somehow seems so much better than so many of the flourless chocolate cakes that turn up at gatherings. It’s so easy to throw together. The original recipe is here, but I’ve cut down the sugar and may cut it down further but be careful as sugar plays a role in cake making beyond mere sweetening.

Use a mild olive oil, I have at times used a too fruity one and whilst adding a depth of flavour, it’s distracting.

Once you’ve made this once you’ll realise it’s so easy you can make it in a commercial break, no chocolate to melt or chop. Largely store cupboard ingredients. My children love it.

You need

150ml mild olive oil

50g cocoa powder

125ml boiling water

Two teaspoons of vanilla extract

150g ground almonds (you could also substitute half almond half hazelnut, you can also use flour but unless you are allergic to nuts I implore you not to do this)

Half a teaspoon of bicarbonate of soda

A pinch of salt

175g caster sugar

3 eggs

What you do

Oven to 170C

A 23cm spring form tin, base lined with baking parchment.

Pour the boiling water slowly into the cocoa and stir until no lumps remain, add the vanilla extract.

In a separate bowl, mix together the almonds, bicarb and salt. And then you’re going to beat/whisk together the eggs, olive oil and caster sugar, either by hand (go you) with a whisk/wooden spoon or with an electric contraption (hand held or free standing).

Nigella says to use the paddle attachment, I always use the whisk because I can never find the paddle attachment. Beat electronically for three minutes until it’s syrupy and fluffy and pale yellowy. By hand: until your hand falls off.

To the eggs/oil/sugar mixture slowly add the cocoa mixture (turn down the speed if you are doing this with a gadget). When all incorporated add the ground almonds/bicarb/salt. Scrap down, make sure all mixed then pour into the tin.

Bake for 25-45 mins. Nigella says 40-45, mine is done in 25. You want it to be a bit quivering on top in the middle (Nigella describes it as looking a bit damp) but defo set at the edges. A skewer should come out pretty clean.

Ratatouille and halloumi tray bake

This recipe came from an excellent and surprising source. My friend Lynda recommended it and it’s The Fast 800 Recipe book. But don’t let it put you off, honestly it’s become one of my most used and loved books for its simple, healthy, quick recipes which you can augment or add to if you’re not fasting. Which I so rarely can…This serves four which you can eat with lovely crusty bread if you’re not carb-avoidant. And who is these days? It’s surprisingly delicious. TBH I’m not a huge fan of ratatouille, or beans and yet this is…yum.

Ingredients

2  peppers – not green sorry, de-seeded and cut into chunks

1 medium aubergine or two courgettes

1 onion cut into chunks

3 tablespoons of olive oil

2 garlic cloves, peeled and crushed

Basil leaves, a small handful sliced into shreds (don’t cry if you don’t have)

1 x 400g can of chopped tomatoes

1 teaspoon of oregano (or use a tin of tomatoes with herbs)

225g block halloumi cheese – slice into eight

A tin of 400g of drained and rinsed cannellini beans

Method

Oven to 220C. Place the peppers and aubergine/courgette and onions onto a tray, drizzle on the olive oil, season with salt and pepper (but not too much salt as the halloumi is quite salty). Mix everything around and roast for 30-35 minutes, turning half way through if you can be bothered.

After this time, take out, stir in the garlic and basil, tomatoes + oregano and beans. Arrange the slices of halloumi on top and back in the oven for about 15 mins. I tend to give it a ‘top oven’ blast for a few minutes at the end. The halloumi should be lightly browned.

Scatter over more fresh basil if you remember and serve with a crisp green salad.

Nigella’s rather good banana and chocolate bread (which can be gluten free).

I always associate banana bread with Nigella. I think it’s because, it was in one of the first recipes of hers that I read, I’m sure, that she said baking a banana bread filled the house with a fug of domesticity.

Or some such. Since then I’ve made dozens of banana breads and it usually
disappoints, probably because I keep changing recipes. Faced, however, with a huge batch of frozen, overripe bananas in the freezer (I always freeze overripe bananas) and more chocolate than any sane person needs (this is what happens when you get made Chocolate Correspondent of a national newspaper) I decided to have another go at making banana bread.

Also, for complicated reasons that I don’t fully understand myself, I hadn’t cooked or baked anything in weeks when I first made this last year. Which is really not like me, but this glorious little cake gave me my baking mojo back.

For a writer, I am remarkably picture led where recipes are concerned and thus it was that I found this recipe for Nigella’s Gluten-Free Banana Bread and it was, I confess the picture of the large slabs of chocolate which lured me in.  I planned to make it gluten free (why not) but in the end found no rice flour in my flour cupboard so made it with normal plain flour. I also lowered the sugar and used pecans instead. I think this would also be great made in muffin size. I’ve put the recipe below as I made it – do refer to the original if you wish and if you want to make it gluten-free which this ain’t.

175g plain flour (I use spelt these days, a mixture of white and wholegrain)

100g ground almonds

two teaspoons of baking power

half a teaspoon of bicarbonate of soda

a quarter teaspoon of sea salt

500g of very ripe bananas (weighed with skin on)

two teaspoons of vanilla extract

100g Greek yoghurt – full fat

Two eggs

125g light olive oil

100g light brown sugar

100g roughly chopped pecans (or any other nut you like)

150g chopped chocolate – I used a mixture of milk and plain in chocolate chip size and quite large chunks

You need a 2lb loaf tin for this (Nigella gives the sizes as 24cm x 12cm and mine was roughly that, why don’t cake tin manufacturers put the volume/measurements on the bottom of their tins?). Line this tin. Preheat the oven to 170C.

Mix together the dry ingredients, thus the flour, ground almonds, baking powder, bicarbonate of soda and salt.

In a larger bowl (for this will be the one everything else ends up in) place the bananas and mash them up, then mix in the vanilla extract, Greek yoghurt and the eggs one at a time. Then the oil and sugar. When all is better unified than a post-Brexit UK, add the dry ingredients bit by bit until combined. Then finally gently fold in the nuts and chocolate.

Dollop all this in the cake tin and bake for about forty minutes. Nigella says 45-55, my oven seems quite fierce so I started checking it after 35 mins. Also it does depend on how much moisture your bananas hold.

You know it’s done when the top is dry, it springs back, it’s shrunk away a little from the sides and a skewer comes out relatively clean (obviously not if you hit a shard of chocolate).

This is a beautiful cake. Unfortunately I can’t find a picture I took of it so this post will be picture-less until I make it again.

2024 I finally remembered to take a pic and post it on here..

Vegetable lasagna: chargrilled courgettes with a multitude of greens.

I’m actually on deadline for two pieces as I start on this. But what the hell. I see it as a warm up.

Every day I look for healthy things to make my family. And if the quest for healthy things is satisfied, my children will invariably not be impressed. The reaction to this was “but where is the pasta” followed by “it isn’t actually half bad”. My youngest – the harshest critic and who would, like her nonno, live off bread and Parma ham if she were able to – ate some. I can’t say she was a fan.

But I thought this was delicious and satisfies that urge for something healthy but tasty. And it has almost a kilo of green leafy stuff in it.

It’s adapted slightly from a Donna Hay recipe. I just love Donna.

Ingredients

About six courgettes, sliced lengthways. Not too thick, not too thin. You’re going to chargrill them.

Lots of extra virgin olive oil but not that super expensive stuff

An onion, chopped up so tears stream down your face

2 x clove of garlic, chopped small (I can’t bear to crush them)

A small bunch of oregano chopped up

Salt and pepper

About 300-400g kale, trimmed of the big thick stems in the middle – rinsed

About 300g spinach – rinsed

500g or thereabouts of ricotta

15g fresh parsley finely chopped (either sort)

Rind of an unwaxed lemon

About 100g of grated mozzarella

About 100g of grated parmesan – like with the mozzarella I do it by eye and depending on size of container.

(quantities of cheese don’t have to be super exact but don’t veer off too much. Don’t sweat it if you only have 80g of each, say).

HipstamaticPhoto-578332785.064248

Before the oven


What you do

I do love a recipe you can make in stages and this is one such. First you oil each side of the courgette slices and chargrill them.

[I use a griddle pan which I bought years ago. It’s a Le Creuset one and it’s big and rectangular shaped and you lay it across two rings. I use it for so many things: not just veg but also making toasted sarnies. I also have a griddle ‘press’ that I used to press things down on. I just looked and my Le Creuset griddle costs £160 now! But I bought it nearly 20 years ago and it’s still going strong so it is worth it on a per use basis. The press I have is something like this.]

So griddle the slices until they are marked and a bit cooked through. Put to one side. If you plan to make this later you can just put it in a lidded Pyrex and put in the fridge, otherwise just keep on a plate until you are ready to assemble.

Then you chop the one onion with the two cloves of garlic and gently saute with the handful of oregano and a little olive oil. I add the seasoning at this point:  a good pinch of sea salt and some black pepper which I always angrily grind over food, as if in a fury. When the onion is translucent set the mixture to one side. Or put it in the fridge until needed.

Now you blanch the spinach and kale and you will think “how can we eat all this green veg?” but you can because it will reduce down. What I do is blanch it, drain as best I can, then I whizz the lot up (in batches unless your food processor is ginormous) in a food processor, and then I sit it over a fine sieve atop a bowl and press down with a potato masher. Because I make this in stages, and not in a great rush, I sit it over a fine sieve over a bowl for an an hour or so. You don’t have to whizz it up, it’s perfectly fine as it is, but you will need to carefully drain it in some way. You could sandwich it between two tea towels you don’t much care about. You then mix the drained veg with the onion and garlic and herbs. What I do is add it to the pan this is in, and for a few minutes just gently steam any remaining water out of the veg.

At some point you introduce to each other, via a fork: the ricotta and the lemon rind and the parsley.

So you now have essentially three things: courgettes, ricotta mix and veg/onion mix which you can assemble now or store for later.

It’s hard to say what size dish to use. Within reason you can use a normal family-supper sized dish. But I favour a square one that is about 25/26cm. Lightly oil the bottom, then when you are ready to cook you preheat oven to 220C.

Start with a third of the courgettes. On top of this put a half the ricotta, then half the greens, then sprinkle on a third of the cheeses.  Repeat and end with a layer of  courgettes and the last of the cheese. Mine was crammed to the top so I put it on a baking sheet in case it erupted (it didn’t). Cook for about 12-15 mins until golden and bubbling and crisp on the top. I didn’t taste it during making it and honestly expected something pretty healthy but bland. Well, no. It was really delicious. I served it with a crisp green salad made with a sharp dressing. Half of it fed four of us, but I suspect for people with larger appetites it won’t go so far.

HipstamaticPhoto-578336868.528218

A cross section

Spiced carrot and lentil soup

This is one of those soups that is so much more than a sum of its parts.  (A bit like this chorizo and red lentil soup one is, too.) It’s also perfect for this time of year when you’ve been in elasticated waistbands for the last two weeks and dread structured clothing. And yet you can’t stop eating, as if hiding evidence.

It’s so easy to make. I chuck it all into the slow cooker at about 2pm, not that it needs slow cooking, but it just makes it even easier. Put it on low and then we eat it at about six  o’clock after a quick whizz up with the stick blender. No need to grate the carrot, I just chop mine into pieces.

The recipe is here on the BBC Good Food site.

Peanut butter and date protein bars (with a bit of chocolate on top)

These came about after a desire to find something in the supermarket that was, basically, just dates and a nut butter. Because that is something I crave post-workout. I also wanted something which was as delicious as the protein bars that my ex-trainer used to get me which used to be so tasty I daren’t look at the ingredients, but they were also so filling that, with a glass of water (you should always drink a glass of water with protein bars) they’d often see me onto the next meal.

Then one day, I saw that Donna Hay published a recipe for something called peanut butter choco-coconut protein bars and I adapted them. I now make these regularly and eat them post work out, or if I haven’t got time for a meal (which is rare but does sometimes happen) or if I just fancy a little treat during the week when I try to really watch what I eat (one has to be realistic and these hit the I need a treat button without making me feel like I’ve fallen into the abyss of unhealthy eating). They also don’t make me crash, blood sugar wise and I would now, honestly, have these over pretty much any chocolate bar.

You can experiment with the amount of protein powder you put in – I did and I put more in than Hay originally suggested. But if you do that, I recommend you do so in 10g increments.

This is what you need:

260g fresh Medjool dates. You can use others but these really do make the best bars. If you use dried dates, rehydrate them in boiling water for half an hour before use, then drain them.

25g raw cacao powder

100g salted peanuts and 40g of unsalted, raw, cashews (or use half and half, depends on how big you want the salted peanut hit to be). You can of course use 140g of any nut you want, roasted or raw. A few extra nuts if you want to chop and sprinkle on top

Two tablespoons of peanut butter (or any nut butter)

50g desiccated coconut

35g unflavoured protein powder (I use an organic whey protein powder)

1 teaspoon of vanilla extract

45g cacao nibs

150g dark chocolate, melted

What you need

You can make this in a round cake tin – about 8/9″ would be ideal. I make it in my square cake tin which is 20cm. You might prefer the bars thicker but I like them like this. 20cm square is about as big as you want to go, any bigger and you’ll struggle to have enough chocolate to coat all the top – it just covers it as it is, but is still plenty, if you see what I mean.

Whatever tin you use, line with baking parchment.

Place everything except the cacao nibs and the dark chocolate (which you need to melt, for the topping) in a food processor and blitz til it’s all amalgamated – about one or two minutes. Right at the end, add the cacao nibs and blitz a couple more times.

Press this mixture into your prepared cake tin. Put it in the fridge for at least 30 mins.

Then you melt the chocolate either in the microwave or in a bain marie arrangement, and spread over the top. Add some chopped peanuts (or whatever nuts you are using) on the top if you like. Sometimes I do, sometimes I don’t. As I said, in my 20cm square tin it’s just enough to cover. You don’t really want to up the chocolate, as then it becomes all about the chocolate and turns this from an interesting, not totally nutritionally devoid treat into something else…

Refrigerate until you need them, which will be soon. Cut into whatever shape you like. I do long thin bars, little squares or if I want to pack it in my bag for a meal replacement (which I would only do in emergencies) or a good snack later, I cut it into a bar shape and take it in my bag wrapped in foil and then eat it feeling really smug and happy.

They keep for at least a week in my house and have never been around longer than that.


Cacao, banana and walnut bars: good for breakfast or post work out.

To my mind, no-one does ‘healthy but delicious snacks’ better than Donna Hay. I’m really not interested in mixing together linseeds and dates and other such stuff if the result is something you might have found in a health food shop circa 1974.

What I love about Hay and her recipes, is that there are no really contrived ingredients, no-one is pretending they are a substitute for broccoli, but if you want something a bit better than a sugar-laden cereal bar, she comes up with the goods.

I adapted these because I just didn’t agree with the number of dates she originally put in (200g) and although I think I have a sweet tooth, it’s evidently not that sweet.

Anyway. I cut these into squares. They freeze brilliantly. They are tasty and nutritious and the sugar hit from the dates and bananas is balanced by the cashews.  I eat them when I want something a bit chocolatey and quick and they have also served as an emergency lunch – with a green smoothie – when I’ve had no time and had to go straight to an interview. I know this makes me sound really virtuous and you know what? I am during the week. At the weekend I can eat whatever I damn well please.

You need

225g cashews, raw (although might try them anon roasted)

120g dessicated coconut

300g ripe bananas (about three)

150g fresh dates, pitted

2 teaspoons of vanilla extract

35g raw cacao powder

half a teaspoon of bicarbonate of soda

2 tablespoons of cacao nibs

50g chopped walnuts

Method

Oven to 180C. Line a square 20cm tin with baking parchment.

Place everything, save for the walnuts and the cacao nibs, into a food processor and blitz the buggery out of it – Hay recommends 5 minutes I can’t remember how long I did it for. At the end, add half the cacao nibs and pulse a few times.

Shove the mixture into the tin, pressing down with your hands or the back of a spoon and sprinkle on top the remaining cacao nibs and chopped walnuts.

Cook for 25 minutes or thereabouts. Cool, the refrigerate and cut into required shape. Keeps for about a week in the fridge but as I said, I keep half, freeze half and they froze beautifully.