Lovely, nutty tasting (but with no nuts) poppy seed oatcakes

These are wonderfully nutty tasting, and you’ll be convinced there are nuts therein. But there are no nuts. They are very frangible, so don’t roll them too thin, and when cooked don’t be too rough with them. Lovely with some cheese, of course, but I also sometimes have them for breakfast with some almond butter and a smidge of apricot jam on top.

Being full of oats ‘n’ seeds, they are particularly good for you, too.

(Note: I’ve put these under gluten free, oats are naturally gluten free but some have gluten in due to the manufacturing process so look at the packet your oats come in.)

These are from Hugh F-W’s Light and Easy book.

150g medium oatmeal

150g porridge oats (not the jumbo variety, if you have those, give them a quick spin in a food processor)

One tablespoon of ground linseeds

One tablespoon of poppy seeds

One tablespoon of sunflower or pumpkin seeds, or half of each

half a teaspoon of salt

75ml of sunflower or other tasteless oil

You will also need 100-150ml of boiled water

Baking parchment


Oven to 180C.

Put all the ingredients, save for the oil and water, into a bowl. Make a well in the middle and now add the oil and mix the ingredients around. Add 100ml of just boiled water and mix to a sticky wet dough, if you need to, add up to 50ml more but try not to if possible. This will seem like an unpromising dough and won’t be like a smooth dough, such as you may be used to.

Now you need two sheets of baking parchment to roll the dough out. Not too thin. Cut into squares – just free form with a knife, you don’t need to be madly exact. Hugh recommends cutting the square in two so you get triangles and I like this shape, too.

Don’t be tempted to use a cookie cutter. But do ball up and re-roll any off cuts. I shaped the last one by hand, in a butter-patting style.

Put on baking parchment lined baking tray and cook for 20-25 mins until just coloured. These give out a lot of steam (cos of the water) so be careful when you open the oven. You don’t want them too cook too much and be too dark, but equally they do need to be cooked so if your oven is temperamental, check after 15 minutes. The surface should be dry – no bubbling bits of steam – but not too coloured. Mine took about 22 minutes in a quite fierce oven. You may need to cook in two batches, I did.

This makes about 20-24, depending, on course, on the size.


Making your own almond milk

Although we all eat everything in this house, we do also try to mix things up a bit. In smoothies, especially green ones, I stay away from dairy, but often want something a bit more luxurious than water.

Enter almond milk. You can buy almond milk, of course, and we do, but it tends to be full of stuff I don’t recognise and it contains just 2% almonds. So we make our own when possible and it’s really easy, nutritious and super tasty but not, I should add, cheaper than buying ready made. I like to use this in iced coffee (even though the base is dairy) to add a lovely nutty dimension to the finished drink.

Anyway, this is what you do:

Get 250g almonds, skin on and put them in a container that will fit in the fridge, cover with water and leave overnight. When you are ready to make the almond milk, drain the almonds, give them a rinse then put them in a powerful blender with 700-800ml of clean fresh water and blend up until all mushed up – it takes about 30 seconds.

Take out this sludge and place it on a muslin, in a sieve, over a bowl. Let it drain and then gather up the muslin and give the nuts a squeeze to get the most out. What comes out is almond milk (and you can use this method to make hazelnut, cashew etc milk too) – store it in a big jar/bottle in the fridge and it will keep for a few days (probably up to a week but I’ve never kept it that long). Stir it up before you use it and if you like, you can add a bit of vanilla extract to it for an extra bit of flavour.

The nut residue you have left in the muslin can be used in bread, biscuits, soup, smoothies, porridge or ice cream. If you don’t use it straight away put it in the fridge for a day or two or even freeze it to use later. Whatever you do don’t throw it away!

Tiramisu cheesecake

Tiramisu, for those that don’t yet know, mean’s ‘pull me up’. The English equivalent is ‘pick me up’.

Although I don’t know anyone in Italy who uses tiramisu as anything other than a delicious, indulgent dessert. Zabaglione was used, maybe still is, if you felt a bit under the weather and needed a pick me up. Presumably the warnings about not using raw egg (traditionally an ingredient in zabaglione) hadn’t reached the members of my family who used this as a salve for sick children who were too poorly to go to school.

My dad (from Parma, NE Italy) would sometimes feign illness – something he never does as an adult – as a child in order to stay off school and have zabaglione made for him by his mamma.

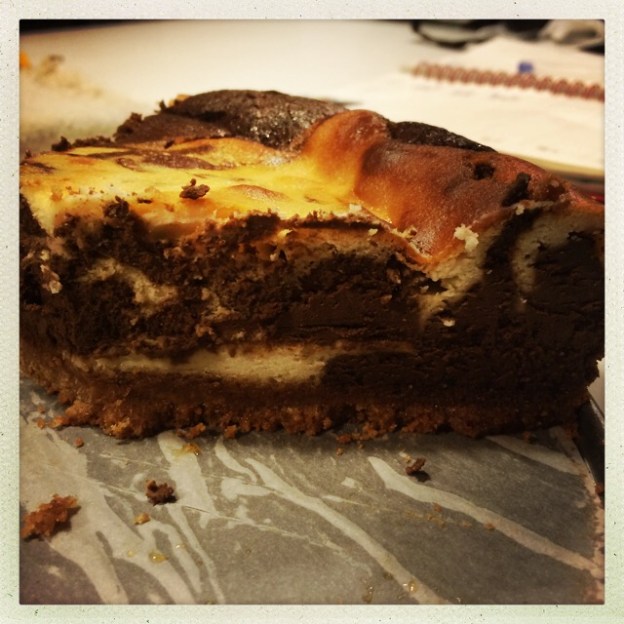
Anyway, this is a tiramisu cheesecake. If you don’t like coffee or cheesecake then there is nothing for you in this cheesecake. I think the base is absolutely inspired, but, again, if you don’t like amaretti biscuits (and in truth I don’t, on their own, but somehow they work here) you may not like the slightly bitter hit. But this is a really excellent cheesecake, classy, different, complex. Just don’t be left alone with it. Oh and, once chilled, it’s really the most excellent if you take it out of the fridge for half an hour before eating.

If you plan to make this for an ‘occasion’ – say a special lunch or a dinner – then I really recommend you make it the night before and leave it sitting chilling in the fridge until you serve it. One less job to do, plus with the chilling of the base and the chilling of the cake etc, it does take quite a long time from start to finish. So don’t get caught out.

This was originally from Delicious magazine.

For the base:

275g amaretti biscuits, crushed

75g unsalted butter, melted

For the cheesecake:

700g mascarpone at room temperature. I use a mixture of 500g mascarpone, cream cheese, ricotta, depending on what I have in the fridge. But I wouldn’t go lower than 500g mascarpone

150g caster sugar

3 large eggs, separated

45ml dark rum

30g plain flour

half a teaspoon of vanilla extract

175g plain chocolate, chopped (of course I didn’t chop mine and just broke up the pieces, because I am lazy like that)

1 tablespoon of finely ground espresso coffee powder – I just use something I have in a dusty jar from the supermarket, even though I have a full on, fuck-off coffee machine which freshly grinds my coffee for me. Next time it will maybe be even more awesome if I used freshly ground espresso powder

3 tablepoons of coffee liqueur. I use Kahlua which is lovely, incidentally, in an after dinner espresso, to make it espresso corretto.

Icing sugar for dusting. I was so greedy and impatient, I forgot this bit

Put the biscuit crumbs in a food processor and pulverise. In a bowl, introduce melted butter to the biscuit crumbs and let them do their thing. Press the crumbs into a 23cm spring form tin (I parchment line the base) and as far up the sides as you can get them (I didn’t do them up the sides and it was fine). Chill for 30 mins or even overnight.

When you are ready to make the cheesecake, preheat the oven to 200C; melt the chocolate in a bowl, atop some simmering water and then leave to cool. Put the mascarpone/cheeses into a bowl and beat until nice and smooth, then beat in the sugar, then the egg yolks.

Now divide this mixture into two bowls.

Into one of these bowls stir in the 30g plain flour, the 45ml of dark rum and the half a teaspoon of vanilla extract. Set aside for a moment.

Remember the melted chocolate? Into it, stir the espresso powder and coffee liqueur. Now stir the chocolatey/coffee/coffee liqueur into the second bowl of cheese mixture.

Put the egg whites into a bowl and whisk until soft peak stage, and now fold half the egg whites into each of the bowls – so half into the flour/rum/vanilla cheesey mix and half into the chocolate/coffee/liqueur mix.

Now dollop alternate spoonfuls of the mixture into the cake tin, give a swirl to gently mix and bake for 45mins to 1 hour. I lowered the temperature of my oven for the last 15 minutes or so only because my oven is fierce. Just keep an eye on it after 45 mins. It should be golden brown but still soft in the centre. Not liquid soft but softly soft, like a bit jelly on a plate.

Turn off the oven and leave the door ajar and leave the cheesecake until completely cold. When cold, chill in the fridge for several hours then it’s ready to be taken out and eaten, either fridge-cold or leave it to warm up a bit at room temperature.

Dust with icing sugar and revel in the calorie count. It’s high.


My breakfast smoothie

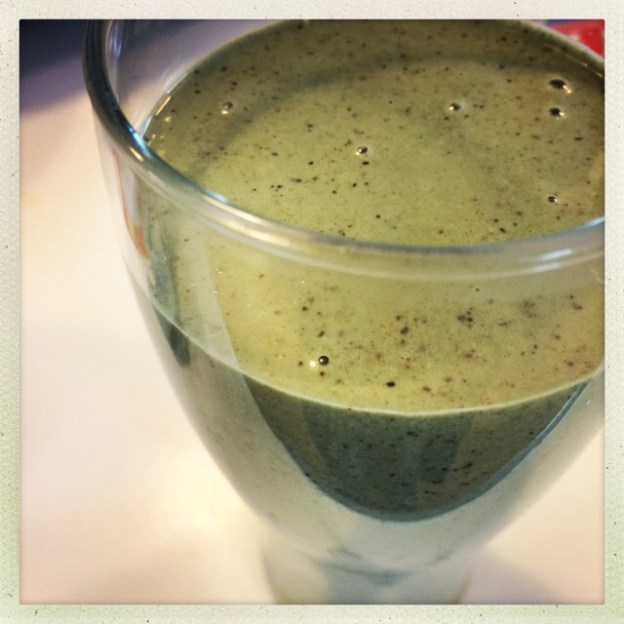
Seriously, like we need another picture of a green smoothie. But, nevertheless, here is mine.

But I wanted to share this because I think it’s so nice, it’s healthy but it’s not so scary that it alienates perfectly ordinary people, like me and you. I absolutely love it and will either have it first thing (after my mad Italian woman habit of lemon and psyllium husks in hot water), or after I’ve had a ‘proper’ breakfast and at about 11am. Depending on what time I have it I will vary the ingredients. I don’t add spinach if it’s too early because WTF am I turning into? But. My big discovery is frozen spinach. The one you get chopped up in ‘pods’. This way you don’t have bags of fresh spinach going off in the salad drawer (yuk) mocking you; it’s always fresh, and adds a nice cold element to the smoothie.

There are three key ingredients, to my mind, to make this smoothie really nice and friendly. And those are the almond butter, the cinnamon (who would have thought I’d become obsessed with cinnamon?) and the dates which must be those lovely expensive medjool dates. I buy mine from the market and £3 worth last me, easily, all week. I would probably also add banana as a must have. Remember that if you don’t fancy a whole banana, you can freeze it, chopped up in pieces, in a box in the freezer to add to subsequent smoothies.

So this is my basic smoothie:

One and a half medjool dates, two if you like

One banana, nice and ripe if possible

One teaspoon of cinnamon – don’t skimp on this

A big old tablespoon of almond butter

Handful of blueberries

200ml or so of almond milk or milk of your choice. I fill it up to the ‘max’ on my Nutribullet container. If you like a thicker smoothie add less, if you like it runnier add more etc.

You can blend it up now for a minute or so until smooth. But, if you want to ramp up the nutrient content you can add any, or all, of the following.

quarter of a teaspoon of spirulina

half a tablespoon of linseeds

big pinch of hemp seeds

1-2  tablespoons of oat flakes

some kefir if you culture it – I add two tablespoons

a pod of frozen spinach

The spirulina makes everything go really green. Don’t be scared. And you don’t have to add it if you don’t want to.

Just remember to blend until really smooth. I do it for about 30-45 seconds in my Nutribullet.

This fills you up for, ooh, maybe 30 minutes. Seriously it doesn’t fill me up for long in that ‘full up’ way. But I do feel REALLY good after drinking it. Until I pollute my body with a cappuccino. Sssh.


Sticky cinnamon buns

Buns is a word you simply can’t say enough. If it’s not already, it should be a control word, used by psychologist in experiments, to put people in a good mood. It is a fabulously English word and, even though I try, there isn’t really any alternative in Italian. We have the rather more catch-all phrase meaning, simply, ‘pastries’.

Although we don’t really celebrate Mother’s Day (I really don’t need a day to tell me to appreciate my mum), if you were so minded, these would probably go down a treat if you made them today (as I write, tomorrow is Mothering Sunday), put them in the fridge to prove overnight, then cooked them in the morning.

They take almost no kneading. I got the initial inspiration from Edd Kimber who won the Great British Bake Off five years ago, but I’ve cut the sugar down (with no ill effect) and changed the kneading process so there isn’t really any, Dan Lepard style. I also don’t use currants or any dried fruit because my children don’t like them. I’d never thought of using cream cheese in an icing before but it’s wonderful and entirely Kimber’s idea, not mine. I am not a fan of sugar/water icing and the addition of a protein-rich food really takes the teeth-janglyness out of the icing. It doesn’t make them any less delicious, only more so.

These are life-affirmingly good about half an hour out of the oven, I’ve just eaten one and am in a seriously good mood. I’ve done a lot of gluten/dairy free baking recently and was just about to put up a recipe for a green smoothie, so thank goodness for these. My inner Nigellas and Gwyneths are still fighting but, for today, Nigella wins.

This made 20 for me.

For the buns, you will need:

250ml whole milk (I don’t suppose the world would fall in if you used semi skimmed)

50g unsalted butter

500g strong white bread flour

30g caster sugar

1 teaspoon of salt

7g fast action yeast

1 large egg, beaten – the egg should be at room temperature

vegetable oil for greasing

For the filling, you will need

100g light brown sugar, smash any lumps out

3 tablespoons of cinnamon – yes tablespoons. It seems a lot, but these are cinnamon buns

60g butter, melted

For the topping, you will need

50g soft cream cheese

50g icing sugar

This is what you do

Warm the milk and the butter up in a small pan until the butter has melted then let it cool until it is just luke warm. (If you haven’t taken your egg out of the fridge yet, do it now and set it aside to warm to room temperature.)

The milk/butter is ready when you put a clean finger into it and you can’t really feel hotness or coldness. If it’s too hot or cold it won’t activate the yeast efficiently. If you want to speed up the cooling process, take it out of the pan and put it into a wider-lipped vessel like a bowl.

In the meantime, in a large bowl, mix together the: flour, sugar, salt and yeast.

When the milk and butter mixture is lukewarm, make a well in the middle of the dry ingredients (the flour etc) and pour the milky buttery liquid in, followed by the beaten egg. Mix this all up as best you can using a fork. You’ll have a lumpy dough that will look most unpromising.

Leave it for ten minutes.

Turn out onto an oiled surface and knead gently for a few seconds, cover with a bowl and leave for another ten minutes. Knead again for a few seconds. You should now have a smooth, soft-ish dough (it won’t be super soft and may seem a tad dry). If not, if there’s still obvious ‘bits’ to it, give it another 5-10 minutes rest and another quick ten second knead.

Now, put  it into an oiled bowl and cover with cling film and leave it until it’s doubled. This may take much longer than you think. In my kitchen (which is kept at a Spartan 18C and a humidity level of under 50) this took nearly three hours. In a hotter kitchen it can take as little as an hour. I know this bit is scary – knowing when the dough is ready always used to scare me – but what I do is I put it in a large bowl, so that the dough fills up about half the bowl. This is because, as the dough rises, you can never remember what height it was, can you? So it’s difficult to judge when it’s doubled. But if you choose a bowl where the dough comes up about half way to begin with, and then cover with cling film, you know it’s done when the dough starts to push up the cling film.

At this point tip onto a lightly oiled surface and roll out the mixture until it’s about 40cm x 50cm. It should roll out really quite easily. You may need to oil the rolling pin – I did. You will get rounded edges, no right angles. That’s okay.

Now the mixture: mix together the sugar and cinnamon and set aside for a momentino. Now, with a pastry brush, brush the melted butter all over the slab of dough, right to the edges. This is quite meditative. Think of all the people who have done you wrong whilst you do this and think that they won’t be getting any of your cinnamon buns, the bastards.

Now, on top of the dough, sprinkle the sugar and cinnamon, making sure to go to the edges as best you can. You will spill some onto your work surface, try to pick these up and put them back on or, at the end, gather the up with a clean hand-sweep and sprinkle them on top of the made up rolls.

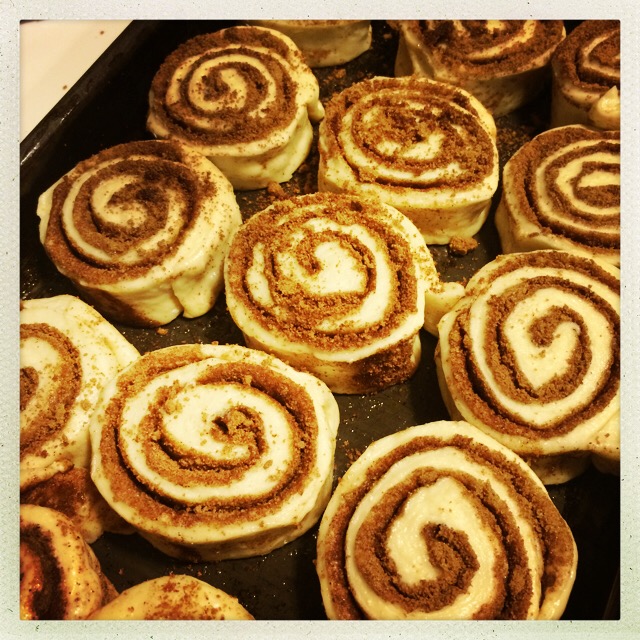
Now, with the filling all spread, roll up the dough, with the longer end towards you so you get one long cinnamon bun roll. With a sharp knife, trim the edges off, then cut slices of about and inch and a half or so. Place the buns flat down on a lightly oiled tray measuring about 23cm x 33cm (you can even got a bit bigger, but no smaller). There will be a little gap between them, see picture.

IMG_1712

(If you have any sugar/cinnamon stuff left on the work surface, don’t waste it but gather it up and sprinkle it on top at this point.)

You now have a choice. If you fancy eating them soonish, cover them with cling film and leave until they have doubled in size. Anything from 45 mins to a couple of hours. But. I put them in the fridge at this stage and leave them all night. (Also, see update, below.)

Whenever you cook them, you need to a) preheat the oven to 180C b) brush the cinnamon buns with melted butter before they go in the oven (this is important). If you prove them in the fridge you can cook them straight from the fridge, or leave them at room temperature just until the oven warms up. No longer.

Cook for 20-30 minutes (mine took 25).

Whilst they are cooling make the icing, just mix together the icing sugar and the cream cheese until it’s pourable but not too liquidy. It will really seem like it’s not going to work for a bit but then it all comes together. Drizzle on top of the buns (it’s okay to do this when they are about 20 mins out of the oven). Then, prize them apart with a spatula thing and eat with a good coffee whilst making whimpering noises.

(Have napkins handy, these are sticky.)

UPDATE 20 April 2015

Having now made these a few times, I offer these observations:

These buns are fabulous when freshly made, but they go stale disappointingly quickly. Unless you plan to eat them all in one go (!) then what I suggest you do – what I do – is I now cook these in two batches. You can easily keep them in the fridge for that final stage of proving (i.e. the bit just before they go into the oven) for two days. I divide mine up onto two smaller trays and cook them over two days, thus giving me fresh buns for breakfast two days in a row. Just mix up 25g cream cheese and 25g icing sugar for each batch. Which brings me to my next observation:

I think that 50g of cream cheese and 50g of icing sugar is AMPLE icing for these in total so I’ve amended the original recipe above.

Date and ginger biscuits (gluten, refined sugar and dairy free)

I haven’t gone gluten, or dairy free. I am incredibly fortunate that I can, thus far at least, eat what I want. And I do. Last night I stuffed my face with cheesy Wotsits (I love a flourescent food stuff sometimes). Today, for the first time in eight years, I went into a supermarket and bought a loaf of white sliced and we had toasted sandwiches for Sunday lunch.

But generally, I do eat really well and also, I do like to try new things and double-also I like to have a little biscuit or something every day, and it kinda helps, now that I’m no longer 19 years old and seven stones, to think of my health ‘n’ stuff.

(Whilst I’m vaguely on the subject of healthy eating, has anyone else noticed that saying you’re on a ‘whole food plant based’ diet seems to have replaced saying “I’m vegan”? I’m not saying this recipe is vegan btw, because it’s not – it contains eggs – but I’ve noticed this phrase a lot lately..)

So I found these in Hugh F-W’s new book Light and Easy (which thus far I really like although have only tried a few things). They are choc-full of good-for-you ingredients, have no refined sugar, no dairy, no wheat, no gluten and although they absolutely won’t be to everyone’s taste, they are to mine and also my youngest loves them (incredibly). They are not overly spicy or gingery, and make a great little snack when you need a treat. But are also – thanks to the fibre and protein – rather satisfying and sustaining.

You need:

200g pitted dates

15g peeled ginger, roughly chopped

2 eggs

250g ground almonds (this is not a cheap biscuit recipe..)

a quarter of a teaspoon of bicarbonate of soda

One and a half teaspoons of ground Chinese five-spice

Pinch of salt

Flaked almonds for topping if you so wish

What you do:

Oven to 170C. Baking parchment or magic carpet type sheet onto a baking sheet.

Put the dates and ginger into a food processor. Not a blender, but a processor (it’s sticky and if you put this in a blender I wouldn’t want to be you cleaning up afterwards). Whizz up for a couple of minutes until the mixture is really sticky and everything is evenly chopped up. This is also the time you realise you have bought unpitted dates as the processor will start making an awful sound and then start smoking.

When the mixture is all mixy, then you add the eggs and process again until you get a nice sloppy mixture – takes seconds really. Now add all the other ingredients and pulse for a few times until everything is, how can I put this? Mixed. You will have a very sticky dough. Either drop spoonfuls onto the tray or wet your hands slightly, roll into a ball and then flatten – which is what I do. I make mine about 5cm wide. They don’t really spread out so you can pack them fairly tight – but not touching – onto a baking tray. Top with flaked almonds if you so wish (this is my addition).

I bake mine for 15 minutes and this is plenty. Hugh says 20. They should be golden but not too dark and have a ‘slight give’ in the middle. I can lift my straight off the tray, with my hands, onto a wire rack to cool.

That’s it. Eat and feel virtuous.

Adding kefir and oats to sourdough

Last year I was given some kefir from my friend Becky. Don’t ask me too much about kefir, cos I’m still learning about it. It’s basically something that looks like a small, glutinous brain, which you put in milk (I have milk kefir you can also get water kefir) and it does something to the milk after a day or so which you can then drink or put in smoothies and it has magical qualities.

Something like that.

Every day, however, I fear I am going to poison everyone with sour milk, which is what it tastes like. This isn’t helped by my partner saying “What IS this stuff? Are you sure it’s safe?”

It doesn’t really taste great on its own. I originally started it because my eldest has eczema and it’s a battle to keep her probiotics/prebiotic level high (this is another, long story). But we channel Gwynnie whilst we imbibe it.

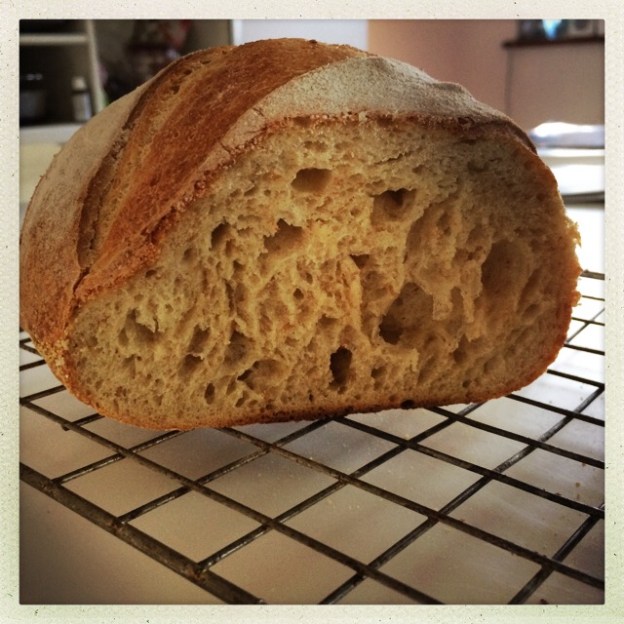
The thing with kefir is that you get lots of it to use up. We can only use so much in smoothies so I started thinking what else could I do with it? And then I decided to put it into my sourdough. Not loads, but about 60g (that’s all I get per yield) of it which I used as part of the ‘water’ element (I add 335g of liquid to 500g of flour so my kefir takes up some of the 335g, make sense?) And it works really well. It gives the loaf a lovely rise and you get a wonderfully moist crumb – less air holes I find (see photo below, the main photo shows the crumb after the first slice when there are more air bubbles), but a really nice sourdough for making sandwiches. And it’s tasty. Really tasty.

(I’m not pretending that any of the nutritional qualities of kefir are kept during the baking process.)

The other thing I’ve been adding is oats. I grind them up in my Nutribullet to make oat flour, and I don’t add more than 10% of the total flour content – so no more than 50g of the 500g of flour. (Oats don’t naturally contain gluten, but if you are coeliac do read this.)

Again this adds a lovely dimension to the bread. I made some the other day with oats and my children said the bread was “particularly delicious”.

I’ve also used kefir in place of buttermilk in my prune and almond loaf to great success.

IMG_1296

Towelling turbans

Swimming is a fairly big thing in our house. I don’t swim in winter, because I am a wuss. But my children do. In the summer, however, I swim every day. Sure you can wrap a towel round your head turban-style. But these (see links below) make the job so much easier, because you can fasten it up so it doesn’t fall off. Also of course, these are super useful every time you wash your hair. Especially now that I have LONG HAIR (almost). Indeed, I am actually writing this post with a turban on my head whilst my hair has a conditioning treatment on it.

Talk about method writing.

I must interrupt this post to tell you about the time I had to go to a party and face my nemesis, an ex girlfriend of my boyfriend who had caused a lot of trouble (this was the first and last time I ever let this happen to me). I took ages getting ready. And I thought I looked great. Except for one problem: I still had my hair all piled up on my head in a towel, turban-style. Without the turban it looked all wrong. Anyway, I went to the party – without a towel on my head – and I faced her and she was actually perfectly nice and we sort-of became friends. There is no moral to this story other than, sometimes, you can demonise people you’ve never met and there are very few people who don’t suit a turban.

Don’t be tempted to buy cheap ones. I have an Aquis Lisse one, which is made of microfibre; I was sent it ages ago when I wrote about beauty. For an adult head I think they can’t be bettered. But they cost £15 odd. For children the Cuddledry ones, £9 odd, are perfect and well worth buying. Once properly secured they pretty much stay put.

Lemon poppy seed cake that can be drizzled if you want

The first time I made this, I made a mistake. I didn’t read the recipe all the way through. The recipe was just a collection of letters, made into words, that were irrelevant to me until I started actually making the cake when they became vital and important, a means to cake. And then I realised that the sugar quantity was meant to be split in two, 165g of which was meant to be added to the cake mixture and 135g was meant to be reserved for the drizzle. So I never did the drizzle part and, actually, that was the best (to me) version of this cake I’ve ever made. I’m not overly keen on sugary drizzle on a cake. I mean, it’s like the sugar fairy has pissed on a perfectly good cake.

To me a cake should be soft, yielding, maybe creamy; but purposely moist – made moist – just confuses me. I think this is in part because there is an old Italian tradition, when eating stale bread, which is to wet it. A habit that I used to find abhorrent as a child, but then, I had that luxury, having not lived through a war.

So now, I occasionally make this cake the proper way and sometimes make it my way. I give both versions below. It’s a lovely cake to have in, it lasts a good few days and you always have something for guests. But it’s not the sort of cake you want to eat loads of, it’s not a dangerous cake. And it’s the best version of this sort of thing that I’ve ever made/had. I think the addition of ground almonds gives it a certain substance, a certain meatiness. And I like that. It was from Delicious magazine a few years ago.

Ingredients

165g soft, unsalted butter

250g caster sugar – if you intend to make the drizzle then use 165g of sugar in the actual cake and reserve the rest. If you don’t want to do the drizzle then just 165g of sugar is fine

The zest of 3 lemons and the juice of 2 (you only need the juice if you intend to do the drizzle)

2 eggs

165g plain flour (I sometimes put some wholemeal in there, or some oat flour, but not much, maybe 20-30g no more)

half a teaspoon of bicarbonate of soda

1 teaspoon of baking powder

50g ground almonds

50ml hot water

1 and  half tablespoons of poppy seeds

Method

Preheat the oven to 180C and line a 1litre loaf tin. MIx together the 165g of butter and 165g of sugar and beat until pale and fluffy. Mix in the lemon zest. Now beat in the eggs, a bit at a time, adding a spoon of flour as you go with each egg. Add the rest of the flour/bicarb/baking powder.

Mix in the hot water, the ground almonds and poppy seeds and pour into the tin. Bake for 40-50 minutes. A tester pushed into the cake should come out clean. My oven is very hot so I check after about 38 minutes.

Now, set aside to cool and that’s it if you are not doing the drizzle. If you are, then you now mix the lemon juice with the remaining 85g of sugar and heat in a pan until dissolved. Prick the cake all over whilst it’s still warm and in its tin (but has had about 10 mins to just chill) and then gently spoon the lemony sugar mixture over the top.

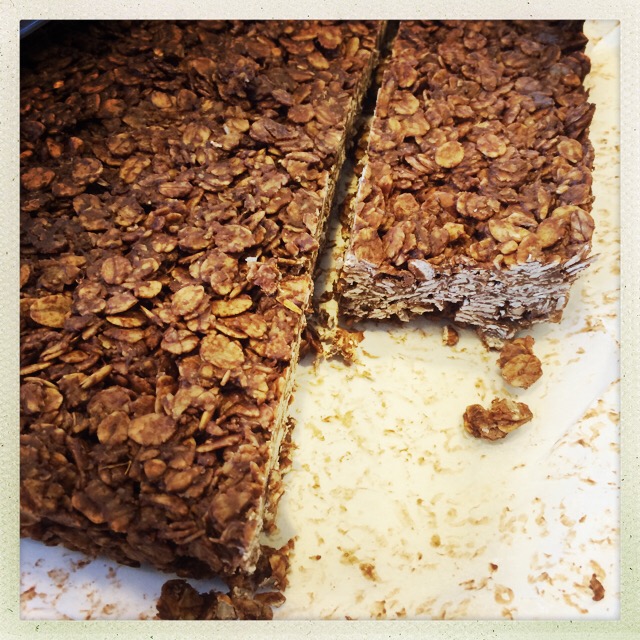
Chocolate and nut oat bars

I live in hope of finding some sort of cereal bar, that I can make, that my children will like. I think a good cereal bar is an excellent thing to be eaten when you don’t have much time, but need something that will keep you going. But so many bought cereal bars are full of crap.

Many years ago, I co-ran a parenting website called I Want My Mum (because that’s all I said when I was pregnant and not long after having my baby, “I want my mum, I want my mum!” I would lament. Luckily she wasn’t far). I posted a recipe on there for some sort of healthy cereal, chewy bar. Loads of people went crazy for it, saying that their children loved it.

Not mine. My children have never liked any sort of bar that I’ve made, but they look at the Kellogg’s Special K Raspberry and Chocolate bars with longing every time they go past them in the supermarket aisle.

So I saw these in my Dale Pinnock Healthy Every Day book. He’s the one I got the chocolate/coffee smoothie idea from. I adapted his recipe, changing the proportions and also, he said you should sandwich the chocolate/peanut butter layer in between the layers of oats. But this didn’t look great to me, and also, in a bid to entice my children, I thought it’d be better to coat the whole lot in chocolate. I even wrapped them up in little bags to make them look shop bought. Did they love them?

No.

The ungrateful bastards. But I really like them (just as well as I have about 18 of them now) and if you need a healthy but delicious, quite treaty snack, you can try these. Or, if you’re lucky, your children might like them.

65g unsalted butter

50g coconut oil

45g raw honey

1 teaspoon of vanilla extract

300g porridge oat flakes

125g 70% cocoa chocolate

80g nut butter of choice – not one that’s full of sugar but if your nut butter doesn’t have salt in it you may want to add a pinch

Melt the  butter, coconut oil and honey in a pan. Add a pinch of sea salt if your nut butter doesn’t have it. When melted, add the vanilla extract and the oats, and coat everything.

In a bowl atop another pan of simmering water, melt the chocolate and nut butter. When melted, add to the oat mixture and stir really well.  Tip into a tin (I use one that’s about 20cm square but you can see how much mixture you have so use a tin accordingly. I line mine with baking parchment to make thing easier). Then just chill for an hour or two, cut into slices and offer to your children and when they refuse, sit down and eat the lot yourself whilst writing them out of your will.

IMG_1243