Category Archives: Chocolate

Cacao, banana and walnut bars: good for breakfast or post work out.

To my mind, no-one does ‘healthy but delicious snacks’ better than Donna Hay. I’m really not interested in mixing together linseeds and dates and other such stuff if the result is something you might have found in a health food shop circa 1974.

What I love about Hay and her recipes, is that there are no really contrived ingredients, no-one is pretending they are a substitute for broccoli, but if you want something a bit better than a sugar-laden cereal bar, she comes up with the goods.

I adapted these because I just didn’t agree with the number of dates she originally put in (200g) and although I think I have a sweet tooth, it’s evidently not that sweet.

Anyway. I cut these into squares. They freeze brilliantly. They are tasty and nutritious and the sugar hit from the dates and bananas is balanced by the cashews.  I eat them when I want something a bit chocolatey and quick and they have also served as an emergency lunch – with a green smoothie – when I’ve had no time and had to go straight to an interview. I know this makes me sound really virtuous and you know what? I am during the week. At the weekend I can eat whatever I damn well please.

You need

225g cashews, raw (although might try them anon roasted)

120g dessicated coconut

300g ripe bananas (about three)

150g fresh dates, pitted

2 teaspoons of vanilla extract

35g raw cacao powder

half a teaspoon of bicarbonate of soda

2 tablespoons of cacao nibs

50g chopped walnuts

Method

Oven to 180C. Line a square 20cm tin with baking parchment.

Place everything, save for the walnuts and the cacao nibs, into a food processor and blitz the buggery out of it – Hay recommends 5 minutes I can’t remember how long I did it for. At the end, add half the cacao nibs and pulse a few times.

Shove the mixture into the tin, pressing down with your hands or the back of a spoon and sprinkle on top the remaining cacao nibs and chopped walnuts.

Cook for 25 minutes or thereabouts. Cool, the refrigerate and cut into required shape. Keeps for about a week in the fridge but as I said, I keep half, freeze half and they froze beautifully.

Prune and dark chocolate brownies

I saw this recipe in my Donna Hay Fresh and Light magazine, which costs me a staggering £9.50 from Selfridges but is, to my mind, worth every penny as each edition yields more recipes than many recipe books which cost double that.

But I saw it and shunned it as I’m not overly a fan of brownies – too sweet for me usually. But due to a rather terrifying health scare a few weeks ago (I had tests and everything is not only fine but I am actually in really good health yay!) I’ve overhauled the way I eat which was long overdue because although I have always eaten with health in mind, I’ve I’m also greedy and at times lazy. So I’ve gone back to planning what I eat (this has always worked really well for me) and maximise nutrients. And it not only shows in the way I feel, but I’ve lost weight and body fat, whilst augmenting my muscle mass (I do big weights twice a week).

Anyway I shunned them but then was fancying a weekend chocolatey treat and decided to try them and I was not disappointed. Now I know that this isn’t a recipe which magically transforms broccoli into brownies, and I know that prunes are very high in sugar. I know all this but prunes have more nutrients than mere sugar and here’s the thing. These are delicious in their own right. My eldest doesn’t like them but my youngest adores them and my partner – who hates brownies – had one and declared it “the best chocolate thing I’ve tasted in a long time”.

So these are still an occasional treat (I only eat stuff like this at the weekend now) but they’re delicious and gluten free.

The brownies

255g prunes, take the stones out

50g of dark chocolate, melted (Hay asks for 70% but I use these chocolate chips for nearly all my cooking now and they are delicious)

60 ml of light olive oil

80ml maple syrup

1 teaspoon of vanilla extract

80g ground almonds

25g cocoa powder (I use raw organic, no idea if it’s better but it makes me feel better looking at the packet)

2 eggs

The chocolate ganache

80g dark chocolate

60ml of cream (Hay says to use coconut milk but I used cream as that’s what I had, you could use milk)


Pre heat the oven to 180C. You need a 20cm square baking tin, preferably with a removal bottom, if not make sure the baking paper you line it with comes up the sides so you can carefully lift it out later. If you scrunch up the baking paper first it sits in the tin more easily.

Take 170g of the prunes and put them in a jug, cover with boiling water for about ten minutes. I scissor cut the remaining prunes into small pieces and put in a small bowl for later (don’t forget them!) or you could of course chop them with a knife on a board.

Drain the prunes (discard the water) and place in a bowl with the rest of the ingredients for the brownies and whizz up with a hand held blender (or you could put in a food processor, I did as I was told). When done, scatter in and mix in the prune pieces. Put the mixture in the tin and cook for 25-30 minutes. The middle should be firm when pressed but you do want them a bit squidgy.

They will be very soft, so keep in the tin and when cold gently take out. Make the ganache by very gently heating the chocolate and cream in a small pan (I would never usually melt chocolate like this, I’d use a bain marie set up, but I was hungry and it was fine). Spread over the top. If you can, wait a while before slicing up and eating. Store in the fridge where they do harden up.

IMG_7999

I have no idea how long these last as they were practically all gone in 24 hours.

Note: the main image is the brownies a day later, after being taken out of the fridge, the image in the text is of them first iced and sliced – with some missing for, ahem, testing purposes.

Note to self: Put walnuts in next time.


Chocolate Chip Brioches, dough made in the bread machine (especially for Connie).

So a while ago, I posted a recipe for enriched dough chocolate chip brioches. My youngest actually prefers the enriched dough version but I had long hankered after proper, buttery, brioche dough.

I wanted something I could bung in the bread maker and let machine make the dough. And although my Panasonic bread maker doesn’t have a brioche cycle (it’s nearly 20 years old) I knew the newer ones did so I did a search and found a recipe, online, in a newer Panasonic breadmaker instruction book.

These brioches are fairly fuss free. As with all brioche dough, it is very buttery and if handled too much at the shaping stage you become FULLY aware of how much butter is in there as it starts to slide across the kitchen counter and you end up needing to wipe down your hands a lot. But most of the work is done in the bread machine so don’t worry.

Make these the day before you want them, shape them, cover them, stick them in the fridge and the day you want them (they make wonderful breakfasts) just heat up the oven, glaze the buns and stick them in the oven. Voila. Buttery, brioches with melting chocolate inside.

I cooked some of these this morning (made yesterday) because I was making Christmas cards with my children and my friend Mary, who is super crafty came with her absolutely fabulous children and we all sat sticking, embossing and cutting; chatting, the fire burning, lovely music on. It was like something out of a Jane Austen novel, except with Spotify.  Connie, the eldest has just started making bagels and asked me for the recipe. So here it is.

One and a half teaspoons of instant yeast

400g strong white bread flour

Four tablespoons of caster sugar

15ml of rum (I seriously don’t know what this does so if you don’t have it I’m sure you can just add a bit more milk but if you have it, add it, I mean why not?)

One and a half teaspoons of salt

70g of butter, cut into cubes and straight from the fridge

90ml of milk

50g of butter, cut into cubes and straight from the fridge for later *

100g chocolate chips, I prefer dark – for when the dough is out of the machine

Makes 12

Put everything except for the chocolate chips and ‘later’ butter into the bread maker and set the dough cycle – it should be about 2hrs. Mine is 2hrs 20minutes.

At the first knead stage (about 30-50 mins in) add the ‘later’ butter. Your machine may have a beeper for ‘later butter’ stage. Mine doesn’t.

*You can add all the butter at the beginning and honestly I’ve not noticed much difference, so see how you go. If you’re around and can add it later, do, if you need to get on with something just add it all at once.

Don’t, however, add the chocolate chips now, they will melt slightly and the dough will be slightly coloured. It doesn’t affect the taste but..I just prefer it done later.

When the dough cycle is finished, take the dough out, flatten out, add the chocolate chips and sort of gently knead them in. Rest the dough for ten mins, then cut 12 pieces out of it and shape into sausage shapes (or rounds). If you find the dough resistant you can cut the 12 pieces, then rest, then shape. Or just cut and shape straight away – see how you feel.

When shaped, place on a baking parchment lined tray, cover with a tea towel and put in the fridge overnight or for a few hours until you need them.

When ready to bake, heat oven to 180C, brush the brioches with egg yolk and cook for 20 mins (check after 15).

Eat about 30 mins out of the oven when it’s the perfect mix of warm brioche and melting chocolate. You can also freeze them, when cold, for resuscitation another day.

Enriched dough rolls with chocolate chips (bread machine)

These came about trying to make chocolate chip brioches for my youngest who is obsessed with them. M&S does the best shop bought ones – most leave a really weird taste in your mouth. But we no longer have a local M&S (thanks Stuart Rose)  and anyway, shop bought bread-products are nearly always full of other ingredients I neither recognise nor welcome.

These aren’t strictly speaking brioches – there just isn’t enough butter or eggs to really warrant the name – but they are a lovely little enriched breakfast bread that’s a bit more exciting than bread, but with very little sugar. I promised my youngest I’d make her some brioches, but when the time came, I had very little time and was slightly awed by traditional brioche recipes which involve massaging an entire packet of butter into dough. Plus we were in the middle of jigsaw making and I didn’t want to “splinter off” as my youngest puts it, and start mucking about with dough when she is happy with shop bought. So I looked at my trusty Panasonic bread maker recipe book which is 20 years old; the newer models have actual recipes for brioche bread which I shall attempt anon, and also a special cycle for them which adds half the butter during the cycle. Mine didn’t, but it had a recipe for enriched bread dough. I tweaked it slightly, threw everything save for the chocolate chips into the machine – although I could have put those in too (if you put them in, put them in at the beginning with everything else not in any fancy dispenser drawer as they may melt and get stuck).

It was so easy. Ingredients in bread pan, dough cycle (which is 2hrs 20mins on mine), during which you can do a jigsaw, out, knead in about 80g of chocolate chips, shape into eight rolls – put on baking parchment, cover with cloth, prove in fridge overnight.

In the morning: oven on to 220C, little buns brushed with a bit of milk, baked for 10 mins. Eaten for breakfast. Delicious. I ate three just for testing purposes.

What you need

half a teaspoon of dried yeast (I use Dove’s Farm)

250g strong white bread flour

1 teaspoon of caster sugar

25g butter

1 tablespoon of milk

half a teaspoon of salt

1 egg

85ml water

80g chocolate chips


Un tiramisu che ti tirasu

A few years ago, when we fancied making a tiramisu (it means pick me up, or pull me up), I looked at loads of recipes. I was quite shocked (I’m a bit of a purist when it comes to Italian cooking) at the variations. I mean, Nigella, whom I love, had one, in How To Eat, using no coffee or chocolate and meringues instead of sponge fingers. It caused me to  to slam the pages of the book shut in mock horror.

It is the coffee, and the chocolate that is supposed to act as a ‘tiramisu’. Anything else, to my mind, ti spinge giu (pushes you down).

I have hundreds of cookery books, and a world of recipes at my fingers tips, as do you, on the internet. But nothing was really saying Italian tiramisu to me. Then I thought of looking in my Italian cooking bible: The Silver Spoon.

In these days of celebrity cookbooks, stuffed full of photographs, the recipes in this book are easy to overlook: simple, very few pictures and the list of ingredients for each recipe is short. But don’t overlook them because not only is this a fantastic cookery book, the recipes are accomplished – some of them go back fifty years. As you may expect, some of the recipes are as good as they’re ever going to get.

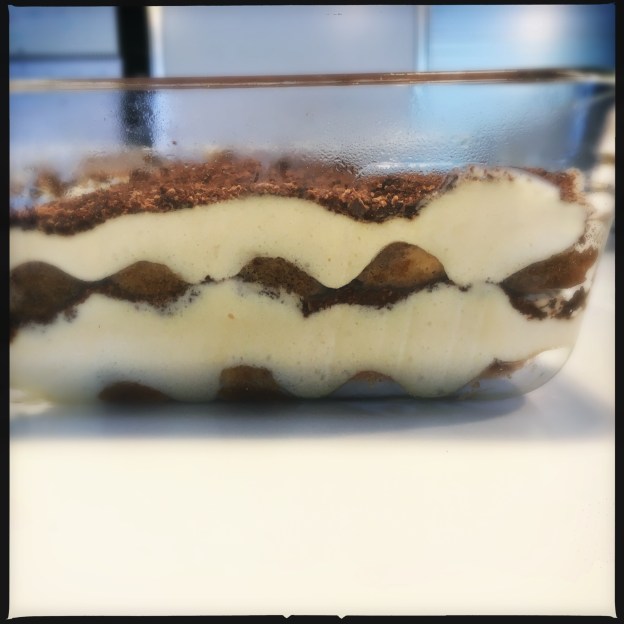
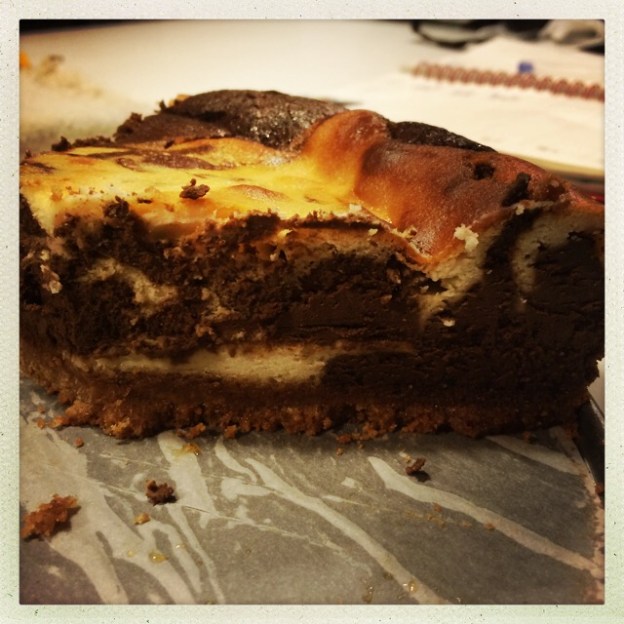
And the tiramisu recipe is no exception. It is one of the few with a photo which I admit helped…I made it and it is the only way we make tiramisu now. It’s simple, anyone can do it (my bambine frequently do) and once made sits in the fridge for a good few days, yielding to your spoon just when you need a…pick me up.

It has no alcohol – so if you feel the need for some after dinner, serve that separately – which means children can easily eat this. Although beware of eating it too late as there’s quite a caffeine punch.

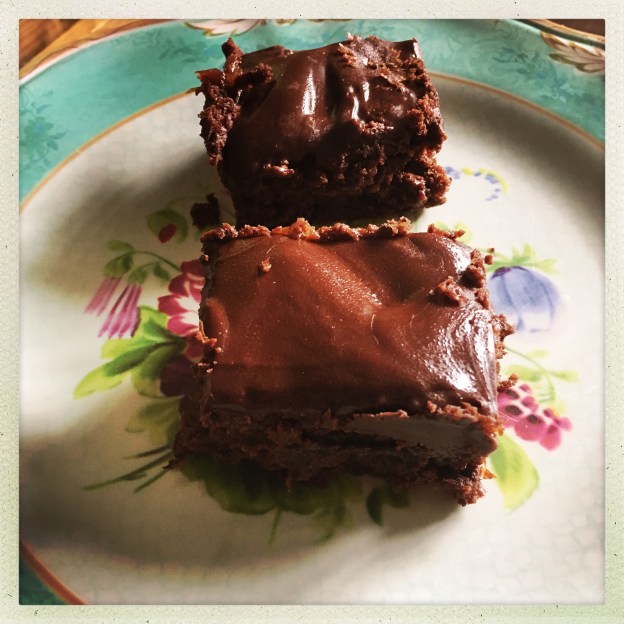
My friend Tamsin doesn’t like coffee, so she doesn’t include it in her tiramisu. Of course I have told her it’s not really a tiramisu, but more of a creamy pudding. Don’t even think of using cocoa powder (other than, maybe, on the very top but I don’t) instead of grated chocolate. The chocolate shavings make this stand out and allow for some bite in what is a wallowy pudding which offers little resistance: you could easily eat aged 98, when all your teeth have fallen out.

And use icing sugar, not caster, which can result in a runny mess.

Here is the original recipe but the adaptions I now make are in italics.

2 egg whites, 4 egg yolks (freeze the 2 extra egg whites)
because I end up with a plethora of egg white I now use all of the four eggs and it just makes for a slightly softer, fluffier tiramisu.

150 icing sugar

400-500g mascarpone (mine comes in 250g tubs so I just use two)

because the mascarpone I buy comes in 250g tubs I now use 500g of mascarpone to no ill effect

200g sponge fingers I use as many as I need to cover the base of my container and the second layer.

175ml espresso coffee

200g plain chocolate, grated I often use less and lately have started using really good hot chocolate mix instead of grated chocolate. Really good hot chocolate is just chocolate flaked..see update note below

NOTE: grating chocolate is one of my least favourite jobs but I do it for this. 200g is what the original recipe asks for, but I’ve made this dozens of times now and I never use this much anymore and in fact I use less than half of it and it’s plenty. My advice is go for 100g of it, because also, grating 200g of chocolate is a total yawn. Jan 2021 update: I’ve discovered that really good hot chocolate comes in flakes and now I use this….

What to do:

I make this in a rectangular Pyrex, which also has a handy lid so I can save it for a few days. Mine is about 17cm x 25cm and it makes two layers. But of course you can make it in a different shape so you get more layers, or even make it circular or in individual portions, just break the sponge fingers up to fill the spaces.

It would, I think, easily serve eight people depending on the size of portion.

First you whisk the egg whites until stiff, set them aside for a moment whilst, in a separate bowl you beat the egg yolks with the icing sugar, then you fold/whisk the mascarpone into the egg yolks and sugar and finally, into this you gently fold in the egg whites. This is your creamy bit.

Lay the sponge fingers onto the base of your dish and brush or pour the coffee on top. Because I know mine makes two layers, I pour half the coffee on now. Then spoon on a layer of the cream and sprinkle with the grated chocolate. Repeat this, ending with a layer of mascarpone/sprinkling of chocolate. I usually end up with more chocolate than I need for this, for some reason, so if so just keep it in a jam jar for next time.

It is better the next day, but can be eaten within a few hours of making it and chilling it to allow the ingredients to meet each other, and mingle.

Milk shake mix-ins

This is a great way to use up scrappy bits of ice cream ‘n’ bits you may have, or just to amuse yourself for five minutes in the kitchen – it’s permissible to buy ice cream just to make these, too.

I got the idea from an ice cream shop in Aldeburgh called The IceCreamery – which is well worth a visit if you are in the area. Here you select your ice cream ‘base’ – vanilla, chocolate, strawberry etc., then add a ‘mix in’. And here’s where it gets fun, and slightly diabetic-inducingly crazy.

The mix-ins can be M&Ms, Jaffa Cakes, Oreos and a million other alternatives, and these get added/crushed into your ice cream to give you a custom-made ice cream.

Or you can have it made into a milk shake.

My eldest chose vanilla and Oreos and my youngest chose chocolate and M&Ms. I watched, in awe/horror as about four scoops of ice cream were put into a mixer and then – in the case of the M&Ms – a WHOLE PACKET of M&Ms were put in. I would never, in a million years, let my youngest (who is tiny) eat a whole packet of M&Ms in one go, let alone with four scoops of ice cream.

But I had to metaphorically shut my eyes and switch off my inner mummy-OMG-ness and just go with it.

The milk shake was amazing, I hesitate to say the best ever as of course the best ever milk shakes were those my dad made for me in his cafe, when I was a child. But aside from that:

BEST EVER.

The vanilla and Oreos was particularly memory-hogging.

So when I got home I sought to recreate these but using less ice cream and less mix-ins and the way I make them isn’t more calorie-laden than a regular ice cream in a cone, I put two scant ice cream scoops in my Nutribullet, with some milk and some mix-ins (like one cookie if it’s an Oreo, maybe one and a half) and blend the whole thing together.  So far we’ve done:

Strawberry ice cream with fresh mint

Strawberry ice cream with Milky Way Magic stars

Chocolate and fresh mint

Coffee ice cream with Oreos

Vanilla and Oreos

Vanilla and Milky Way Magic stars

Vanilla and jam ‘doughnut’ sponge crumbs (these were left over from some Nigella jam doughnut muffins which my eldest made which stuck to the tin and I scraped out and froze and I add them straight into the mix and it works beautifully).

Chocolate and peanut butter……you get the idea.

Of course I had to buy the special cups and lids and straws.

26 July 2016 update: I made raspberry cheesecake milkshakes today: vanilla ice cream, frozen jam doughnut sponge crumbs, fresh raspberries, milk and a dollop cream cheese. DELICIOUS. I didn’t have one (just tasted it) otherwise I’d be the size of a house come the weekend with all the milk-shaking we have going on..


Chocolate ganache that makes a rather splendid base for hot chocolate or chocolate custard

Sorry about the overly long title.

I’ve written before that I have a thing about really good hot chocolate. I prefer a potent pokey hot chocolate rather than a long, watered down poor-man’s version of one. This base is absolutely brilliant, it takes not very long to make, you store it in the fridge, it lasts for a week (unless you use cream that’s right by its sell by date) and you can turn it, in minutes, into superb hot chocolate or add it to shop bought custard (buy good quality one) to make chocolate custard that’s just really IMPRESSIVE.

The proportions below are a rough guide. Stick loosely to them, because I’ve perfected this over years. But of course it doesn’t matter if you have only 90g of one chocolate or 60g of another, or a bit more or less cream. The effects of varying the proportions are, indeed, something you can play around with. This is what works for us.

100g 70% cocoa chocolate

75g 37% cocoa milk chocolate (I use Green and Black’s milk cooking chocolate)

225g of cream, I use double but you could use single

In a bain marie or a bowl over pan of boiling water, melt the two types of chocolate with the cream. Be careful not to let it get too hot or scorch. Then just put it in a suitable container and put it in the fridge until you need it.

IMG_5975.jpg

To make hot chocolate you just measure out some milk into the cup you are using – for a normal size cup of mug you use 3/4 of the cup of milk and a big dessert-spoon dollop of chocolate ganache, all into a pan, warm through until melted/warm. Drink and sigh.

To make chocolate custard get shop bought custard – I use this one from Waitrose which is 500g and I add the whole quantity of the custard ganache the recipe above makes. This makes a good old amount of chocolate custard, but of course you can vary it to make as much as you want, or you may prefer the custard less chocolately. Experiment. It goes super well with my chocolate sponge.

Later note: a dollop of this ganache, mixed up with cold milk, also makes a divine chocolate milk drink.

Halloween spider’s web cake

We do Halloween in our own way in this house, which is not very much. We don’t do trick or treating because that kinda contradicts everything we say the rest of the year (“knock on strangers’ doors! Eat lots of sweets! Ghosts and ghouls do exist!”).

But we aren’t total killjoys, either. We do stuff and have our own traditions and one of them is that I make this cake.

It’s basically a red velvet chocolate cake – or that’s how it started – but I don’t add red colouring so mine isn’t red, it’s just a light chocolate cake with cream cheese/sugar/butter filling and covered with a chocolate ganache, then iced with white chocolate. It’s actually fairly easy and really tasty and if you have one, a plastic spider on top looks good.

This recipe is adapted from a recipe in Waitrose magazine. The changes I’ve made are: no salted butter, no red food colouring, more cocoa, I used kefir instead of buttermilk (don’t worry if this means nothing to you!) and I cut the sugar down. But you can’t tell. It’s still very much a proper cake.

The cake

200g butter at room temperature

350g plain flour

1 tsp of baking powder

1 tsp bicarbonate of soda

4 tablespoons of good cocoa powder

quarter of a teaspoon of sea salt

300g caster sugar

3 eggs

1.5 tsp vanilla extract

284ml buttermilk/kefir

Cream cheese filling

120g butter

120g cream cheese

100g icing sugar

Chocolate icing

300ml double cream

250g 70% cocoa chocolate, chopped

1.5 tablespoons of liquid glucose (you can buy it in tubes in the baking aisle)

50g white chocolate (I use Green and Black’s – absolutely the best white chocolate there is that doesn’t cost loads)

You’ll also need an icing bag and fine nozzle

What to do

Oven to 170C.  Line a 23cm spring-form cake tin with parchment or treat yourself and buy some cake tin liners. Put all the dry ingredients in a bowl, but not the sugar. Put the sugar and butter in a separate bowl and either beat by hand or put in a food mixer with whisk attachment and beat until smooth. Now add the eggs (continue with the food processor if you have started with it, but by hand is also, of course, fine) one at a time, beating well with each addition.

Now add the dry ingredients, alternating with the buttermilk/kefir until all combined. That’s it, your cake is done. Scrape into a tin then bake for about an hour.

It needs to cool completely. When it is cool, slice it into three. You’ll probably have two flat layers – the bits of the cake that were the middle and the bottom – and a slightly domed layer – the natural top of the cake. You can, if you want, straighten the slightly domed layer out by cutting it, or you can just use it as the middle layer of your cake. Either way, you want a very flat layer for the top, please.

Place what will be the bottom layer on a cooling rack on top of a baking tray (this is important for later) and spread half the filling on, place other layer on top and finish with a flat layer. Put it in the fridge for about 30 mins (longer if you want).

When you are ready to do the topping: place the double cream, dark chocolate and liquid glucose in a bowl atop some simmering water until all smooth and melted. At roughly the same time, melt the white chocolate in the same way and prepare to put into an icing bag with a thin nozzle icing head-piping-thing.

Now, spread the chocolate layer over the top with a spatula knife – this is where the baking tray comes in useful. It takes some practise but you will get some chocolate on the sides as you really need to cover the whole thing. Flatten the top. Now you pipe a spiral of white chocolate around the cake – start a bit off centre. When you’ve covered the whole cake, take a cocktail stick or skewer and make lines from the centre out, to make that ripple effect. Put back in fridge to chill and take out and serve at room temperature.

It’s good. Happy Halloween!

Tiramisu cheesecake

Tiramisu, for those that don’t yet know, mean’s ‘pull me up’. The English equivalent is ‘pick me up’.

Although I don’t know anyone in Italy who uses tiramisu as anything other than a delicious, indulgent dessert. Zabaglione was used, maybe still is, if you felt a bit under the weather and needed a pick me up. Presumably the warnings about not using raw egg (traditionally an ingredient in zabaglione) hadn’t reached the members of my family who used this as a salve for sick children who were too poorly to go to school.

My dad (from Parma, NE Italy) would sometimes feign illness – something he never does as an adult – as a child in order to stay off school and have zabaglione made for him by his mamma.

Anyway, this is a tiramisu cheesecake. If you don’t like coffee or cheesecake then there is nothing for you in this cheesecake. I think the base is absolutely inspired, but, again, if you don’t like amaretti biscuits (and in truth I don’t, on their own, but somehow they work here) you may not like the slightly bitter hit. But this is a really excellent cheesecake, classy, different, complex. Just don’t be left alone with it. Oh and, once chilled, it’s really the most excellent if you take it out of the fridge for half an hour before eating.

If you plan to make this for an ‘occasion’ – say a special lunch or a dinner – then I really recommend you make it the night before and leave it sitting chilling in the fridge until you serve it. One less job to do, plus with the chilling of the base and the chilling of the cake etc, it does take quite a long time from start to finish. So don’t get caught out.

This was originally from Delicious magazine.

For the base:

275g amaretti biscuits, crushed

75g unsalted butter, melted

For the cheesecake:

700g mascarpone at room temperature. I use a mixture of 500g mascarpone, cream cheese, ricotta, depending on what I have in the fridge. But I wouldn’t go lower than 500g mascarpone

150g caster sugar

3 large eggs, separated

45ml dark rum

30g plain flour

half a teaspoon of vanilla extract

175g plain chocolate, chopped (of course I didn’t chop mine and just broke up the pieces, because I am lazy like that)

1 tablespoon of finely ground espresso coffee powder – I just use something I have in a dusty jar from the supermarket, even though I have a full on, fuck-off coffee machine which freshly grinds my coffee for me. Next time it will maybe be even more awesome if I used freshly ground espresso powder

3 tablepoons of coffee liqueur. I use Kahlua which is lovely, incidentally, in an after dinner espresso, to make it espresso corretto.

Icing sugar for dusting. I was so greedy and impatient, I forgot this bit

Put the biscuit crumbs in a food processor and pulverise. In a bowl, introduce melted butter to the biscuit crumbs and let them do their thing. Press the crumbs into a 23cm spring form tin (I parchment line the base) and as far up the sides as you can get them (I didn’t do them up the sides and it was fine). Chill for 30 mins or even overnight.

When you are ready to make the cheesecake, preheat the oven to 200C; melt the chocolate in a bowl, atop some simmering water and then leave to cool. Put the mascarpone/cheeses into a bowl and beat until nice and smooth, then beat in the sugar, then the egg yolks.

Now divide this mixture into two bowls.

Into one of these bowls stir in the 30g plain flour, the 45ml of dark rum and the half a teaspoon of vanilla extract. Set aside for a moment.

Remember the melted chocolate? Into it, stir the espresso powder and coffee liqueur. Now stir the chocolatey/coffee/coffee liqueur into the second bowl of cheese mixture.

Put the egg whites into a bowl and whisk until soft peak stage, and now fold half the egg whites into each of the bowls – so half into the flour/rum/vanilla cheesey mix and half into the chocolate/coffee/liqueur mix.

Now dollop alternate spoonfuls of the mixture into the cake tin, give a swirl to gently mix and bake for 45mins to 1 hour. I lowered the temperature of my oven for the last 15 minutes or so only because my oven is fierce. Just keep an eye on it after 45 mins. It should be golden brown but still soft in the centre. Not liquid soft but softly soft, like a bit jelly on a plate.

Turn off the oven and leave the door ajar and leave the cheesecake until completely cold. When cold, chill in the fridge for several hours then it’s ready to be taken out and eaten, either fridge-cold or leave it to warm up a bit at room temperature.

Dust with icing sugar and revel in the calorie count. It’s high.


Chocolate and nut oat bars

I live in hope of finding some sort of cereal bar, that I can make, that my children will like. I think a good cereal bar is an excellent thing to be eaten when you don’t have much time, but need something that will keep you going. But so many bought cereal bars are full of crap.

Many years ago, I co-ran a parenting website called I Want My Mum (because that’s all I said when I was pregnant and not long after having my baby, “I want my mum, I want my mum!” I would lament. Luckily she wasn’t far). I posted a recipe on there for some sort of healthy cereal, chewy bar. Loads of people went crazy for it, saying that their children loved it.

Not mine. My children have never liked any sort of bar that I’ve made, but they look at the Kellogg’s Special K Raspberry and Chocolate bars with longing every time they go past them in the supermarket aisle.

So I saw these in my Dale Pinnock Healthy Every Day book. He’s the one I got the chocolate/coffee smoothie idea from. I adapted his recipe, changing the proportions and also, he said you should sandwich the chocolate/peanut butter layer in between the layers of oats. But this didn’t look great to me, and also, in a bid to entice my children, I thought it’d be better to coat the whole lot in chocolate. I even wrapped them up in little bags to make them look shop bought. Did they love them?

No.

The ungrateful bastards. But I really like them (just as well as I have about 18 of them now) and if you need a healthy but delicious, quite treaty snack, you can try these. Or, if you’re lucky, your children might like them.

65g unsalted butter

50g coconut oil

45g raw honey

1 teaspoon of vanilla extract

300g porridge oat flakes

125g 70% cocoa chocolate

80g nut butter of choice – not one that’s full of sugar but if your nut butter doesn’t have salt in it you may want to add a pinch

Melt the  butter, coconut oil and honey in a pan. Add a pinch of sea salt if your nut butter doesn’t have it. When melted, add the vanilla extract and the oats, and coat everything.

In a bowl atop another pan of simmering water, melt the chocolate and nut butter. When melted, add to the oat mixture and stir really well.  Tip into a tin (I use one that’s about 20cm square but you can see how much mixture you have so use a tin accordingly. I line mine with baking parchment to make thing easier). Then just chill for an hour or two, cut into slices and offer to your children and when they refuse, sit down and eat the lot yourself whilst writing them out of your will.

IMG_1243