Category Archives: Birthdays

A super healthy clafoutis

So, first up this is from Tim Spector’s excellent The Food for Life Cookbook which you should buy.

I have a very restrictive and healthy diet (no dairy or soya, minimal animal products, nightshades and sugar). Regular cakes, biscuits n ting are a thing of the past. I do taste chocolate as that’s my job, but in tiny amounts. So Tim’s book (as well as some of the Deliciously Ella books: the first one was awful but they’ve got really good since) is a Godsend for me. I still make yummy things for my family and friends but I rarely have anything for me to eat that’s desserty. Don’t feel sorry for me! I look great, have lost a ton of weight, feel pretty good most of the time and can, and still do, eat pasta and bread because my nutritionist – Pr Valter Longo – is Italian!

I didn’t have much hope for this but I made it for some girlfriends and I really loved it and my friend Katie went mad for it, but I thought I could improve it (sorry Tim) and so this is my adapted version.

55g light brown sugar
3 tablespoons of extra virgin olive oil
1 egg
200g kefir (I use coconut kefir)
100g oat bran
100g ground almonds
35g toasted hazelnuts (or nuts of your choice, or more seeds), chopped
35g pumpkin seeds
half a teaspoon of baking powder
Pinch of salt
160g frozen berries or fresh ones (I particularly like cherries when they are in season)
Zest of one lemon

Oven to 200C, oil an oval baking dish (the sort you might make a crumble in, Tims says 23cm round one).

Basically put everything together, mix well, spoon into the dish, whack in the oven for 25 mins. Best eaten warm, it also makes a rather nice breakfast. Serve with whatever you want/can eat. I have mine with coconut yoghurt.

Carrot and Cardamom cupcakes

These are delicious, fresh and light and adapted from a Waitrose recipe which you can find here.

I changed the frosting as I can’t bear an overly sweet one and the addition of the Fiori di Sicilia is, if I say so myself, inspired…

Unfortunately they don’t travel well and need to be kept in the fridge – if you can let them chambré at room temperature for a bit before eating. I guess you could make this into one giant cake but not sure why you’d want to…

Ingredients for the cakes

12 cardamom pods
175g light brown sugar
200g self raising flour
Half a teaspoon of baking powder
Quarter a teaspoon of fine sea salt
2 eggs
150ml of olive oil
200g of carrots, coarsely grated (I hate grating things)
Two oranges, preferably organic as you are using the zest. You’ll only need the zest of one for the actual cakes. So if you’re short you really don’t need two but the zest, grated, as a decoration – see later – does look nice.

Ingredients for the icing/frosting

250g mascarpone
85g Greek yoghurt
55g icing sugar
Optional but wonderful: a good few drops of Fiori di Sicilia essence. You can also add this into the cake mixture if you prefer.

Oven to 180C.

You’ll need a 12-hole muffin tin lined with muffin papers. Open the cardamom seeds, discard the shells and grind up the little seeds as best you can. It’s good if you’re in a bad mood here as you can really bash away with a pestle and mortar.

Whisk together the sugar, flour, baking powder, salt and the ground up cardamom when ready.

In a separate, larger bowl whisk together the eggs and olive oil then pour over the dry ingredients with the grated carrot and zest of one orange. Gently mix until combined well and then pour equally into the muffin cases.

Bake for about 20 mins until a skewer comes out clean and they bounce back when gently pressed (careful not to burn a finger). When done take out and let cool completely (I take them out of the tin, still in their cases of course, about ten minutes out of the oven).

You can make the frosting whilst they are cooking and put it in the fridge for later. Here you just mix the mascarpone, icing sugar and yoghurt together with a few drops of the Fiori di Sicilia. You should have a fairly thick mixture. If it’s not thick enough for you (and sometimes it isn’t due to the water content of the dairy) then add a bit more icing sugar.

When the cakes are cooled you can ice the frosting on – it looks really good if you can be bothered to do this but I admit sometimes I just can’t be so I just spoon/spatula it on thicky and then, if you had another spare orange, grate zest on top. Voilà.

Chocolate, ginger and nut pavé

This is another old timer, heavy lifter of a recipe that I’ve had for ages and never committed to ether. Why? I’m not sure. But it’s such a useful thing to have/make/give at this time of year. I’ve never given it to anyone that hasn’t been anything less than delighted, asked for the recipe and asked me to make it again for them. As long as, of course, that they like all the ingredients.

There’s a possibility that you have all the ingredients at this (Christmas) time of year so you could rustle it up if you need an extra nice thing.

What you need

200g dark chocolate, broken into pieces. I recommend 70%
50g unsalted butter
60g double cream
50g of either crystallised ginger or stem ginger drained of its syrup
100g of nuts of choice: pistachio work well here cos of the colour, as do pine nuts* (pine nuts is what the original recipe called for) or almonds/hazelnuts. If you use the latter I would toast them gently first and let them cool before adding.
*if you use pine nuts use 50g, and 50g of other nuts because what are you, loaded?
25g icing sugar
Cocoa for dusting


What you need to do


You’ll need a tin of approximately 26cm x 8cm. I use the base of a 2lb loaf tin as I like my pave to be a rectangle but you use whatever shape you like just bear in mind the above dimensions. Line it with v. lightly greased baking parchment.

Atop a simmering pan of water put the chocolate, butter and cream making sure that the bowl doesn’t touch the water (or it might seize). Take off heat let cool for a minute or so and then stir in all the other ingredients.

Easy isn’t it?

Then put it in the fridge to set. When ready to eat/serve/give you just turn it out, trim the edges to make it really neat if you want (you can also nibble here to test!) and dust with cocoa powder.

I give mine wrapped in string and parchment.

Wish I had a picture but don’t currently you’ll have to trust me this is lovely.


Chocolate Chestnut Rum Roulade

I’ve made this every Christmas for over twenty years. Last year, I went to look up the recipe on line (it was a Waitrose recipe from Iceland) and it had gone. It was a ‘404’. I panicked. Despite an extensive internet search nothing came up for it.

More panic. This is my pièce de resistance every Christmas, and my children love it so much they have, on occasion, requested it for birthdays.

But luckily – amazingly – I had made a note of it in my Travelling Cookbook which I started up years and years ago to commit my favourite recipes to paper. But if that goes…so finally I’m going to commit it to technology for me, and all, to enjoy.

I won’t say this is difficult. It’s not. But it’s not always perfect and it is a roulade and involves rolling, like a Swiss roll. It’s not super easy but just go with it and don’t worry. It’s delicious and look, no flour.

Ingredients

For the roulade

170g 70% chocolate, broken into pieces
170g caster sugar
Five eggs separated
1 teaspoon of vanilla extract
Three tablespoons of hot water (see note later)
Icing sugar for dusting

For the filling

Three tablespoons of icing sugar
115g unsweetened chestnut purée
Four tablespoons of sour cream
100g cooked, peeled chestnuts chopped
Two tablespoons of rum (or liqueur of choice but then it’s not rum roulade!)
285ml of double cream

Method

Now, those are the ingredients above. I admit what I now do is buy some vacuum packed chestnuts, whizz some up and use the rest chopped. Because otherwise I tended to get left with lots of left over chestnut purée. But you do what works.

Preheat oven to 180C. Lightly oil a shallow baking tray of approx 34cm by 24cm and then line with baking paper and very lightly, again, oil. TBH you’re probably fine with just the baking parchment/paper but this recipe is from like 25 years ago so just reproducing what they said at the time..

Now melt the chocolate in a bowl, on top of some simmering water and as ever, do not let the bowl touch the surface of the water.

In a separate, large bowl, beat the caster sugar with the egg yolks until thick and pale and creamy. Add the vanilla extract to that.

Once the chocolate has melted and cooled a little, stir in the hot water until smooth then gradually add into the egg/caster sugar mix. Now again, I’m not sure what the hot water does. I’m quite skilled and fearless with adding hot water to chocolate but chocolate can and will seize if the water you’re adding is too hot or cold, so you might want to leave it out. Gently stir the chocolate until smooth and then gradually stir this into the egg and sugar mix.

Now again separately, whisk the egg whites until they hold soft peaks. Quickly and gently fold them into the chocolate mixture and pour the whole lot onto the lined tray, spread evening and put in the oven for fifteen minutes.

Remove and immediately cover with a sheet of baking parchment and a clean tea towel and leave until cold. Don’t leave it too long though or it will crack when rolling it.

Whilst that’s happening, mix the icing sugar into the chestnut purée, followed by the sour cream and chopped chestnuts. Pour the rum/liqueur and double cream and whisk until peaks, then partially fold the rum/cream into the chestnut cream so you have a marbled mixture. You could technically do this in advance and keep it in the fridge but it’s a perfectly good thing to do whilst the roulade is cooling.

Now the originally recipe asks for you to spread out a large sheet of baking parchment on a clean work surface, liberally dust with icing sugar and then gently turn out the roulade onto it, peeling off the baking parchment.

I don’t do this. To me this is adding too much faff and precariousness. So what I do is I take the sponge off the baking sheet – already on baking parchment – and I use that as the base. If you want, trim the roulade of any rough edges but I don’t – it’s all good. Spread the marbled cream on the roulade and then carefully roll up the roulade from the long end. It may crack – do not panic. What I do is I then sort of mould it/hold it together with cling film (just on top using your hands to do this you don’t take the roulade off the plate to do it it just helps keep it together if that’s what it needs) and put it in the fridge until it’s time to serve it. Then I peel off the cling film and then I sprinkle with icing sugar and decorate it. I’ve made this so many times and sometimes it cracks, sometimes it doesn’t and there seems to be little rhyme or reason. It’s always delicious and it reminds us that, even cracked, things are still beautiful.


The best flapjacks you will ever make (a bold claim)

Many years ago, I co-founded a parenting website called I Want My Mum (so named because I said this a lot when I was pregnant and after I had my first born). It was a small but wonderful little site and many of us are still friends today. Aside from mothering tips we also shared recipes.

From somewhere I got this recipe for flapjacks and they were amazing. I shared it on the board and then lost it and then over the years wondered how I’d ever find it when anyone ever talked about flapjacks…. But a wonderful woman called Sarah Green saved it and started making them.

Recently I asked on Facebook if anyone (I’m friends with lots of ex-IWMMers) just happened to have it. “No,” a few said “but Sarah Green makes the best flapjacks”. Sarah was at choir but when she came back she said “the recipe I use is the one YOU posted all those years ago.” The fact she had kept the recipe (and was so generous, she could so easily have just said it was her recipe, after all it wasn’t actually mine, I got it from somewhere) made me unfeasibly happy.

So to avoid having to hunt for it again, here is the original recipe with Sarah’s additions.

250 unsalted butter
Grated ring of one unwaxed orange
325g golden syrup
325g rolled oats (Sarah sometimes replaces 50g of oats for 50g of oat bran which is a great idea)
75g light muscovado sugar

Preheat oven to 180C/350F/Gas mark 4. You need a tin of about 28cm x 20cm which you line with baking parchment.

Put the butter, orange rind, golden syrup and brown sugar in a pan set over a low heat and stir until the butter has melted and everything is coated. The add the oats to the pan and mix it together. Tip the whole lot into the tin and spread evenly.

Bake for 15-20 mins. Don’t overcook or you’ll lose the lovely chewy texture. You know it’s done when it’s just beginning to go golden brown around the edges but don’t panic cos the mixture will be really soft still.

Leave in the tin to cool completely and it will set. Don’t be tempted to take it out before it’s cool. When it is, take the whole thing out of the tin, holding the edges of the baking parchment and cut into slices as desired.

I will make these again and post a picture but in the meantime enjoy them!

Yorkshire Eclairs

These were a beautiful accident.

We had guests coming, and I had planned to make normal eclairs, stuffed full of white chocolate cream. But as I went to get the mixture out of my Kenwood mixer, I noticed the whisk attachment, which I’d had for about twenty years, had splintered and broken. There were really sharp filaments of metal sticking out, and I couldn’t risk the possibility that some had got into the mixture (and you can’t really sieve eclair mixture). So I had to start all over again.

However, my Magimix food processor whisk wasn’t strong enough to give me that really ribbony eclair texture, so I knew the dough would be too soft to pipe. But I wasn’t about to waste a whole other mixture so I thought sod it, I’m going to pour it into my Yorkshire Pudding tins – which are like shallow four circle shapes per tin – that’ll contain the mixture. And it worked beautifully. You could treat these like a normal eclair, by splitting them and coating the top with chocolate and injecting the insides with cream. But I didn’t want the faff after such a relatively stressful baking morning. So I just placed the cream on top, put some berries on and as an homage to the usual chocolate topping I poured on some Bare Bones Chocolate Syrup (seasonal produce) but you don’t need this latter.

Just to bring everything up to date here are the recipes for the eclairs and the white chocolate cream.

Eclairs (makes eight in my Yorkshire tins)

125ml water
50g butter
75g plain flour
3 medium eggs (at room temperature, this is important)
pinch of salt

Preheat oven to 180C.

Put the water in a sauce pan with the butter and salt and heat until the butter has melted. With the heat still on, beat in with a wooden spoon, the flour. Mix around vigorously until it forms a dough and doesn’t stick to the sides of the pan.

You can let the mixture cool here, you’re meant to, I never do.

Put the dough in a stand alone mixer with the whisk attachment on, then add the first egg. When fully incorporated add the other egg and then the third. Strictly speaking you only add enough egg til it comes together to form a thick, ribbon-y dough, that is to say that when you lift the whisk out of the mixture it leaves trails of visible ribbons behind for a few seconds. But I just add three eggs in and if you’re making Yorkshire eclairs the consistency of the dough should be thick, but it doesn’t matter if it’s not super thick because you’re not piping it.

When the dough has some substance to it, pour it into your Yorkshire tins (you do not need to grease them in anyway). Bake for about 25-35 mins. Longer will give you a dryer, crisper eclair if that’s what you want. For this recipe, ie in this shape, I like them a bit fluffier and softer so I check after 25 mins.

When cool, dollop on the white chocolate cream and top with berries and you are good to go. Once assembled eat immediately.

The eclairs can be kept in a tin for a day or two but they will soften. I rather like them like this but you may not.

White chocolate cream

Ideally make this just before you do the eclairs (even the day before) so it can set in the fridge.

You need 300ml of double cream and about 100-125g of white chocolate.

Heat half the cream in a saucepan, break up the chocolate, as small as you can, and then pour the heated cream over the top of the chocolate and stir until melted. (You can of course just put both together in a bowl and melt over hot water but I find that’s more of a faff.) When it’s all melted, put this chocolate/cream mixture in the fridge until it’s cool. When it is, mix in the other half of the double cream and whisk until stiff. It’s now ready to serve when you are.

Lavosh

Lavosh are a bit like Italian Linguette – flat breads that you use with dips. They are so easy to make, the dough can be kept, balled up into individual portions for extra convenience, in the fridge for a day or two, ready to be rolled out and baked and you can have fresh lavosh on the table in under 20 mins.

You need, for eight lavosh

1 teaspoon of dried yeast
125ml of lukewarm water
1 teaspoon of caster sugar


300g of 00 flour (or just plain if you don’t have 00)

60ml of extra virgin olive oil

1 teaspoon of sea salt plus extra for sprinkling

1 egg white

Some herbs for atop, I’ve used basil here but you can use anything you like, fresh rosemary would be nice, as would dried oregano.

Mix together the 1 teaspoon of yeast, 125ml of lukewarm water and the teaspoon of caster sugar in a small bowl and give it 10-15 minutes until the top is frothy.

Whilst you are waiting for this mix together the 300g of flour and one teaspoon of salt in a bowl, make a little well and pour in the 60ml of extra virgin olive oil.. When the yeast/water/sugar mixture is frothy, pout this into the flour mixture too, and mix together until you have a rough dough. Knead this gently for a few minutes (if you need to you can do this on a lightly oiled chopping board or surface) leave for five minutes, go back and knead it again for a a minute or so (nothing strenuous is needed) leave it for another five minutes and by this time it should be smooth. Now leave it covered with a tea towel in a bowl in a warm place until it’s risen slightly. You could also put it in the fridge at this stage and carry on the next day with the cutting up into portions and rolling it out.

When it’s risen slightly cut into eight portions. I then roll them up into balls and with a rolling pin roll them out until they are long and thin. You can then cook, as below.

But if you haven’t previously kept the whole dough overnight you can cook some now and some – balled up in portions or as one big lump of dough – tomorrow as long as you leave the dough in the fridge at about 4C.

Basically when you are ready to bake them, preheat oven to 200C.

You can then either place baking parchment on a baking sheet and put the rolled out lavosh onto it, brush with the egg white, press in the basil leaves or whatever herbs you are using and sprinkle some salt. Then cook for about 12 mins until golden brown.

Or what I do is I preheat the baking sheet with the oven and when the oven is up to temperature the baking sheet is hot. I have separately prepared the lavosh onto the baking parchment (I have a re-usable silicon one). I take out the hot baking sheet and gently slide the lavosh on the baking parchment onto the tray. This way the lavosh puff up more but it’s really not necessary. Then bake as before

They are ready to eat pretty much straight away and are absolutely delicious with dips.

Nigella’s chocolate olive oil cake

This is simple and beautiful. It can be flourless but somehow seems so much better than so many of the flourless chocolate cakes that turn up at gatherings. It’s so easy to throw together. The original recipe is here, but I’ve cut down the sugar and may cut it down further but be careful as sugar plays a role in cake making beyond mere sweetening.

Use a mild olive oil, I have at times used a too fruity one and whilst adding a depth of flavour, it’s distracting.

Once you’ve made this once you’ll realise it’s so easy you can make it in a commercial break, no chocolate to melt or chop. Largely store cupboard ingredients. My children love it.

You need

150ml mild olive oil

50g cocoa powder

125ml boiling water

Two teaspoons of vanilla extract

150g ground almonds (you could also substitute half almond half hazelnut, you can also use flour but unless you are allergic to nuts I implore you not to do this)

Half a teaspoon of bicarbonate of soda

A pinch of salt

175g caster sugar

3 eggs

What you do

Oven to 170C

A 23cm spring form tin, base lined with baking parchment.

Pour the boiling water slowly into the cocoa and stir until no lumps remain, add the vanilla extract.

In a separate bowl, mix together the almonds, bicarb and salt. And then you’re going to beat/whisk together the eggs, olive oil and caster sugar, either by hand (go you) with a whisk/wooden spoon or with an electric contraption (hand held or free standing).

Nigella says to use the paddle attachment, I always use the whisk because I can never find the paddle attachment. Beat electronically for three minutes until it’s syrupy and fluffy and pale yellowy. By hand: until your hand falls off.

To the eggs/oil/sugar mixture slowly add the cocoa mixture (turn down the speed if you are doing this with a gadget). When all incorporated add the ground almonds/bicarb/salt. Scrap down, make sure all mixed then pour into the tin.

Bake for 25-45 mins. Nigella says 40-45, mine is done in 25. You want it to be a bit quivering on top in the middle (Nigella describes it as looking a bit damp) but defo set at the edges. A skewer should come out pretty clean.

How to make your own salted caramel wagon wheels

What I want to know is, when did this blog become almost exclusively about food? I used to write about coffee machines, and fridges ‘n’ stuff. I think it’s partly to do with laziness, greed and also that as I get more serious in my day job, I want to write about things that comfort and soothe.

This is my excuse for writing about Wagon Wheels a week before Christmas when I have at least twenty-three other things to be doing.

I never liked original Wagon Wheels. So this wasn’t about trying to recreate something I loved, but in more, ahem, nutritious format. This is entirely about being seduced by a picture in a Donna Hay magazine in which she makes them. I hesitated before posting the recipe. These are, by no stretch of the imagination, good for you. They use Fluff – jarred, spreadable marshmallow – which contains corn syrup which is really really bad for you. So you must ASSURE me that you will only make these once a year.

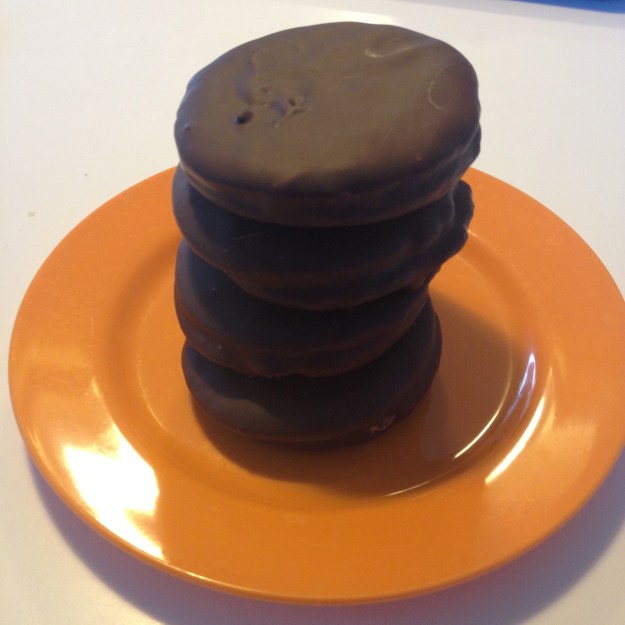
These biscuits are, however, really fun. They are not difficult to make, and can be made in stages. The trickiest bit, I found, was the dipping them in chocolate. There is no easy way to do this and you end up making a great big mess. I made the biscuits differently to how Donna recommended – she uses three tiers and smaller biscuits. In an attempt to recreate a more authentic WW look I went for two tiers and larger.

Big mistake. They end up being quite a biscuit. I’d say probably 500 calories a piece. Which isn’t good. I definitely wouldn’t serve these if Gwyneth were coming round to tea. When I first made them I stored them in the fridge which was a mistake as they go kinda crispy and I didn’t like them so much (so perhaps not a mistake after all). After a few hours out of the fridge and stored in a biscuit jar, they were just perfect. Strangely addictive. People I gave them to started making weird, primal noises. They started telling me they loved me.

Be warned.

Don’t go fooling yourself you will only take one bite of these and not eat the whole thing. So make them small. And make them when you have lots of people coming round so you’re not left alone with them. I made a few changes: I substituted salted caramel for jam as I had a jar of caramel that my friend Helen had made for me and everyone preferred them to the jam version (I made a few with jam to try).

And I used about 2/3rds 34% cocoa chocolate and to 1/3rd 70% cocoa chocolate to coat them instead of doing half of them with white chocolate and half with plain as Donna Hay suggested. I actually think I’d slip into a diabetic coma if I made these with white chocolate.

Anyway, enough chat, here is the recipe as I did them, and the low down.

170g unsalted, softened butter

160g icing sugar

1 teaspoon of vanilla extract

2 teaspoons of honey

1 egg

335g plain flour

1 teaspoon of baking powder

half a teaspoon of bicarbonate of soda

A jar of Fluff – marshmallow spread in a jar

Either a jar of blackberry jam/jelly or salted caramel (I say jelly as that’s all I could fine, not because I’ve gone American)

About 200g high cocoa content milk chocolate (I used Green and Blacks, which is 34%)

100g 70% cocoa chocolate (I always use Waitrose Continental)

Put the butter, sugar and vanilla extract in an electric mixer (I used the whisk attachment) and beat for 5-7 minutes. Imagine doing this by hand?! Scrape down the sides and then add the honey and egg and beat again for a bit until combined.

Now add the flour, bicarb and baking powder and beat on a low speed until combined – just a minute or so. Flatten the dough into a disc. It will be very soft. Put in cling film and put it in the fridge for about an hour (longer is fine). It should be firm before you start to roll it out.

Now, preheat the oven to 180C and line a baking tray with baking parchment. Roll the dough out bit by bit between two pieces of baking parchment until about 5mm thick. This is a very soft dough so after a few rollings out it will be hard to handle so put it back in the fridge if need be.

Cut circles of 5cm. I did larger but as I said, I think that was a mistake as I ended up with a really calorific biscuit!

Place on baking trays – they don’t spread out much so you can go quite close together but not too close. About 1cm is fine.

Bake for just a scant 4-5 minutes, until the edges are just tinged with a golden brownness. Take out of the oven and leave to cool completely. You will need to cook these in batches.

When the biscuits are completely cool it’s just a case of assembling them, then dipping. So, spread one biscuit with the salted caramel, one with fluff and sandwich together. Don’t be too mean with the filling but don’t go mad either. When they are all sandwiched together put in the fridge to firm up for a bit whilst you melt the chocolate in a bowl, atop a saucepan of boiling water.

When melted, dip the biscuits in the chocolate. If there’s an easy, non-messy way to do this, I haven’t discovered it yet. I tried painting the biscuits with chocolate and that worked but left brush marks. After several goes I discovered the best thing to do was coat the edges then dip quickly one side then another. If you end up with bald patches where your fingers were then you can remedy by just spreading a bit over with the back of a spoon. Leave to drip for a few seconds over the chocolate bowl, then leave to set on a rack. Be careful though. If you do like I did one time and put it straight in the fridge, the chocolate will set around the bars of the cooling rack and you will end up with half a wagon wheel when you prise it off.

This is no bad thing in a way, as you immediately lower the calorific value, but it makes a mess. So be aware this can happen.

Do leave them to set in the fridge at some point, then you can store them in a biscuit jar in a cool place, preferably at someone else’s house.

IMG_4336

How to make your own jaffa cakes

Inside. Luscious. The perspective makes these look giant, they are in fact the same size as regular jaffa cakes. And that’s a three year old holding one.

I bake, not only because I love cakes ‘n’ stuff and I prefer home made, but I bake when I need to feel safe. I find baking immensely therapeutic. The fact that I’m quite skilled at it is helpful because when I’m, say, grappling with a difficult deadline, as if it were a salt water crocodile (and we know how slippy they can be)  I have a need to achieve.  I have an almost pathological need to achieve. Something. Anything.

And when that something happens to result in baking a good biscuit, just baked into a chewy crispness, with hidden little bullets of chocolate. Or a fluffy, jolly cake, heavy with a mascarpone frosting stained red with raspberries, so large that you have to dislocate your jaw to get a slice in…well where’s the fucking harm in that.

When the news makes me feel like the world is too big, baking reminds me that the gentle stirring (or sometimes, vigorous whisking) of a few fine ingredients, can come together to make something good.

This is how I found myself making jaffa cakes.

Jaffa cakes. I don’t even really like jaffa cakes. But they seemed tricky enough to take my mind off all the bad news.

This recipe is from Jamie magazine. They weren’t tricky at all, but they did result in something so excellent and delicious and authentic (similar enough to shop bought ones to not alienate fans, different enough from to entice the not so keen) I had to keep eating them to make sure.

You need:

1 egg
50g caster sugar
65g self raising (I never sift flour but I guess you should)
butter for greasing
250g marmalade
100g 70% cocoa chocolate, chopped
Finely grated zest of half an orange
2 teaspoons of vegetable oil
 (the original recipe also asks for a tablespoon of water to use when melting the chocolate) but I didn’t use it and never use water in when melting chocolate).

You need a jam tart tin or shallow ‘bun’ tin with 12 holes. Grease this well, I also dusted it with flour (not from the 65g!)

Oven to 200C.

You do:

Okay so whisk the egg and sugar together, using an electric mixer if you have one (don’t sweat if you haven’t, you think sponge cakes were never made before the advent of the electric mixer?) if not by hand. Get those biceps and triceps working. Beat until the colour has lightened and the mixture has thickened. I’ll admit this is a a hell of a lot easier with an electric mixer.

Now stir in the flour by hand.

This is so easy isn’t it?

Now dollop about a tablespoon of the mixture into each hole, evenly. So if you get it wrong you’ll need to go round and nick a bit from the moulds that have too much.

Bake in the oven for 8-10 mins. Be careful: you want them lightly golden.

When done turn out and let cool. When cool slice in half horizontally. Are you seeing these jaffas taking shape?

Hopefully you’re the sort of person who reads recipes through before embarking on making something. And therefore you’ll know that whilst the cakes are cooling, put the marmalade in a pan, on the stove. I didn’t use the whole 250g but if you have any left over, once cool, you can put it back in the jar.

The sponge cakes fresh out of the oven.

So, heat the marmalade until it’s melted and stirrable and all one big thing and not little clumps of marmalade skulking round the pan, like nervous teenagers circling each other at a party, and then take off the heat and leave to cool. You can leave it for a good 20-30 mins, perhaps more and in fact it’s easier to use when it’s cooler. You could sieve out the peel in the marmalade but come on! Butch up and leave it in. I did and it was delicious.

Note the bit with a slice off? I ate it. Couldn’t wait.

Now. Take a teaspoon of the marmalade and dollop it in the centre of each sponge.

Melt the chocolate, with the orange zest and oil (oil not essential but gives a nice gloss), in a bowl over a pan of water. When melted, spoon over each marmalade covered sponge. What I did was put the cooling rack over a baking tray to catch any drips (ahem, I took it away for the photo below for better contrast), and then pick up each sponge and spoon the chocolate over, spreading it delicatedly with the back of the spoon – you don’t want to compromise the blobs of marmalade – then putting each back on the rack over the tray to catch any drips. And there were hardly any drips. I guess you could be more slap happy and just spoon the chocolate over each sponge whilst they’re sat on the rack and let the chocolate drip gaily.

Just one left to do.

But I think that’s more wasteful.

I ate at least six of these waiting for the chocolate to set. My youngest went potty for them. My eldest doesn’t like jaffa cakes and wasn’t convinced by these.

Make them and tell me what you think.